Honestly, the “learn button” acts like a secret handshake between your garage door opener and your remote. When you know where and how to use it, pairing and troubleshooting suddenly gets a lot less mysterious. Let’s work through where to find this tricky little button, what it actually does, and how you can use it to make your remote behave—step by step.
Understanding the Overhead Door Garage Remote System
Think of your Overhead Door garage system as a tiny private network—only the people (or remotes) you invite can get in. To keep things secure (and keep random remotes out), your opener uses a process that involves special codes and pairing steps. The “learn” button is basically the security guard that says, “Okay, you’re authorized to enter.”
Most Overhead Door remotes are designed with a rolling or fixed code technology, which means the code between your remote and opener either changes with every use (rolling code) or stays static (fixed code). This is important because the learn button will help your opener recognize a new remote or forget an old one. If you’re having issues—maybe you just replaced the battery, bought a new remote, or need to reset everything after moving—knowing where this button is and how to use it changes everything.
The “learn” button isn’t actually on the remote itself. It lives on the main garage door opener unit—the box that hangs from your ceiling inside the garage. Your remote just sends out the signal; the opener is what listens, learns, and acts. So before you spend another 10 minutes pressing every button on your handheld remote, let’s focus on where the real action happens.
Locating the Learn Button on Overhead Door Garage Openers
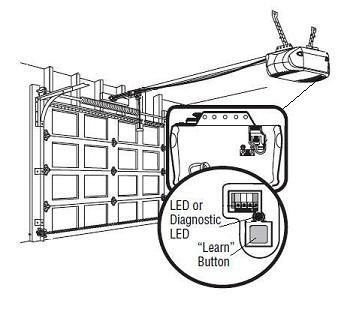
Here’s the thing: The “learn button” on an Overhead Door opener is usually tucked away in a spot that’s easy to reach, but not always labeled in neon lights. Start by finding your garage door’s main opener—the box mounted above your garage door, attached to the ceiling. That’s where you’ll do all the programming, syncing, and troubleshooting.
On most Overhead Door models, the learn button is found on the back or right side of the opener unit. Sometimes there’s a small panel or light cover you’ll need to gently pop open, usually by hand or with a flat screwdriver. Look for a button that’s often colored red, orange, yellow, or purple (colors can change by model and year). It might be labeled “LEARN,” but not always. You might also spot a tiny LED light next to it, which will light up or blink when the button is pressed.
A quick tip: If you can’t see any buttons, check all visible panels for hinges, seams, or obvious covers that could be hiding the controls. Some newer models keep everything neat and out of sight to avoid accidental presses, but it’s never too tricky to access. If you find yourself standing in the garage, scratching your head with the opener above you, try using your phone’s flashlight to see into corners and shadows.
How to Use the Learn Button: Pairing Your Overhead Door Remote
Now, once you’ve spotted the learn button, here’s where the magic happens. Pressing this button tells your opener, “Hey, listen up—someone new wants access.” Here’s a step-by-step to make things painless:
- Press and release the learn button. Don’t hold it down—just a single press will do. You should see a small LED light either turn on or start blinking.
- Within 30 seconds, grab your remote. Press and hold the remote button you want to pair with the opener. Hold it for about 2–3 seconds, then release.
- Watch for the opener’s confirmation. Usually, the light on the opener will either blink or turn off. Sometimes you’ll hear a click or the opener lights will flash—this is your signal the code was accepted.
- Test it out. Stand back and press your remote again. The door should open or close—if it doesn’t, repeat the steps and make sure you’re within range.
Pairing a new remote shouldn’t take more than a minute or two. If it’s not working, don’t panic. Sometimes it takes a couple of tries. Make sure you’re pressing the learn button rather than holding it down (which can sometimes reset all remotes if held for too long).
What If You Can’t Find the Learn Button?
You might be wondering: “But what if there’s no obvious button or the label’s worn off?” Good question. Overhead Door has made a variety of opener models over the years, and some really old ones look different. If you’re staring at a panel covered in dust and unfamiliar plugs, don’t stress.
First, look for any kind of removable cover around the lights or wiring terminal. Sometimes the learn button is hidden behind an access panel for safety. If you see a cluster of wires and terminals but no button, look again for a small, square or rectangular button (colors sometimes fade). For older openers, the button might be a recessed switch you need to press with a pen. For models with a dip switch (very old school), there may not be a learn button at all—instead, you’ll manually set matching code switches on both the opener and remote.
Here’s my take: If you’ve checked every side, under light covers, and behind panels and still can’t spot it, jot down your opener’s model number (usually on a sticker or metal plate somewhere on the box). A quick online search with your model number, or a call to Overhead Door customer support, can save you a lot of frustration.
Using the Learn Button to Reset or Erase Remotes
Not only does the learn button help you add new remotes—it’s also the key to disconnecting old ones or completely resetting your opener’s memory. Maybe you’ve just moved into a new home, or someone lost a remote and you want to be safe. Here’s how to wipe the slate clean:
- Hold down the learn button for about 6–10 seconds. This is different from pairing—don’t just tap it. Keep holding until the LED light goes out or starts blinking rapidly.
- Release the button. This erases all codes from the opener, meaning no current remotes will work.
- Reprogram any remotes you want to keep. Follow the earlier pairing steps for each remote you want to use going forward.
This trick is especially useful for security, or if you’re troubleshooting pairing issues that just won’t clear up. Just remember—after resetting, every remote must be re-paired one by one.
Common Problems With Overhead Door Learn Button and Remote Pairing
Let me explain: even with your best efforts, technology has its moods. If something isn’t clicking, here are a few classic issues—and what you can do:
- Dead or weak battery in the remote. Sounds silly, but a fresh battery solves a shocking number of problems.
- Too far from the opener. Stand within a few feet when pairing—the garage opener’s receiver isn’t as strong as you think.
- Wrong remote type. Not all Overhead Door remotes work with every opener—make sure the model numbers match or that you’re using a compatible universal remote.
- Too many remotes already programmed. Some openers have a limit (usually 3–5 remotes). Reset and reprogram if you’re maxed out.
- Radio interference or electrical noise. Wi-Fi routers, LED lights, or other electronics can disrupt the signal. Try pairing with other electronics unplugged.
A little patience and checking the obvious can save you hours. If you’re still stuck after a few rounds of troubleshooting, there could be a deeper issue (like a faulty receiver on the motor unit), but nine times out of ten, it’s something simple.
Comparing Overhead Door Remotes to Universal Garage Remotes
Universal remotes promise to work with “any” garage door, but honestly, they don’t always play nice—especially with brand-specific systems like Overhead Door. Here’s what sets the genuine remotes apart:
- Brand-specific remotes are tuned to your opener’s security code and syncing protocol. They’re plug-and-play with the learn button and rarely need extra steps.
- Universal remotes often require manual programming, using dip switches or a multi-brand setup process. Sometimes pairing takes longer, or certain features (like rolling code security) might not work at all.
- Overhead Door remotes tend to last longer with regular use, and replacement models are easy to find online or through authorized dealers. With universal models, you may need to try several before you hit the jackpot.
If you already own an Overhead Door opener, sticking with the matching brand remote is the stress-free route. But if you’re in a pinch, some universal options do sync up—just check compatibility, and be ready for a little extra setup with the learn button.
Why the Learn Button Matters for Garage Security
It might seem like just another button, but the learn button is a core part of your garage security system. Every time you use it—whether to sync, reset, or erase remotes—you’re managing who has access to your home. That’s a big deal.
Rolling code technology, which updates the signal each time you press the remote, helps block code grabbers and keeps intruders out. The learn button is how you “teach” your opener which remotes to trust, and which ones to forget. If you lose a remote, erasing and reprogramming is much safer than crossing your fingers and hoping it doesn’t end up in the wrong hands.
So, knowing exactly where the learn button lives and how to use it isn’t just a tech skill—it’s a security step every homeowner should feel good about.
Pro Tips for Easy Garage Remote Troubleshooting
If you’ve ever had that moment where you’re holding the garage remote, mashing the button in frustration, you’re not alone. Here are a few tried-and-true tips to make things smoother:
- Label your remotes. Especially if you have more than one, write which door or opener it’s for on a sticker.
- Keep a spare battery on hand. Batteries always seem to die at the least convenient time—having a backup is a lifesaver.
- Take a photo of your opener’s wiring and label location. That way, next time you’re troubleshooting, you won’t have to guess.
- Make pairing a two-person job if possible. One at the learn button, one at the remote—saves you a lot of up-and-down the ladder.
- If in doubt, check the manual (or the Overhead Door website) for your exact model. Manuals are more detailed than you expect, and model-specific diagrams can make finding the learn button a breeze.
Sometimes, the best fix is slowing down, double-checking, and going step by step—even if it feels like a basic “Did you try turning it off and on again?” moment.
If you ever feel like garage door tech is needlessly complicated, remember: Even the pros have spent twenty minutes upside-down with a flashlight, muttering at a stubborn opener.
When you know exactly where your Overhead Door learn button is and how to use it, the whole system feels less like a puzzle and more like something you’re finally in control of.
Closing Thoughts: Knowing Where the Learn Button Is Makes Life Easier
So, where is the learn button on an Overhead Door garage remote? The answer: hiding in plain sight, right on the main opener box above your garage door. Once you know what to look for—a small colored button, often with an indicator light—the task of pairing, resetting, or troubleshooting your remote suddenly feels a whole lot less daunting.
Garage tech isn’t always intuitive, but with a bit of patience and a step-by-step approach, you’ll never be at the mercy of a stubborn remote again. Next time your garage door acts up, or you bring home a shiny new remote, you’ll have the confidence (and the secret handshake) to get everything running again—no panic required. Happy programming!