Here’s the thing: garage remotes aren’t universal puzzles. Each brand hides its tricks. With LiftMaster, people often expect the learn button to be front and center, maybe even on the remote itself. In reality, it plays hide-and-seek on the main garage opener unit—the big box on your ceiling—not the handheld remote. The first time I looked for it, I stared at my remote for way too long before realizing I was looking in the wrong place.
If you’re just trying to sync a remote, reset a code, or troubleshoot a stubborn system, knowing *where* to look saves you time, effort, and maybe even a little dignity. Let’s walk through exactly where to find the Learn button on a LiftMaster garage remote system, how it works, and what to do once you spot it.
Understanding LiftMaster Remotes and Their Main Opener Unit
Before we play hide-and-seek with the Learn button, let’s slow down and get our bearings. LiftMaster is a well-known brand in the garage door world—think of it as the Apple or Samsung of garage openers. Their remotes range from compact keychain fobs to wall-mounted buttons. They all communicate wirelessly with a *garage door opener unit*, which hangs from the ceiling right above your garage door.
Now, here’s a common mix-up: people think the remote holds the programming button. Actually, the *remote* is only a transmitter—it sends a signal to your garage opener, which acts like the brain of the whole operation. Imagine the opener unit as the WiFi router, and your remote as a smartphone trying to connect to that signal. Any syncing, pairing, or resetting has to happen at the “brain,” not the “mouthpiece.”
So, when folks ask about the learn button on a LiftMaster remote, what they actually need is the button *on the opener unit*. This bit will become obvious once we get our hands (or eyes) on the actual hardware in your garage.
Where To Find The Learn Button On Your LiftMaster Garage Opener
Ready for the scavenger hunt? The Learn button isn’t on the remote—it’s firmly attached to the main opener unit above your garage door. Start by looking for a ladder, because unless you’re basketball-player tall, you’ll probably need a boost.
Here’s where LiftMaster typically puts its learn button:
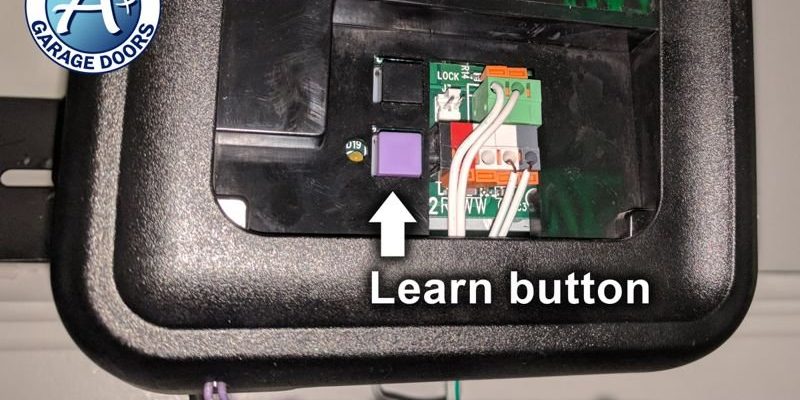
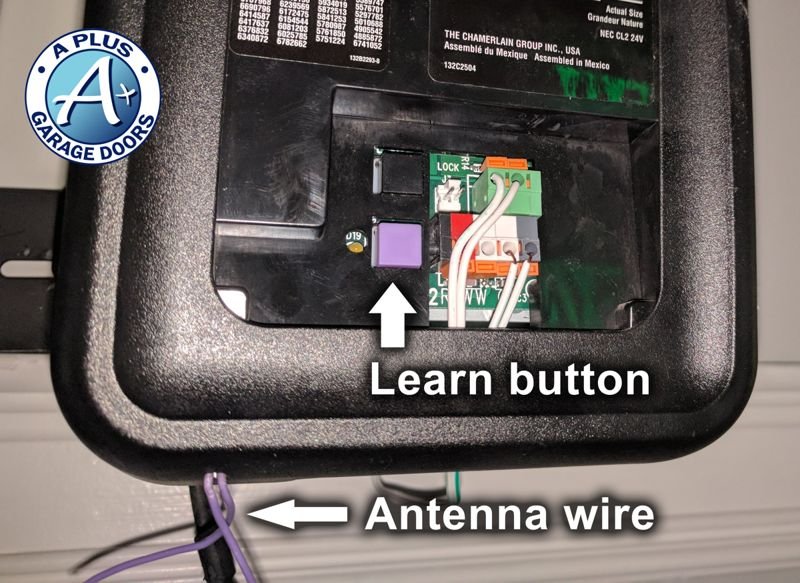
- On the Back or Side of the Motor Unit: Most newer models have a small panel or light cover you’ll need to flip open or slide off. The button is usually hiding behind this cover, near where the wires connect.
- Next to the Antenna Wire: Spot a thin wire hanging down? The learn button is frequently right next to it, colored in yellow, purple, or red, depending on your unit’s age.
- Beneath the Light Bulb Cover: On some older units, you might have to gently unscrew or slide off the plastic light bulb cover to reveal the learn button tucked inside. Don’t panic—these covers are made to come off without breaking anything.
Pro tip: The learn button is always on the opener itself, never the remote. Once you spot it, it’ll probably be labeled as “LEARN” in tiny letters, or simply be a colored square or round button.
So, if you’re staring at your handheld remote, turn your gaze to the big box above your door. The smallest button is the one you want—it’s your access point for pairing, resetting, or troubleshooting the system.
What Does The Learn Button Actually Do?
Let me explain why this tiny button matters so much. Pressing the learn button puts your garage opener into a special listening mode. It’s basically telling the unit, “Hey, I’m ready for new instructions.” In this state, you can pair a new remote, program a keypad, or reset a lost code.
Think of it like syncing Bluetooth headphones—if you don’t press “pair,” your devices just won’t talk. The learn button acts as this connector, allowing the remote and opener to “shake hands” and exchange secure codes. Without it, your remote is just a fancy paperweight.
The pairing process is designed to be simple but secure. By requiring physical access to the learn button, LiftMaster makes sure only someone in your garage can program remotes. That helps prevent random strangers from gaining access—always a plus.
If you need to reset (like after losing a remote) or if your old remote stops working, the learn button lets you wipe old codes and start fresh. It’s a failsafe built into most modern systems, reducing headaches from lost or malfunctioning accessories.
Step-by-Step: How To Program Your LiftMaster Remote Using the Learn Button
Setting up your remote isn’t rocket science, but it does help to follow each step. Here’s how to pair your LiftMaster remote with the opener unit using the learn button:
- Get Ready: Grab a sturdy ladder and place it under your opener unit. Have your remote handy—no need to rush, but you won’t want to go up and down the ladder repeatedly.
- Find the Learn Button: Look for a colored button on the back, side, or under the light cover of your opener. Double-check for the “LEARN” label, or just spot the oddly colored button.
- Press the Learn Button: Press and release (don’t hold) the learn button. An indicator LED will usually light up, showing the unit is in learn mode for about 30 seconds.
- Press Your Remote Button: Within those 30 seconds, press the button on your remote that you want to program. The opener’s light may blink, or you might hear a click—this means the code synced successfully.
- Test It: Head back down, stand clear of the door, and press your newly programmed remote. The garage door should move like magic.
If the door doesn’t budge, double-check that you pressed the learn button correctly and within the time window. Sometimes, older remotes or drained batteries can also cause trouble (more on that below).
Common Problems: Why Your LiftMaster Remote Might Not Sync
Honestly, sometimes things just don’t work on the first try. You might be wondering, “Why won’t my remote connect even after pressing the learn button?” Don’t worry; it happens to almost everyone.
Here are a few common culprits:
- Dead or Weak Batteries: Remotes are powered by small coin-cell batteries, and even a slightly drained battery can mess up the pairing process. Swapping in a new battery can make all the difference.
- Outdated Code Technology: Very old LiftMaster units use a different code system (like DIP switches instead of rolling code). If your remote and opener don’t share the same tech, they simply won’t communicate.
- Too Many Devices Synced: Most openers max out at 5 remotes or keypads. If you’ve hit the limit, you’ll need to clear codes before adding another device. Hold the learn button until the LED turns off to wipe all old pairings.
- Obstructions or Interference: Electronic interference or physical obstructions (like thick garage walls) can sometimes block signals. Try standing closer to the opener or moving other wireless devices away.
If all else fails, consult the exact model number on your opener for tailored troubleshooting. Some unique models (or those installed by professional security companies) may have quirks outside the standard instructions.
Comparing LiftMaster Remotes With Universal Garage Remotes
You might hear about universal garage remotes and wonder, “Can I just use any remote with my LiftMaster opener?” Here’s where things get interesting.
Universal remotes promise to work with multiple brands, including LiftMaster, Chamberlain, and Craftsman. In theory, they save you from buying a brand-specific remote. But reality can be a little messier. While many universal remotes can sync using the same learn button process, not all are compatible with LiftMaster’s rolling code technology or unique frequency settings.
Here’s a quick comparison:
| LiftMaster Brand Remote | Universal Remote |
| Guaranteed compatibility | May require extra programming steps |
| Matches rolling code tech perfectly | Not all support newer rolling codes |
| Designed for your opener’s frequency | Some support multiple frequencies, but not always |
| Customer support for issues | Limited support—brand may refer you elsewhere |
If you want an easy life, stick with a genuine LiftMaster remote. Universal options can save money, but they’re a bit more trial-and-error. Both will need the learn button process, so the hiding spot remains the same.
Resetting or Clearing Codes From Your LiftMaster Garage Opener
At some point, you might lose a remote, give one to a neighbor, or want to lock out an old device. The good news? The same learn button is your reset tool.
Here’s how to clear all programmed remotes and keypads from your opener’s memory:
- Press and Hold the Learn Button: Don’t just press—hold the button for about 6–10 seconds, depending on your model. The LED indicator will turn off when the memory is cleared.
- All Remotes Unpaired: This wipes every paired remote and keypad, which means you’ll have to reprogram any devices you still want to use.
- Safety Tip: Resetting is especially important if you suspect someone has an old remote or you’ve moved into a new house. Better safe than sorry.
You might be tempted to just swap batteries or ignore a lost remote, but anyone with a synced device can open your garage. The learn button’s reset feature is the simplest way to secure your garage fast.
Troubleshooting: Learn Button Not Working or Hard To Find
Sometimes, even after everything above, the learn button itself becomes a problem. Maybe you can’t find it at all, or it seems unresponsive. So, what then?
Let me walk you through some quick fixes:
- Dirt or Dust Build-Up: Garages are dusty. Sometimes, a layer of cobwebs or grime can hide labels and even jam buttons. Don’t be afraid to wipe the opener with a dry cloth—just make sure the power’s off for safety.
- Button Stuck or Unresponsive: If the learn button doesn’t “click” or doesn’t trigger the indicator light, it might be worn out. Try pressing gently with a pen or a non-metallic tool. If it still doesn’t work, the internal switch might need professional repair.
- Opener Cover Won’t Move: If your opener’s light cover or wiring panel is jammed, avoid forcing it—you don’t want to break anything. Check for hidden screws, clips, or instruction engravings before pulling hard.
The learn button is always somewhere on the main opener—never on the remote. If your model looks radically different, or if you’re stuck, searching online for your opener’s exact model number usually pulls up the right manual or schematic.
If you’ve ever stood in your garage, remote in hand, feeling clueless about where the learn button is supposed to be, you’re definitely not alone. It’s one of those details that seems obvious *after* you know where to look, but not a second sooner.
The magic always happens on the opener unit above your garage door, never on the remote you carry in your car. From syncing a new device to troubleshooting a code that just won’t stick, the learn button is the behind-the-scenes hero of the LiftMaster system. Yes, it’s sometimes buried under plastic covers and camouflaged among wires, but a careful check will always reveal it.
Remember, if you’re ever feeling lost, just slow down, look for your opener’s model number, and keep an eye out for a brightly colored button near where wires connect or under a light bulb cover. With a little patience and the right steps, you’ll have your LiftMaster garage remote paired, reset, or troubleshooted in no time—no secret agent skills required.