If you’re staring at your Liftmaster garage remote, baffled by its silence, you’re not alone. This is one of those “grown-up puzzles” that can seem way more complicated than it actually is. But resetting your Liftmaster garage remote is less like defusing a bomb and more like making a peanut butter sandwich—there are steps, but none are rocket science. Whether you’ve moved into a new place, replaced an old remote, or just need to resync it after a battery swap, knowing how to reset it can save you time, money, and probably a little stress-eating, too.
Why Resetting Your Liftmaster Garage Remote Is Necessary
Here’s the thing: not all remote problems mean “broken.” Sometimes, your Liftmaster remote just falls out of sync with your garage door opener. It can happen after a power outage, a dead battery, or accidental button pressing (shout-out to toddlers everywhere). Resetting—or reprogramming—the remote is like giving it a clean slate. It’s the digital equivalent of saying, “Alright, forget everything you know. Let’s start fresh.”
Security also comes into play. If you’ve lost a remote or moved into a place where old remotes might be floating around, resetting ensures only your current remotes have access. Imagine leaving your house keys with a dozen strangers—yeah, you’d want to change the locks. The same goes for your garage code and remote pairing.
Finally, Liftmaster remotes—like anything with circuitry—can hiccup. Getting familiar with the reset process means you can troubleshoot quickly, sidestep expensive service calls, and keep your garage secure. And honestly, there’s a weird satisfaction in mastering one of those adulting skills most people never bother to learn.
Understanding Your Liftmaster Garage Remote and Opener
Before you get elbows-deep into buttons and codes, let me explain how the Liftmaster system works. The remote isn’t just a simple “on-off” switch. It’s actually a mini-transmitter, sending a unique code to your garage door opener whenever you click the button. The opener is up on your garage ceiling, quietly waiting for that code to give it the green light.
Liftmaster uses something called “rolling code technology.” Instead of sending the same code over and over (which would be easy to hack or copy), both the opener and remote switch up the code every time you use it. Pretty clever, right? Resetting the remote is really about syncing up these ever-changing codes so both devices are speaking the same secret language.
You might be wondering: what if you have multiple remotes or a universal garage door remote? Good question. Each remote must be paired to your opener. Universal remotes often have extra steps, but the basic principle doesn’t change. The battery powers the remote, the remote sends the code, the opener listens for the code, and the cycle repeats.
What You’ll Need Before You Begin
Before you start pressing buttons, grab a few things to make life easier. You’ll need:
- Your Liftmaster garage remote.
- A sturdy ladder (if your opener is ceiling-mounted).
- Access to the garage door opener unit (not just the wall button).
- New batteries (if your remote is totally unresponsive).
- A little patience—some steps require steady hands and timing.
Safety check: Always unplug the opener if you’ll be poking around inside it or near any wiring. For most resets, though, you’ll only need to press the “Learn” button on the opener’s exterior.
Step-By-Step: How To Reset Your Liftmaster Garage Remote
Here comes the part you’re here for. The method below works for most standard Liftmaster garage remotes, including newer rolling code models. If your remote is a universal aftermarket brand, you may need to check the specific instructions, but this process covers the vast majority.
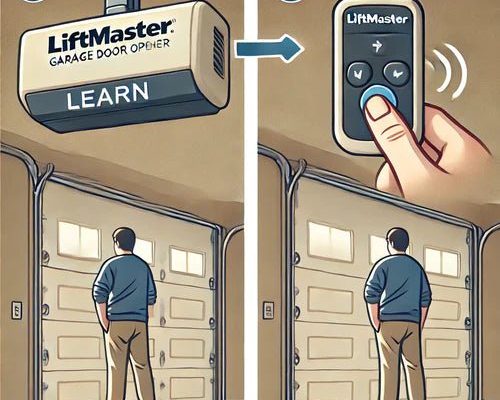
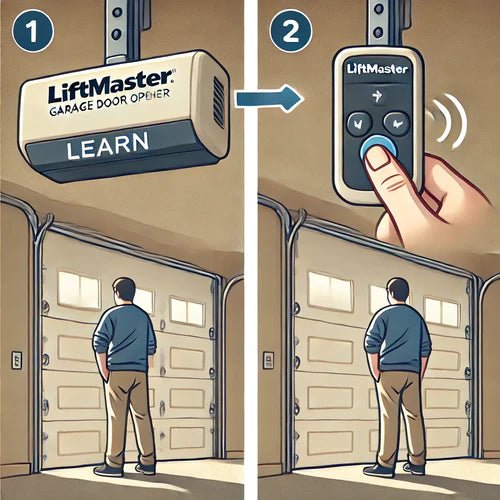
Step 1: Locate the “Learn” Button on Your Garage Door Opener
Look for a small button on the side or back of your ceiling-mounted opener. The button might be red, yellow, orange, purple, or green, and usually sits under a plastic cover or near the antenna wire. “Learn” is sometimes printed next to it, but if you’re squinting at a rainbow of buttons, check your Liftmaster manual or the opener’s brand sticker for clues.
Pressing the “Learn” button puts your opener into programming mode—a bit like putting your phone in Bluetooth pairing mode. Once you press it, you’ve got about 30 seconds before it times out.
Step 2: Clear All Previous Remote Codes (Optional But Recommended)
If you want a total reset—maybe you lost a remote, or you’re worried about someone else having access—hold down the “Learn” button for about 6-10 seconds, until the indicator light goes out. This erases all paired remotes and wireless keypads. Now, no remote or code will work until you program it fresh.
Pro tip: Only do this if you’re ready to reprogram every remote and keypad in your home. Otherwise, a quick tap (not hold) of the Learn button jumps right to pairing mode.
Step 3: Re-Pair Your Remote To The Opener
With the opener in programming mode (the Learn button light is glowing), grab your remote. Within 30 seconds, press and hold the main button on your Liftmaster remote. You should see the opener light blink or hear a soft click—that’s your sign it worked. Release the remote button.
If you’re syncing more than one remote, repeat the process for each, one at a time. Remember, every pairing “stores” a unique code between the opener and each remote.
Step 4: Test And Troubleshoot The Connection
Give your freshly programmed remote a try. Stand a few feet from the opener and tap the button. The door should move—up or down. If nothing happens, double-check you pressed the Learn button correctly and held your remote in range. Sometimes, old or weak batteries can sabotage the whole process, so swap in new ones if you haven’t already.
If you still have problems (like flickering lights, inconsistent range, or the remote only working up close), your opener might need a reset, or you might have interference from nearby electronics. Retrace your steps, and don’t be afraid to repeat the process—sometimes, it takes a second try.
What To Do If Your Liftmaster Remote Still Won’t Work
Reset not fixing your issue? Take a deep breath—there are a handful of easy troubleshooting steps you can try before buying a whole new remote or calling support.
- Check the remote batteries—even new remotes sometimes ship with weak cells. Pop the case open and swap in fresh batteries. Polarity matters, so line them up according to the + and – signs.
- Inspect the remote for physical damage. Water, drops, and dust can mess with internal contacts. If the remote rattles or has sticky buttons, it may need cleaning or replacement.
- Examine the opener’s antenna. Some units have a hanging wire—make sure it’s straight and not tucked inside or broken off. That little wire is crucial for remote range and code reception.
- Reduce interference. LED light bulbs, cordless phones, and even some routers can mess with remote signals. Try unplugging or moving nearby electronics if your garage door opener only works erratically.
If after all this, the remote still won’t sync, it might be time for a new remote, or the opener’s logic board could be on the fritz. Most remotes last years, but like everything, they don’t live forever.
Pairing A Universal Remote With Your Liftmaster Opener
Not all remotes come stamped with the Liftmaster logo. Universal remotes are a solid backup, especially if you have multiple brands of openers, or need a replacement in a hurry.
Universal remotes work almost the same way as brand-name ones, but you’ll often have to set a code or flip a tiny switch inside the remote first. That tells it what type of opener it’s talking to (Liftmaster, Chamberlain, Genie, etc.). Then, head back to the Learn button on your opener and follow the same pairing steps.
One caveat: Some older openers (pre-1993) don’t support rolling code technology or universal remotes. If you suspect your opener is ancient, check the model number and search online for compatibility. Otherwise, most modern Liftmaster-compatible remotes are a breeze once programmed correctly.
Heads up: Universal remotes typically won’t reset the opener itself—they only pair with it. If you want to wipe all existing paired devices, use your opener’s Learn button, as described above.
Resetting Your Liftmaster Keypad or Wireless Entry System
Maybe you also have a wireless keypad mounted outside your garage. These work a lot like remotes, except the “button” is actually a PIN code you punch in.
If resetting the remote didn’t fix your keypad issues, or you’re worried someone else has your code, resetting the keypad is a smart move. The process is pretty similar:
- Press the opener’s Learn button, then within 30 seconds, enter a new 4-digit PIN on the keypad and hit Enter.
- The opener’s light should flash, confirming you’ve set a new code.
- If you want to erase all codes, hold down the Learn button as described earlier.
For keypads, always use a code you’ll remember but others won’t guess (skip birthdays or 1234). If your keypad uses batteries, now’s a good time to change them.
Safety And Security Tips After Resetting Your Liftmaster Remote
After you’ve reset and paired your garage remote, you’ve basically set up a new digital lock on your home. That’s pretty powerful, but there are a few smart habits to keep things secure.
- Keep extra remotes safe. Treat them like house keys—don’t leave them in your car or somewhere visible outside.
- Reset remotes after moving in or if you lose one. It’s an easy way to keep past owners or strangers from opening your garage.
- Update codes regularly on both remotes and keypads, especially if you’ve had service workers or house sitters who might know the codes.
- Remove remote batteries during long vacations to prevent battery leaks or accidental presses.
Resetting your Liftmaster garage remote isn’t just about convenience—it’s a basic step in protecting your home.
When To Call A Professional For Liftmaster Remote Help
Sometimes, no matter how many times you reset, pair, or swap batteries, things still don’t work. That’s when it might make sense to call in a pro. Liftmaster openers are reliable, but logic boards can fail, wires can get damaged, or radio interference can be too tough to troubleshoot yourself.
If your garage door opener hums but doesn’t move, the light blinks rapidly, or your Learn button won’t respond, a professional garage tech can diagnose deeper issues. They’ll also make sure your opener meets modern safety standards—a nice bonus if your unit is getting up there in years.
I always say: Don’t be afraid to try a DIY reset, but don’t risk your safety—especially working on ladders or near moving garage parts. Sometimes, peace of mind is worth the service call.
Wrapping Up: Take Control Of Your Liftmaster Garage Remote
At the end of the day, your Liftmaster garage remote doesn’t have to be a mystery. Resetting, pairing, and troubleshooting are simple skills—once you know the steps. Whether you’re fixing a stubborn remote, syncing a new one, or just keeping your home a little safer, learning this process puts the control back in your hands.
Next time your remote acts up, you won’t have to panic or call for backup. You’ve got the know-how. As with most home tech, a little patience, a steady ladder, and a willingness to poke around can save you time and money. And honestly, once you’ve mastered this, you’ll never look at a silent garage door the same way again.