
Here’s the thing: the Hunter remote and your wall switch are meant to work together, not against each other. But it takes a bit of understanding to keep things running smooth. Imagine your ceiling fan system as a dance, with the wall switch leading and the remote following; get that rhythm right, and you can control breeze and brightness with ease.
Let me explain how to get your Hunter ceiling fan remote and wall switch working together, without stepping on each other’s toes. Whether you’re pairing a brand new remote, troubleshooting odd behavior, or just tired of running in circles, you’ll find clear answers here.
Understanding Your Hunter Ceiling Fan Remote and Wall Switch Setup
Before touching any switches or remotes, it helps to know what you’re dealing with. Hunter ceiling fans often come with their own wireless remotes, which send signals to a receiver hidden in the fan. The wall switch, on the other hand, controls power to the *entire* fan setup—think of it as the main gate for electricity.
If your wall switch is *off,* no amount of remote clicking will start the fan. The remote only works when the switch lets power flow to the fan’s receiver. For most setups, keep the wall switch in the “on” position and treat it like a master control; then, let the remote handle the rest—like speed, lights, and even direction.
You might be wondering if you can use both at the same time. The answer is yes, but with a catch. If you flip the wall switch while the fan’s running, you’ll cut power and “forget” the previous remote settings. When you turn it back on, you may need to use the remote again to restart the fan or lights. This is why many people leave the wall switch alone and use only the Hunter remote for daily control.
How To Pair or Sync Your Hunter Fan Remote with the Receiver
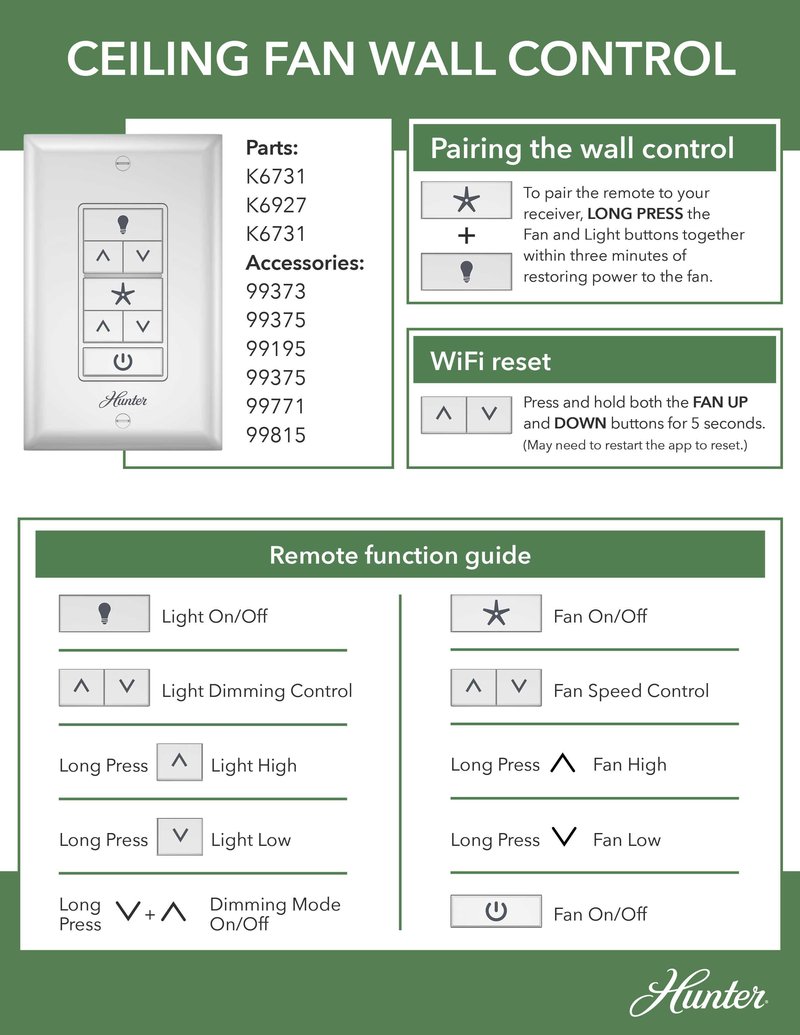
Pairing your Hunter ceiling fan remote is a bit like teaching two friends a secret handshake. They need a unique code to communicate, and that’s usually done by setting matching dip switches or pressing a sync button. Don’t worry—no degree in engineering required.
Here’s the usual step-by-step process:
- Turn off power to the fan using the wall switch or your home’s breaker box (better safe than zapped!).
- Open the battery compartment on your remote. You’ll see tiny dip switches or a pairing button. If you see dip switches, remember their pattern.
- Grab a ladder and carefully remove the fan canopy to access the receiver (where the wires meet the fan motor). Find the dip switches or pairing button.
- Make sure the dip switches on the remote and receiver match exactly. If it’s a sync button, follow the manual’s instructions—usually holding down the button until the fan beeps or flashes.
- Put everything back together and restore power at the wall switch. Test your remote: try light, then fan speeds, and check if everything works smoothly.
If the remote won’t pair, double-check the batteries and the code settings. Some newer Hunter models use a quick “push-to-pair” system instead of dip switches, which makes life a bit easier.
Using the Wall Switch Without Disrupting Remote Functions
There’s a simple rule here: treat the wall switch like the main power switch for your system. If you flip it off, the receiver in your Hunter fan loses power and forgets ongoing remote commands. The trick is to *leave the wall switch on* as much as possible—basically, set it and forget it.
Let me paint a picture: say you turn off the fan with the remote before bed, but someone flips the wall switch in the morning. When you try the remote that night, nothing happens. The fan needs the wall switch “on” to listen for the remote. If you want to truly shut off all power (like for cleaning or during a thunderstorm), then the wall switch is your friend.
For day-to-day use, ignore the wall switch and let your Hunter remote handle fan speeds, light dimming, or direction changes. If you ever notice the remote isn’t working, double-check that the wall switch is flipped on—this tiny detail solves a whole lot of “broken fan” calls.
Troubleshooting Hunter Ceiling Fan Remote and Wall Switch Problems
So, you’ve got a stubborn fan that sometimes listens, sometimes doesn’t. Before blaming the remote or wall switch, let’s go through a checklist. Honestly, most problems are simple missteps or battery issues.
Common issues and fixes:
- Remote not responding: Check if the wall switch is on. Replace the remote batteries. Make sure you’re not too far from the fan’s receiver.
- Lights work but fan won’t spin, or vice versa: Try resetting (turn off via switch, wait 30 seconds, turn back on, and use the remote again). Double-check the dip switch code or sync process.
- Multiple fans or signals interfering: Make sure each fan/remote set uses a unique code to avoid nearby fans getting mixed signals. It’s like neighbors picking up your garage door opener.
- Wall switch flickers or buzzes: Avoid using a dimmer wall switch unless your Hunter fan is rated for it (most aren’t). Use a standard on/off switch.
If all else fails, re-pair the remote from scratch or call Hunter’s customer service—they deal with these issues all day and can talk you through more technical steps.
Using a Universal Remote vs. Hunter Brand Remote
Maybe you’ve lost your original Hunter remote or want a fancier one. Universal remotes can sometimes save the day, but they’re not always a perfect fit. Universal ceiling fan remotes are designed to mimic signals from different brands, including Hunter, but compatibility depends on your specific receiver model.
Here’s what you should know:
- If your Hunter fan is pretty new (within the last 10 years), there’s a good chance a universal remote will work as long as the receiver in the fan is compatible.
- You’ll need to follow the pairing instructions specific to your universal remote. Sometimes, that means matching dip switches. Other times, it’s just holding a button while restoring power.
- Features like dimming, reverse, or special light modes might not work unless your remote and receiver are both built for it.
- Stick with the Hunter brand remote if you want full feature support. Universal options are best for basic on/off and speed control but can occasionally miss out on unique features.
You’ll also want to code the universal remote so it doesn’t accidentally control other fans in the house—or your neighbor’s, for that matter.
Replacing Remote Batteries and Maintaining Reliable Control
Dead batteries can make a high-tech Hunter remote feel like a useless piece of plastic. Most Hunter remotes use standard AAA or 9V batteries, and like your TV remote, they’ll quietly die long before you remember to check them. Here’s a good routine:
- Replace the batteries in your remote once a year, even if it seems to work fine. Weak batteries lead to sluggish or unreliable performance.
- Look for a small indicator light on the remote—if it’s dim or not blinking when you press buttons, that’s a clear sign to swap batteries.
- After replacing the batteries, some remotes need to be re-synced with the fan. If things don’t work immediately, repeat the pairing steps.
If you’re away for an extended period or during a storm, it’s smart to turn off the wall switch or remove the batteries to protect your electronics from power surges.
Hunter Ceiling Fan Remote and Wall Switch: Safety Tips
Electricity is nothing to mess around with. Always flip off the wall switch (and preferably the circuit breaker) before opening up the fan canopy or swapping wires. If you’re not comfortable around wiring or the fan’s receiver, call a licensed electrician. There’s zero shame in wanting safe hands on your ceiling fan—plus, they can spot problems like loose connections or improper installations.
- Don’t use metal objects to adjust dip switches; a small plastic screwdriver or pencil tip works best.
- If you notice hot spots, odd smells, or constant flickering, stop using the fan, and get it checked out. Electrical faults can lead to fires.
- Label wall switches if you have multiple nearby, so houseguests (or forgetful family members) don’t turn them off by accident.
No remote control trick is worth risking a shock or electrical fire. Always err on the side of caution, even for the simplest jobs.
Should You Upgrade to a Smart Fan Controller?
If fiddling with remotes and switches feels old-school, you’ve got options. Smart fan controllers and wall switches are popping up everywhere, letting you control your Hunter ceiling fan via your phone or voice assistant. These devices often replace your basic wall switch, but keep the fan’s receiver (and remote) intact.
Honestly, if you’re someone who loses remotes or wants to schedule fan speeds, upgrading can make life easier. You’ll still need to keep your old wall switch in the “on” position for smart controllers to work, and setup can be a bit more technical. But once you’ve paired everything, you can control your fan from anywhere—no more hunting for that elusive remote wedged in your couch.
Just make sure your Hunter fan is compatible with smart controllers, or pick up a kit designed for ceiling fans. It’s worth the small hassle if you want full control with zero confusion.
Bringing It All Together: Hassle-Free Control of Your Hunter Ceiling Fan
Getting your Hunter ceiling fan remote and wall switch to play nice isn’t magic—it’s just about understanding who’s really in charge. Treat the wall switch as your fan’s main gatekeeper: keep it on and let the remote do the heavy lifting. When you understand the relationship between remote, receiver, and wall switch, you’ll stop the constant guessing and start enjoying that perfect breeze, exactly when you want it.
If anything acts up, start simple: check the switch, change the batteries, and re-sync the remote. Most issues are just that—a tiny hiccup in communication, not a big mystery. And if you’re ready for something smarter, consider a universal or smart controller—but only if it matches your Hunter fan’s receiver.
A little patience with the setup saves you plenty of time chasing down problems later. Once you’ve got the routine down, it all feels surprisingly effortless. Think of it as teaching your ceiling fan a few basic dance steps—pretty soon, you won’t even have to think about it.