Here’s the thing: signal strength isn’t magic. The remote, made by Google for their Nest streaming and smart home products, relies on invisible wireless signals to talk to your devices. When something interferes with that conversation—whether it’s distance, battery, or random household clutter—your “smart” remote suddenly feels pretty stubborn.
Testing the signal strength on a Nest smart remote isn’t just pushing random buttons and hoping for the best. Once you understand how to check and interpret the signal, you can fix most issues on your own—no frantic Googling or late-night tech support calls required.
Understanding How The Nest Smart Remote Communicates
Let me explain how this little gadget actually works behind the scenes. The Nest smart remote doesn’t just use old-fashioned infrared blips (like many universal remotes from the past). Instead, it uses a mix of Bluetooth Low Energy (BLE), Wi-Fi, and sometimes infrared (for legacy compatibility) to send commands wirelessly. This means it’s more flexible—you don’t always have to point it perfectly at your device.
So what does “signal strength” mean in this context? It’s really about how well the remote and the paired Nest device “hear” each other. If the radio signal is weak or interrupted, your commands might not go through. Common culprits include thick walls, furniture, interference from other electronics, and, yes, even low batteries.
You might be wondering, “Isn’t Bluetooth supposed to just work?” Usually, yes. But Bluetooth and Wi-Fi signals can trip over microwaves, rogue power cables, or other smart gadgets. That’s why understanding the communication method matters—it helps you narrow down what’s going wrong when your Nest smart remote looks like it’s ignoring you.
Checking The Battery Level On Your Nest Smart Remote
Here’s a hard truth: most remote issues start with the battery. Even if the remote lights up, a weak battery can seriously mess with the signal strength. The Nest smart remote uses standard AAA or AA batteries, depending on your model, and like most tech, low power means reduced range and spotty connections.
To check the battery, open the back of the remote (usually there’s a little latch or sliding cover). Take out the batteries and look for any corrosion, rust, or general crustiness—if you see that, swap in fresh ones immediately. Even if things look clean, it’s worth trying a new set if you’re having signal problems.
If your Nest remote is rechargeable, check the charge indicator—either a tiny LED or a notification in your Google Home app. Always use the charger that came with the device, because off-brand cables sometimes don’t provide enough juice.
Pro tip: Keep a spare set of batteries nearby. Signal issues that appear out of nowhere often disappear once you pop in a new pair.
Pairing And Syncing The Nest Remote With Your Device
Sometimes the remote and your Nest device get out of sync. Maybe you moved the streaming stick, reset your Wi-Fi, or bumped a setting by accident. If the remote isn’t paired properly, signal strength doesn’t stand a chance.
First, check the Google Home app on your phone. Look for your streaming device or smart speaker, then see if the remote shows up as “connected.” If it doesn’t, you’ll need to re-pair it. Most Nest remotes have a pairing button—sometimes inside the battery compartment, sometimes on the bottom.
- Press and hold the pairing button for a few seconds until the LED starts blinking.
- Follow the on-screen prompts in your Google Home app or on your TV screen.
- If pairing fails, move the remote closer to the device and try again—distance matters.
It’s a good idea to remove any obstacles (like books, game consoles, or metal decor) between your remote and the Nest box or stick during syncing. Honestly, you’ll be shocked how much a heavy picture frame can block a tiny Bluetooth antenna.
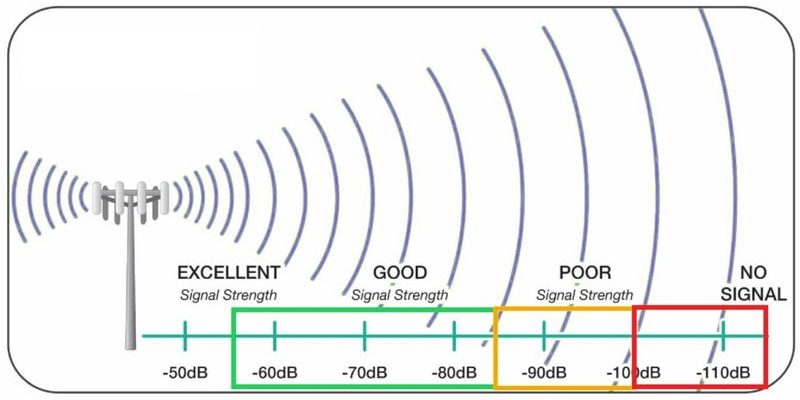
Testing Signal Strength Using Built-In Diagnostics
Here’s where things get interesting. Many Nest devices have built-in diagnostics that let you check signal strength directly. It’s sort of like checking the “bars” on your smartphone, except it’s for your remote.
To access diagnostics:
- On your Nest streaming device, go to Settings (use your TV or Google Home app).
- Look for a menu labeled “Remote & Accessories” or “Device Preferences.”
- Select your remote model and look for “Signal Strength” or “Connection Quality.”
A graph or rating (like “Good,” “Fair,” or “Poor”) will show your remote’s signal health. If you see “Poor,” try moving the remote closer to the device and checking again. You can even walk around the room and see if the bars go up or down. It’s oddly satisfying—like a treasure hunt for better wireless coverage.
Honestly, I’ve fixed stubborn remote delay just by moving a Wi-Fi speaker a foot away from my Nest device. The diagnostics made it obvious what was causing trouble.
Common Causes Of Weak Signal On Nest Smart Remotes
Let’s break down the biggest troublemakers behind weak signal strength. First, distance. Bluetooth and Wi-Fi might advertise long ranges, but walls and ceilings will quietly cut those numbers in half. If you’re more than 20–30 feet away, your remote will start dropping connections, especially if the device is around a corner.
Second, interference. Microwaves, cordless phones, wireless speakers, and even some LED lights can muddle signal quality. If you notice the remote works fine when the microwave is off, you’ve found your culprit. Try relocating your streaming device or smart speaker away from heavy appliances.
Third, device placement. Tucking your Nest device behind the TV or in a metal cabinet looks tidy, but radio signals hate tight, reflective spaces. Give your devices some breathing room for better performance.
If you’ve checked all these and still have issues, consider resetting both the remote and the device (a simple “Restart” in the settings menu often helps). Don’t worry—your settings and apps usually stay intact, but a reset can clear up invisible glitches.
Troubleshooting Persistent Connection Problems
Sometimes, even after all this, your Nest smart remote just refuses to cooperate. Troubleshooting is part art, part science, and a little bit of patience. If you’re still stuck, try the following steps:
- Unpair and then re-pair the remote (repeat the syncing process from earlier).
- Restart both the Nest device and your Wi-Fi router. Sometimes, crowded networks cause silent chaos.
- Try a different room or move large metal objects a few feet away—it’s surprising how much difference this makes.
- Check for firmware updates in the Google Home app. An old version can cause dropouts or lag.
If your remote uses codes (for example, to sync with non-Nest devices), double-check the code entry. One wrong digit and the signal handshake just won’t happen.
Just a heads-up: if your remote is older or visibly damaged (cracks, broken battery contacts), it might be time to consider a replacement. Remotes, like any gadget, have a lifespan. And sometimes, all the troubleshooting in the world can’t fix a physically busted antenna.
Comparing The Nest Remote To Universal Remotes
You might be wondering—why not just use a universal remote instead? Universal remotes can be great for juggling multiple devices, but most still use old-school infrared, which needs line-of-sight and doesn’t work through walls or furniture.
The Nest smart remote stands out because of its smart pairing (using Bluetooth and Wi-Fi), which means you don’t have to wave it at a specific angle every time you want to pause a movie. On the flip side, that also means troubleshooting is more involved, since there’s more tech under the hood.
Universal remotes often require entering codes for every device, and they can’t always control smart home features. The Nest remote syncs seamlessly with Google’s ecosystem—if signal strength is healthy, you can control lights, thermostats, speakers, and more with a single click.
Staying Ahead With Regular Remote Maintenance
Here’s something most people don’t think about: remote maintenance. It takes about two minutes every couple of months and can save you a ton of headaches. First, wipe down the remote with a soft cloth—dust and grime can sneak into the battery compartment and mess with the contacts.
Second, check for firmware updates now and then. The Google Home app will usually alert you, but you can always check manually under device settings. Keeping your remote updated ensures it can talk to the latest Nest devices and squashes weird glitches before they become real problems.
Finally, if your household is heavy on smart gadgets, consider using a Wi-Fi analyzer app to see if your home network is too crowded. Moving a device to a less-used Wi-Fi channel can clear up all sorts of mysterious remote problems.
Wrapping Up: Take Control Of Your Nest Smart Remote
Testing the signal strength on your Nest smart remote isn’t just a chore—it’s a chance to get the most out of your smart home setup. A strong, reliable signal means less frustration and more time enjoying your favorite shows, music, and apps. By checking batteries, understanding wireless codes and pairing, using built-in diagnostics, and keeping an eye on troublemakers like interference, you’ll have a smooth, responsive experience every time.
If something still doesn’t work, you know exactly where to start troubleshooting. And if you ever end up explaining this to someone else, just remember: half the battle is knowing what “signal strength” really means. The rest is just keeping your remote happy, synced, and ready to roll.