Pairing a Westinghouse ceiling fan remote with its receiver isn’t rocket science, but it does have a knack for tripping people up. If you’re picturing tangled wires or tech support on hold, take a breath. Most sync steps are simple, more about patience than electronics know-how. You really can do this with a few basic instructions, some batteries, and maybe a step stool.
Let’s break it down together—no jargon, no assumptions. Whether you have a new fan, a replacement remote, or your original controller suddenly stopped working, syncing Westinghouse’s remote with its receiver is something anyone can master. Here’s how it all works, why it matters, and what to do when things get stubborn.
Understanding How Westinghouse Ceiling Fan Remotes Work
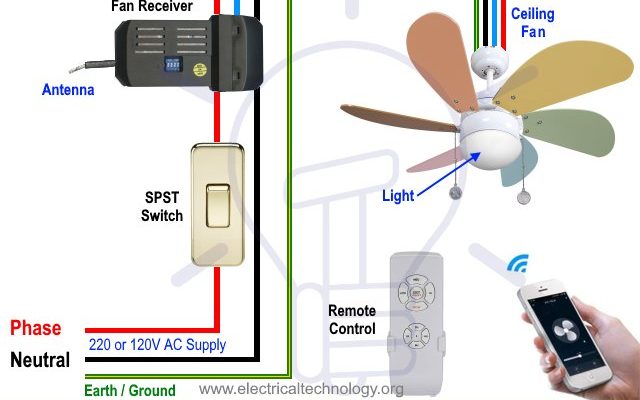
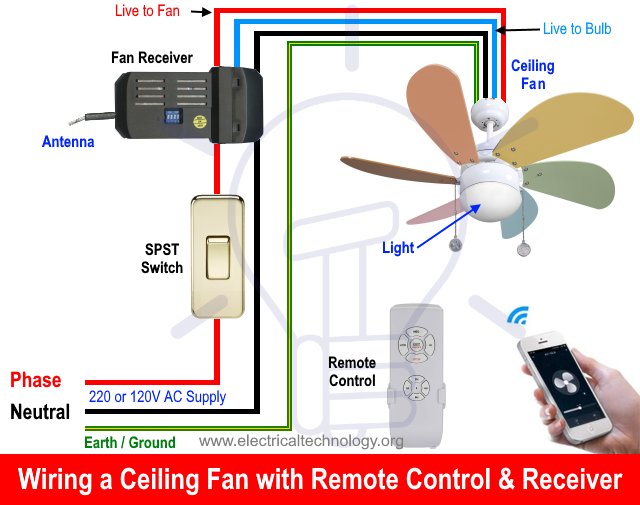
Here’s the thing: a Westinghouse ceiling fan remote isn’t just some universal TV zapper in disguise. It’s a little transmitter, talking in radio waves to a matching receiver tucked away in your fan’s canopy. If they’re not “speaking the same language,” nothing happens—you could press buttons until your thumb cramps. The remote and the receiver need to match up on the right code to sync.
The receiver in your fan acts as the brains of the operation. Its job is to listen for a certain frequency and code from the remote, then relay your commands to the fan’s motor and light. You might think of them as dance partners—they need to know each other’s moves before they can tango. If you’re pairing a new remote or the old one lost its sync, you’ll basically introduce them so they’re back on beat.
Westinghouse remotes often include a row of tiny dip switches inside the battery compartment, or sometimes have a “learning” button to set the code. Doesn’t matter if your fan is old or new—these sync principles are pretty consistent across models. The main takeaway? If the remote’s code doesn’t match the receiver, the fan won’t listen.
When And Why You Need To Sync Your Westinghouse Ceiling Fan Remote
You might be wondering, why all the fuss about syncing in the first place? Most folks run into this situation when they first install a ceiling fan. It’s fresh out of the box, and you need to link the remote to the receiver so they can talk. But honestly, this isn’t a one-time event. You’ll want to resync if:
- You replaced your remote control or receiver module.
- The remote stopped working out of nowhere (even if it was fine yesterday).
- There’s another fan or remote nearby causing interference.
- You moved into a new house with an existing Westinghouse fan, and the remote’s missing or not paired.
Ceiling fans can lose sync due to power surges, battery swaps, or just plain gremlins. Don’t take it personally; electronics like these are sensitive to small changes. Resyncing sorts out those crossed wires, often restoring full control (and your sanity) in a few minutes.
Pairing also matters for privacy and convenience. If your neighbor upstairs has the same brand of fan, their remote shouldn’t be able to hijack your ceiling fan speeds or lights. Matching the code keeps your fan “listening” only to your hand-held, not the guy next door.
Gathering The Tools: What You Need Before Starting
Before you climb up on that chair or reach for your remote, it’s smart to get your tools in order. You don’t need a big toolbox, but you will need a few things on hand so you’re not making repeated trips up and down.
- Westinghouse ceiling fan remote, with working batteries installed (brand-new batteries if possible).
- The fan’s receiver module, which is already installed in the fan (if replacing, make sure it’s the right Westinghouse part number).
- Small screwdriver (for some remotes, to access the dip switches behind the battery cover).
- A ladder or step stool to reach the fan canopy, if you need to reset or check the receiver.
- Your fan’s user manual—not a must, but handy for checking model-specific instructions or codes.
Pro tip: Always cut power at the wall switch or breaker before poking around inside the fan’s canopy. Safety first.
You won’t need special wires or high-tech gear—just patience, careful hands, and a willingness to look for those tiny switches or buttons.
Step-By-Step: How To Sync Westinghouse Ceiling Fan Remote With Receiver
Honestly, the process looks more intimidating than it actually is. Here’s how most Westinghouse fans and remotes sync up, using either dip switches or a learn (pairing) button. Let’s go through both methods so you’re covered no matter your model.
Syncing With Dip Switches
- Turn off power to the fan using the wall switch or breaker.
- Pop open your remote’s battery compartment. Look for a row of tiny switches (usually 4 or 5).
- Use a small screwdriver or pen to gently set the switches to a unique pattern. Write it down—you’ll need to match it on the receiver.
- Climb up (carefully!) to the ceiling fan canopy. Remove the cover to find the receiver’s matching dip switches.
- Set the receiver’s switches to the exact same pattern you set in the remote.
- Replace the canopy cover, restore power, and test the remote. Fan and light should respond instantly if synced correctly.
The dip switches are basically coding the fan and remote to “talk privately.” If they’re off even by one switch, no dice—the fan ignores you.
Syncing With a Learn Button
- Cut power to the fan using the wall switch or breaker.
- Restore power, then quickly (within 30 seconds) press and hold the “Learn” or “Pair” button on your remote. Some models have a “Sync” button on the receiver itself.
- Hold the button for about 5-10 seconds, until you see the fan light blink or the fan starts spinning—this tells you sync is complete.
- Test all the remote buttons (fan speeds, light on/off) to make sure everything’s in sync.
If you’re not seeing results, try toggling power off and on again and restarting the process. Some Westinghouse models can be finicky about timing.
Troubleshooting Common Sync Issues
Even when you’ve followed every step, sometimes the fan just refuses to play nice. Don’t sweat it—most hiccups are minor and fixable. Here are the big problems and how to tackle them:
- Remote not working at all? Double-check those batteries. Even new ones can be duds. Try another pair and make sure they’re inserted in the right direction.
- No response after syncing? The most common cause is mismatched dip switches. Open both compartments and check again, one by one. It’s easy to get a single switch backward.
- Intermittent response or limited range? There could be radio interference from other devices or too much distance. Try moving the receiver’s antenna to a straighter position, away from metal objects.
- Light or fan speed works, but not both? Sometimes, the receiver module itself may be faulty, especially if the fan is older or has seen power surges. Replacing the receiver is usually an easy fix and doesn’t require rewiring the whole fan.
If you’re stuck, try resetting both the remote and receiver to factory default (instructions vary by model, so peek at the manual). Then repeat the pairing steps from scratch.
Comparing Original Westinghouse Remotes vs Universal Remotes
You might be tempted to pick up a universal ceiling fan remote at the hardware store, especially if your original Westinghouse remote is lost or broken. Here’s the truth: universal remotes can work, but syncing is sometimes trickier. You’ll want to check if the universal remote supports the same frequency and code system (usually 304, 315, or 433 MHz for Westinghouse).
Original Westinghouse remotes are tailor-made for your receiver. Syncing is usually smoother, and you get all the fan’s features, including speed settings and dimmer options. Universal remotes often require manual dip switch matching, and may not support every function. Plus, not all universal receivers will fit inside every fan canopy—space is surprisingly tight up there.
Still, if you’re in a pinch and need a fast fix, a universal remote is worth considering, just don’t expect plug-and-play perfection. If you want bulletproof compatibility, sticking with official Westinghouse replacements is a safer bet.
How To Reset Westinghouse Ceiling Fan Remote and Receiver
Sometimes you just need a clean slate. If weird glitches, interference, or repeated failures keep popping up, resetting both the remote and receiver can wipe away confusion.
Here’s how to reset most Westinghouse fan remotes and receivers:
- Turn off the power to the fan at the breaker for at least 10 seconds.
- Restore power. Within 30 seconds, press and hold the remote’s “Learn” or “Pair” button for 10 seconds (check your manual for the specific button—it can be hidden inside the battery compartment).
- Look for the light to blink or the fan to turn in response. That’s the sign reset worked.
- If your model uses dip switches, you can reset by changing both the remote and receiver to a new, matching code.
Resetting wipes out old codes and any radio interference that built up. After a reset, you’ll usually need to pair the remote and receiver again.
Why Syncing Your Westinghouse Remote Matters For Everyday Use
Let me explain why a working sync is more than just a technicality. When your ceiling fan remote is synced up, you’re in the driver’s seat—full control of airflow, energy use, and even the quality of your movie night lighting. No more walking across the room or messing with pull chains in the dark.
Plus, a synced Westinghouse remote stops those annoying “ghost commands” where your fan suddenly changes speed on its own. Direct pairing ensures only your remote talks to your fan, protecting your privacy and comfort.
If you ever decide to upgrade to a smart home system or add more fans, a properly synced original remote makes the whole process easier down the road—no need for constant resets or guesswork.
Final Thoughts: Syncing Your Westinghouse Ceiling Fan Remote Made Simple
Honestly, mastering how to sync a Westinghouse ceiling fan remote with its receiver isn’t just about button presses and codes. It’s about taking back control of your living space, one reliable click at a time. Most hurdles—dead batteries, mismatched dip switches, or timing glitches—are simple to solve with a careful look and a bit of patience.
Whether you’re syncing after a new install, replacing a remote, or chasing down interference, the steps tend to repeat: check codes, match them up, and confirm every button does what it should. Don’t overlook safety—turn off the power before poking around the canopy, and don’t rush through the process. Syncing isn’t dramatic, but it can save you a world of frustration.
So next time your Westinghouse ceiling fan remote ignores you, remember: it just wants to be understood. A little code-matching and attention, and it’ll be back to spinning and lighting up right on cue. Here’s to a breezier, more comfortable room—powered by a remote that finally listens.