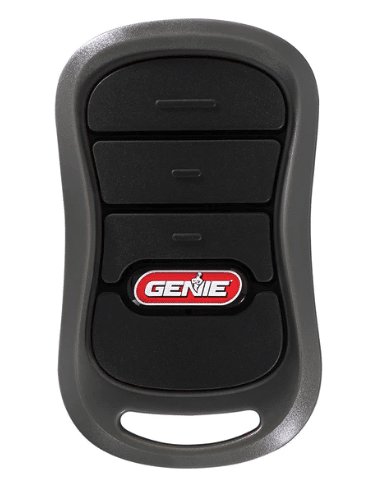
Let me explain how it all fits together. Your Genie remote and wall control are like dance partners—they need the right steps to move in sync. Often, folks find their remote won’t cooperate after replacing the battery, changing the code, or upgrading equipment. If you’re staring at a Genie-branded remote (often the little gray or black fob with chunky buttons) and a wall control panel inside the garage, you’re in the right place. Honestly, getting them to work together is less about tech wizardry and more about patience, timing, and pressing the right buttons in the right order.
Understanding Your Genie Garage System
Before you press anything, it helps to know what you’re working with. Genie has been making garage door openers for years. If you live in a house from the 90s or later, there’s a decent chance your system is using Intellicode technology—this is Genie’s rolling code system that adds extra security. You might not see “Intellicode” stamped on everything, but if your remote and wall control are both Genie, the logic still applies.
Your wall control is the panel on the garage wall—usually near the door to the house. It might have a light switch and a big main button. If you look at your Genie remote, it probably has one, two, or three buttons. Some even have a tiny LED light that blinks when you press them. These work together by sharing a “pairing code,” and when you sync them, the remote’s signal is registered with the garage door opener, which listens for that signal each time you want to open or close the door.
If you’re not sure what kind of remote or wall control you have, check for a model number on the back. Some older Genie systems use a “Learn” or “Program” button on the opener itself, while newer models let you program right from the wall control. The syncing process is about getting all these parts to speak the same language again.
When And Why Syncing Is Needed
You might be wondering, “Do I really need to sync my remote just because I changed the battery?” Sometimes, yes—that’s how picky these things can be. If you just bought a replacement Genie remote, or you’ve reset the system for security reasons, syncing is definitely required. Even a power outage or a lightning storm can scramble the memory of your garage opener, making it forget which remotes it’s supposed to listen to.
Honestly, syncing is also a good step whenever things start acting up. Maybe your remote works only after ten tries, or it randomly stops opening the door but the wall control works fine. That’s usually a sign the *code* is out of sync, not that your hardware is broken. Re-syncing smooths things out and saves you from doing the awkward garage-door-dance every morning.
Don’t overlook the importance of syncing if you’re adding extra remotes. Families grow, and so do the number of people coming and going at odd hours. Each remote needs to be paired separately with the wall control and opener, so everyone gets seamless access.
Preparing To Sync: Gather Your Tools
Let’s talk setup. You won’t need anything fancy, but a few things make life easier:
- Your Genie remote: Check if the battery is fresh. If in doubt, swap it out. A weak battery means a weak signal, which gets you nowhere.
- Access to your wall control: Make sure nothing is blocking it. Sometimes, wall controls are installed high up or behind strange angles—clear a path so you can reach buttons easily.
- A ladder (if needed): Some Genie models require access to the main opener unit’s “Learn” button, which is often on the ceiling. If your wall control handles all programming, you may skip this.
Here’s the thing: Genie systems can look nearly identical but behave slightly differently, depending on age and model. If you’re not sure about your system, it’s worth glancing at the owner’s manual or a quick search for your model number online. But in most cases, the process starts and ends in the garage—no need to tinker with wires or get out your toolbox.
Step-By-Step: How To Sync Genie Garage Remote With Wall Control
Now for the moment of truth. Here’s a step-by-step walkthrough you can follow, one button press at a time:
- Locate the Program or Learn Button: On most Genie openers, this button is either on the wall control or the actual opener unit (the big box above the garage door). It’s sometimes labeled “Learn Code,” “PRGM,” or just “Program.”
- Press and Hold the Button: Press the Program/Learn button until a small LED light turns on or blinks. This means the opener is ready to sync. (If you’re using the wall-mounted control, you may need to hold a “PROGRAM SET” or similar button for a few seconds.)
- Press the Remote Button: With the opener in “learn” mode, press the button on your Genie remote that you want to pair. You’ll usually see the opener’s light blink, or hear a click, to show it’s accepted the signal.
- Test the Remote: Wait a few seconds, then press the remote button again. If all went well, your garage door should respond—up, down, or at least a happy clunk.
Sometimes, you’ll need to repeat the process for each button or remote you want to sync. If you mess up, don’t sweat it—just start over from the beginning. The system erases failed code attempts each time you restart.
If your opener doesn’t respond, check the remote battery, try holding the buttons a second longer, or reset the wall control (most have a tiny reset hole you can poke with a pen). Be patient—the right timing and steady hands are key.
Common Problems And Troubleshooting Tips
Here’s where most folks get frustrated: syncing Genie remotes doesn’t always work on the first try. Maybe the remote is blinking, but the door won’t budge. Or maybe the opener’s learn light never turns on. A few things to check:
- Battery Issues: Even a nearly-dead battery can make the code transmission too weak. Always start with a fresh battery in your remote before troubleshooting anything else.
- Outdated Code: If you recently reset the opener, all previously paired remotes could be wiped. You’ll have to sync each one again.
- Wireless Interference: Other electronics (LED light bulbs, wireless cameras) can mess with your remote signal. Try syncing with the garage lights off, or unplug nearby gadgets temporarily.
- Distance: Stand within a few feet of the opener or wall control while syncing. Too far away, and the signal won’t register.
- Compatibility: Not all Genie remotes work with all wall control models. Double-check the remote and opener are both Genie and, ideally, marked “Intellicode” (or match your opener’s year).
If all else fails, reset your Genie opener by pressing and holding the Program button for about 10 seconds until the LED blinks a few times. This erases all paired remotes and lets you start from scratch.
Comparing Genie Remotes: Universal vs. Brand Models
You might see “universal” remotes at big-box stores, promising to work with any garage door. Sometimes they do, sometimes they don’t—especially with Genie systems. Universal garage remotes usually have you punch in a code or set a few toggle switches, matching your opener’s brand and frequency.
Genie-branded remotes are designed specifically for their openers, so syncing is usually far less hassle. There’s no searching for arcane switch patterns—just the learn button or wall control sequence. If you have an older Genie opener, a universal remote might be your only option. But for newer models, sticking with Genie-branded remotes avoids a lot of trial and error.
Here’s the thing: Universal remotes are great if you’re juggling multiple brands of openers in one house, but for reliability and smoother syncing, I’d pick the Genie remote every time.
Resetting And Re-Pairing: When To Start Fresh
Sometimes, syncing fails no matter how many times you try. In those cases, a full reset can clear out old, conflicting codes and give you a clean slate.
To reset your Genie garage opener:
- Find the “Program” or “Learn” button on the opener unit (not just the wall control).
- Press and hold it for about 10 seconds until the LED indicator flashes or turns off.
- All paired remotes are now forgotten—so you’ll need to re-sync each remote from scratch.
After a reset, follow the same syncing steps as before. It might feel like a hassle, but it solves 99% of stubborn pairing problems. This is especially useful if you’ve lost a remote and want to ensure it can’t open your garage anymore.
Genie Wall Control Features And Shortcuts
Modern Genie wall controls do more than just open and close the door. Some have lockout buttons, vacation settings, and even motion-sensor lights. Knowing what your wall control can do saves you time and, honestly, a few headaches.
If your wall control has a “lock” or “vacation” mode button, make sure it’s not active while syncing remotes—this blocks new codes from being registered. Some wall panels have little LED indicators that change color or blink when you’re in programming mode. If you see a red or amber light, check your manual or the sticker inside the panel cover for meanings.
And here’s an insider tip: If your wall control isn’t lighting up at all, it might just need a new battery or the wires may be loose. Gently open the panel and make sure everything is snug. Sometimes, syncing issues are just a loose connection hiding in plain sight.
Final Thoughts: Enjoying Smooth Genie Garage Access
Pairing a Genie garage remote with your wall control isn’t as intimidating as it first looks. Once you know where the buttons are and get the timing down, it’s almost routine—like setting a new alarm clock or pairing your phone to Bluetooth. The main hurdle is patience. Go slow, press with purpose, and double-check your steps. Most mistakes come from rushing or skipping the battery check.
With your Genie remote synced to your wall control, you’ll get that satisfying “click-whirr” sound every time you come home. No more standing in the rain, no more mad dashes through closing garage doors. If syncing still feels confusing, don’t hesitate to ask a neighbor or peek at Genie’s support resources—they’ve seen every possible quirk by now. Keep your remotes synced, and your garage will always be ready to welcome you home.
