Liftmaster is one of those brands you see everywhere, and for good reason: they’re reliable, easy enough to use, and the remotes come in several shapes and sizes (think visor-clip, keychain, and wall-mount). But when a power outage hits, the remote and opener can lose their handshake, which means you need to reprogram—or “pair” them again—so they start talking to each other. Honestly, it sounds more complicated than it is. I’ll break it down step by step, and you’ll be back inside your garage before you know it.
Why Power Outages Affect Liftmaster Garage Remotes
You might be wondering, why does a power outage make your remote forget its job? The thing is, your Liftmaster opener has a small computer inside—a circuit board that acts as the brain. This brain saves codes that tell it which remotes to trust. When the power gets knocked out, that memory can sometimes get scrambled, or the opener returns to its default “factory” settings when power is restored.
Here’s the thing: many Liftmaster models have *rolling code* technology. That’s great for security (it changes the access code every time you use it), but it also means the remote and opener need to be perfectly in sync. If they’re not, the opener won’t recognize your remote at all. After a major outage or surge, all bets are off until you reset or reprogram them.
Think of it like your Wi-Fi password after a router reset. The devices remember the old password, but the router has a new one. Until you pair them up again, you’re stuck knocking on the door. So when your garage remote stops working post-power outage, don’t panic; you’re just a few steps from syncing things up again.
Getting Ready: What You’ll Need Before Reprogramming
Before you sprint for the “learn” button on your opener, slow down and grab a few things. Preparation really helps, especially if you’re perched on a ladder while wrangling a tiny button.
- Liftmaster remote(s): The one that’s not responding, plus any extras you want paired.
- Garage door opener unit: Usually attached to your garage ceiling, with a “learn” or “program” button.
- Stepladder: Unless you’re NBA-height, you’ll probably need it to reach the opener unit.
- Patience: Honestly, things can be fiddly, especially if your remote is older or the opener is in a weird spot.
Check if your Liftmaster remote needs new batteries. Power outages won’t drain the battery, but it’s almost always the first thing people forget to check. If you swap batteries and it still doesn’t work, you’re in the right place—time to move to reprogramming.
Finding The Learn Button On Your Liftmaster Opener
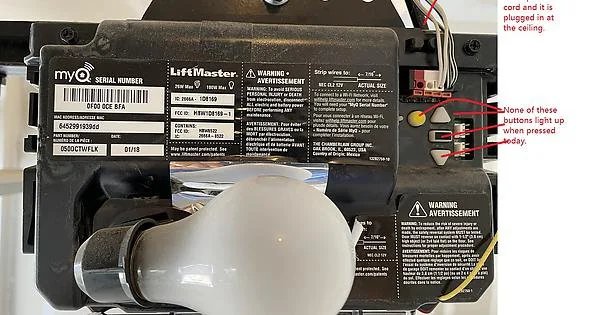
Let me explain: the “learn” button is like the reset switch for your Liftmaster’s memory. It’s small, usually colored (yellow, red, orange, green, or purple), and often tucked behind a light cover or panel on your garage opener.
Different models put the button in slightly different places. Sometimes it’s right next to the little LED indicator; sometimes you have to slide or flip open a plastic cover. Don’t force anything—these panels can be a bit stubborn, but they’re designed to open.
You’ll also see a tiny antenna wire dangling nearby. That’s normal—just don’t pull it out. If you’re not sure what color your “learn” button is, grab your model number (should be on the side or back) and check the manual online for confirmation. The color can matter, especially since newer yellow button models use Security+ 2.0 technology, while older ones use a different code.
The “learn” button is your garage opener’s way of saying, “Okay, I’m listening—show me which remote to trust.”
Once you find it, don’t press it yet. Get your remote and stepladder ready—you’re about to make magic happen (well, garage magic, anyway).
Step-By-Step Instructions To Reprogram A Liftmaster Garage Remote
Here comes the good stuff. Pairing—or reprogramming—your Liftmaster remote after a power outage is a simple process, just a little finicky if you’re new to it. Don’t rush: you usually have 30 seconds to complete the steps before the opener stops “listening.”
1. Clear the garage area: Make sure nothing blocks the sensors or the path of the door, just in case it moves.
2. Press and release the Learn button: Climb your stepladder, then press (don’t hold) the “learn” button. The LED near it should light up—this means it’s in “ready to pair” mode.
3. Press your remote’s button: Within 30 seconds, press the button on your Liftmaster remote that you want to program. The opener light should blink, or you might hear a click. That’s your sign that it worked.
4. Test the remote: Back on the ground, press the remote again. The garage door should move. If not, repeat the steps—there’s no penalty for trying again.
- If you’re pairing multiple remotes, repeat steps 2–4 for each one.
- Some Liftmaster models want you to hold the remote button until the opener “talks back” (with a click or light flash).
If you see no lights or hear no click, check the battery, inspect the remote for corrosion, and make sure you pressed the right button. Sometimes the “learn” button is touchy—you may need to try twice.
What To Do If Reprogramming Doesn’t Work
Sometimes, even after you’ve done everything right, there’s no luck. This is where most people start thinking their remote is broken or the opener needs an expensive repair, but hang on. There’s usually a simple fix.
Double-check the remote battery: Yes, it’s basic, but dead or weak batteries are the
Inspect for interference: LED bulbs, Wi-Fi routers, or even your neighbor’s opener can cause interference. Try unplugging nearby devices or swapping out LED garage lights for old-school incandescents when pairing.
Reset the opener’s memory: If nothing works, you may need to clear all codes from the opener. Hold the “learn” button for 6-10 seconds until the LED goes out. This wipes all remotes from the opener’s memory, so you’ll have to reprogram each one.
Here’s the thing: sometimes, remotes do genuinely fail, especially after years of daily use. If your Liftmaster remote is more than seven years old, consider ordering a replacement.
Comparing Liftmaster Remotes: Original vs. Universal Options
You might be eyeing those cheaper, “universal” remotes at the hardware store—tempting, right? Let me explain the difference.
Liftmaster-branded remotes sync smoothly with their openers, especially newer models using Security+ 2.0 codes. They’re designed for one another, so you avoid weird syncing errors or long-term reliability issues.
Universal garage remotes promise compatibility with most major brands (Liftmaster included), and they *can* work. But programming them often means a few extra steps, like entering a code or toggling switches, and sometimes their range or reliability isn’t quite as strong as the original.
Universal remotes are great as backups, but for peace of mind, the original Liftmaster remote is hard to beat.
If you’re in a pinch or have multiple garage brands at home, sure, grab a universal option. But if your opener has a yellow “learn” button (Security+ 2.0), stick with an official Liftmaster remote for hassle-free pairing.
How Garage Door Codes and Security Features Work
Garage door openers aren’t just about convenience—they’re your first line of defense for home security. Liftmaster uses rolling code technology, which means every time you open the door, the code changes. This thwarts would-be thieves who might use code grabbers.
After a power outage, both the opener and remote need to sync on the same code again. If they’re not, doors stay shut. That’s why correct reprogramming is crucial—not just for convenience but for maintaining security.
If your area has lots of radio interference (think busy neighborhoods or close garages), Liftmaster’s higher-end remotes often fare better. They’re built to withstand interference and maintain a strong, clear signal between the remote and opener system.
Honestly, it’s a little like two spies changing passwords every time they pass a note. Unless both sides agree, the message (or in your case, the garage door) won’t get through.
Common Troubleshooting Mistakes (And How To Avoid Them)
Here’s the part most manuals gloss over: sometimes, your remote isn’t the problem at all. People get frustrated, buy a new remote, or even call in pros when a simple fix would do.
Don’t skip the opener reset: Sometimes old codes lurk in the opener’s memory, stopping new devices from pairing.
Watch out for sensor misalignment: If your garage door won’t close or open after reprogramming, check if the safety sensors near the floor are lined up. A blinking light means they’re out of sync.
Mind the timing: The “learn” button gives you about 30 seconds to sync the remote. Wait too long, and the pairing fails.
One button at a time: Only program one remote at a time. Programming multiple remotes in a rush can confuse the opener’s memory.
When in doubt, patience wins. Each step resets the handshake between your Liftmaster opener and remote, restoring normal garage door operation after a power outage.
Wrapping Up: Enjoy A Reconnected Garage Door
Losing your garage remote’s connection after a power outage is annoying, but it’s rarely the end of the world—or your opener. With a couple of careful steps, you can reprogram your Liftmaster garage remote and be back in business. Always start with the basics: fresh batteries, finding the right “learn” button, and going slowly through the steps.
If things don’t work, don’t get discouraged. There’s almost always a fix, whether it’s clearing old codes, checking for interference, or swapping remotes. As long as you follow the process, you’ll restore that convenient, tap-and-go access Liftmaster is famous for. Now, when the next storm blows through, you’ll know exactly how to get your garage—and your day—moving again.