
Here’s the thing: replacing the battery isn’t hard, but it can feel weirdly intimidating, especially when you’re staring at a remote with no obvious screws or seams. Lutron’s remotes are sleek—that’s pretty, but it can make you second guess where to start. Don’t worry. Let’s walk though this together, step by step, no tech experience required. I’ll even toss in a few tips, just like I would for a friend who’s doing this for the first time.
Identifying Your Lutron Ceiling Fan Remote Model
Before you start prying or poking at anything, it’s smart to know exactly which Lutron remote you have. Lutron has a few different ceiling fan remote styles, and while their look is similar—simple, rounded, often white or gray—the way the battery compartment opens can vary. Some are wall-mounted Pico remotes, others are handheld, and a handful come as part of a “smart” kit.
Look for the model number, usually printed on the back or inside the battery compartment itself. If you’re unsure, try checking the original box or the manual (if you’re one of those rare folks who keeps it). Knowing your model helps you:
- Buy the correct replacement battery (most use a CR2032 coin cell, but don’t just guess!)
- Understand how the compartment opens—sliding or snapping off, usually
- Avoid breaking delicate tabs or scratching up the case
If you have a universal remote or a competitor brand, the steps below might not match up perfectly, but the general idea will be similar.
Gathering the Right Tools and Batteries
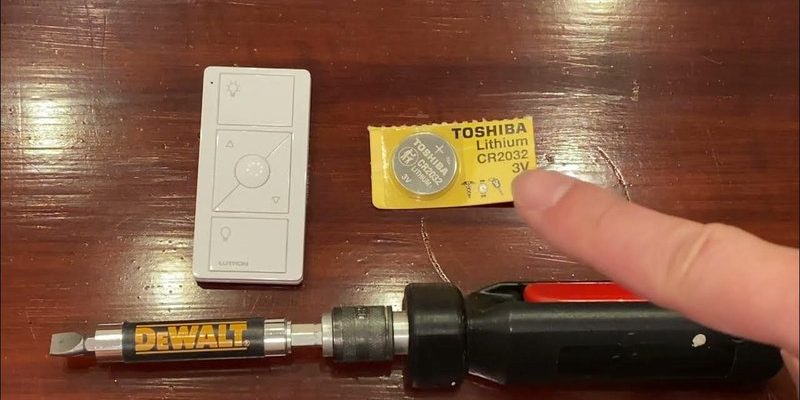
Honestly, you don’t need a whole toolkit for this, but grabbing the necessary supplies ahead of time saves a ton of frustration. The battery type is crucial: most **Lutron ceiling fan remotes** take a CR2032 coin battery, which looks like a thick little silver disk (like a sturdy contact lens case). If you have a different model, double check—some older units may use AAAs or a different coin cell.
Here’s what you’ll want on hand:
- Replacement battery (CR2032 for most)
- Small screwdriver or coin (helpful for popping the compartment open)
- Soft cloth (to avoid scratching the remote or cover)
I like to lay out a dish towel and work on top—no wandering batteries or tiny screws rolling away.
Opening the Lutron Remote Battery Compartment
You might be wondering, “Why isn’t there an obvious door or screw here?” That’s Lutron’s design style—smooth, minimalist, no extra clutter. Most of their ceiling fan remotes have a **sliding back cover**. But I’ll be honest, sometimes it feels like you need a secret code to open these things.
Here’s how to do it:
- Hold the remote face-down in your palm.
- Look for a tiny seam at the back. If there’s a small arrow or notch, that’s your spot.
- Press gently and slide the battery cover down (toward the bottom edge). If it sticks, try using your thumb with steady pressure, or a coin to give extra grip—don’t force it with anything sharp.
If you’ve got a wall-mounted Pico remote, the process is similar, but sometimes there’s a little tab you have to squeeze. If the cover won’t budge, double-check you’re not missing a hidden screw (on some older units).
If you find yourself fighting with the cover, pause. Forcing it can snap the delicate plastic. If you’re stuck, a quick search for your exact model number + “battery replacement” usually brings up a photo or video walkthrough.
Removing and Replacing the Old Battery Safely
Once you’ve got the cover off, you’ll see the coin-shaped battery nestled snug in its home. Removing it should be gentle—no need for tweezers or prying tools unless it’s really wedged in. Usually, there’s a little groove where you can nudge the battery out with your fingertip or the edge of a coin.
Here’s where you want to be careful:
- Note the direction—does the plus (+) side face up or down? Snap a photo on your phone if that helps.
- Slide the old battery out and set it aside (safely—these shouldn’t go straight in the trash).
- Before popping in the new battery, double-check the polarity.
These batteries only fit one way for a reason. Pop the new one in, matching the direction from before. If it feels loose or rattles, the fit might not be right—don’t force it. And don’t touch both battery surfaces if you can help it; fingerprints can reduce contact.
Testing the Lutron Ceiling Fan Remote After Battery Replacement
The best part—seeing things work again. With the **new battery** in place, snap or slide the cover back on. Sometimes it’ll “click” to let you know it’s secure. Now, point the remote at the fan and press any button. Most remotes have a tiny LED indicator that flashes when you press a button. If you see that flash, you’re probably in business.
Still nothing? Don’t panic—new batteries can sometimes need a minute to fully activate. If there’s no response, check:
- Did you insert the battery the right way?
- Is the cover fully closed (some remotes won’t complete the circuit if it’s open)?
- Could the issue be with the fan’s receiver or power—not the remote?
If your remote needs to be paired again with your ceiling fan or synced (especially after a total battery drain), refer to your manual or Lutron’s support. Usually, it’s a simple sequence of button presses, like holding “off” and “on” together to reset or pair.
Syncing and Pairing Your Lutron Ceiling Fan Remote (If Needed)
Sometimes, replacing the battery in a Lutron ceiling fan remote can reset its memory. If you press buttons and the fan still ignores you, there’s a chance the remote needs to sync again. That sounds techy, but it’s usually nothing more than a quick pairing process.
Let me explain how it usually works:
- Make sure both the remote and the fan have power.
- Hold down the main “off” button for about 10 seconds (some models use a specific code, like pressing “on” and “off” together).
- Look for a blink or flash on the remote’s LED—this often means pairing was successful.
If your ceiling fan still doesn’t respond, try resetting both the fan and the remote. Pull power at the breaker for a minute, then try pairing again. And if you’re genuinely stuck, Lutron’s support is pretty responsive via their website.
Don’t worry if you can’t find your manual. Most Lutron remotes use the same basic pairing steps, and you can always check their official support pages for model-specific instructions.
Troubleshooting Common Issues With Lutron Fan Remotes
You might be thinking, “Great, I swapped the battery, but my fan still won’t budge. Now what?” First off, it’s not always the remote’s fault. Here are the usual suspects, and how I’d tackle each:
- Dead New Battery: It’s rare, but a dud CR2032 can happen. Try another one—just in case.
- Dirty Contacts: If you see corrosion or gunk inside the battery compartment, gently clean it with a cotton swab or a tiny bit of rubbing alcohol (let it dry fully).
- Pairing Lost: As above, go through the sync steps—sometimes the remote just needs to “remember” the fan again.
- Fan Receiver Issue: Make sure your ceiling fan actually has power. Try flipping the wall switch or breaker.
If none of that works, test the remote on another compatible Lutron device (if you have one), or contact Lutron support. Sometimes, remotes just need to be replaced after years of use.
Lutron Remotes vs. Universal Ceiling Fan Remotes
While you’re here, you might wonder if you could swap your Lutron remote for a universal brand. Here’s my two cents: Lutron’s remotes are specifically coded to their dimmers and ceiling fan units, which makes for smoother pairing and less fuss with syncing or resetting codes. Universal remotes for ceiling fans exist, but they don’t always play nice with Lutron’s control system (especially if your remote is also working with smart home gear).
So, if your original remote is lost or permanently dead, your best bet is usually to replace it with the same Lutron model. Universal remotes are handy for older, non-smart fans—or if you’re replacing both the receiver unit in the fan and the remote together. Either way, check the compatibility first so you don’t end up with a remote that’s just an expensive paperweight.
Proper Disposal and Battery Safety
A quick note about those little coin batteries—they might seem harmless, but they’re actually dangerous for pets and kids if swallowed. Never leave old batteries lying around. Most cities offer battery recycling bins at hardware stores or civic centers, and some mail-in programs exist.
Always:
- Store new batteries out of reach of children and pets
- Tape over used batteries before recycling to prevent short circuits
- Avoid tossing them in the regular trash, as they can leak chemicals
Doing this keeps everyone safer and helps the environment a bit, too.
Wrapping Up: Enjoying Your Working Lutron Ceiling Fan Remote
Swapping out the battery in your **Lutron ceiling fan remote** is one of those little tasks that makes a big difference at home. With a fresh battery and a little patience, you get back that simple comfort—controlling your fan with a click, whenever the mood (or heat) strikes. If you ran into hiccups, odds are it’s either a quirky battery fit or a quick sync step you need to redo. Most of the time, though, it’s as simple as pop, replace, and relax.
It’s a good feeling when your remote works like new again. And if you ever get stuck, just remember: you’re not alone, and there’s always another resource—a friend, a manual, or good old Lutron support—ready to help. Enjoy that breeze.