Here’s the thing: swapping out the battery isn’t rocket science, but the design can trip up first-timers. Hampton Bay remotes don’t always make it obvious how to pop them open or which battery to use. It’s kind of like trying to open a childproof vitamin bottle—you feel silly when you finally get it, but grateful you didn’t break it in the process. Let me walk you through it, one simple step at a time.
Most Hampton Bay ceiling fan remotes use a flat, coin-style battery or standard AAA batteries. Some models have sneaky sliding covers, while others require a tiny screwdriver. I’ll explain how to figure out which you’ve got, how to open it without damage, and what to do after swapping batteries—yes, sometimes you’ll need to *sync* or *pair* the remote again. Let’s get your fan back under your control.
Identifying Your Hampton Bay Ceiling Fan Remote Model
Before jumping in, it’s smart to identify which remote you have. Hampton Bay offers a range of remotes, and not all open—or even operate—the same way. You might have a rectangular, push-button model, a rounder version with sliding controls, or a more modern, slim remote with digital display features. Each one has a slightly different battery replacement method.
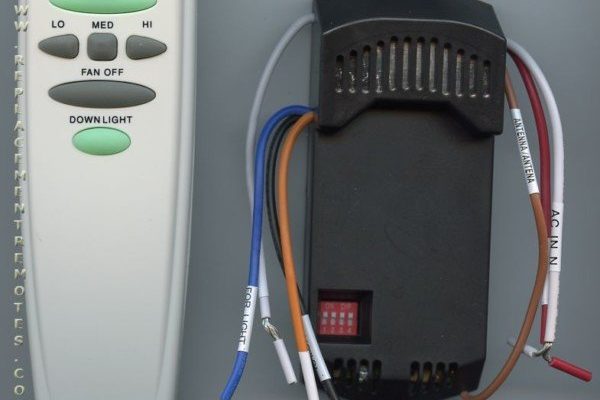
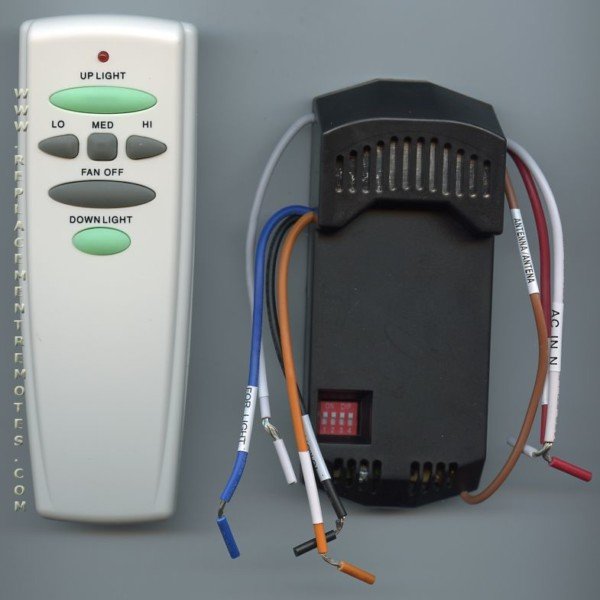
Check the back or inside the battery compartment (if you’ve opened it before) for a model number. It might say something like “UC7083T” or “CHQ8BT7030T.” If you can’t find anything, don’t worry. Take a look at the remote’s shape, button layout, and whether there’s a visible screw. This can hint at how it opens and what battery you’ll need.
Older Hampton Bay remotes often use a 9V battery or two AAA batteries. Newer, sleeker models tend to use the silver, coin-shaped CR2032 or CR2025 batteries. If your remote is pretty flat and lightweight, it’s likely the coin cell variety. Heavier, chunkier remotes may hold bigger batteries.
Why does this matter? Using the wrong battery or trying to pry open a remote the wrong way can damage the housing or internal components. Trust me, that’s a headache you don’t want. So, spend a minute sizing up your remote—the extra care now saves frustration later.
Gathering the Right Tools and Supplies
You don’t need a toolbox worthy of a car mechanic, but a couple of basic items make life easier. At minimum, you’ll need the correct replacement battery. For coin-style remotes, grab a CR2032 or CR2025 lithium battery—check the old one if you’re unsure. For AA or AAA models, standard alkaline batteries work just fine.
A small Phillips-head screwdriver is helpful if your remote has tiny screws securing the battery cover. You might also want a flat-head screwdriver or a sturdy butter knife, but be gentle—these are just for gently prying open snap-on covers, not stabbing at the plastic. If you’re worried about fingerprints or static, a clean cloth is a nice touch.
Here’s a quick checklist:
- Replacement battery (double-check model: coin cell, AA, AAA, or 9V)
- Small Phillips screwdriver
- Flat-head screwdriver (optional, for prying)
- Clean cloth for handling batteries
Honestly, taking two minutes to grab everything ahead of time feels much better than realizing you need a tool halfway through and rooting around your junk drawer with the remote half-open and your patience wearing thin.
Opening the Battery Compartment Without Damage
Here’s where most people start to sweat a little. Hampton Bay ceiling fan remotes aren’t always designed with obvious openings. Some have a sliding cover on the back—just apply a little pressure and slide it down with your thumb. If that doesn’t budge, look for a tiny screw, usually tucked in the middle or at one end. Carefully remove it with your Phillips screwdriver.
If there’s no visible screw and no sliding cover, feel along the edge for a small notch. That’s your cue to use a flat-head screwdriver or even a sturdy fingernail to gently pop the cover off. Avoid jamming or twisting too aggressively—the plastic isn’t indestructible. Think “coaxing” rather than “forcing.”
Once the compartment is open, make a note of how the battery is oriented. There’s usually a small plus (+) sign showing which side faces up. If you’re worried about forgetting, snap a quick photo on your phone before taking the battery out. It’s a small detail, but it can save you from installing the new battery upside-down.
If you’re struggling, set the remote down and take a breather. There’s no rush, and sometimes a second look helps you notice that hidden latch or sliding piece you missed the first time.
Removing and Replacing the Old Battery Safely
Now that you’ve got the battery compartment open, it’s time to swap out the old battery. For coin cell types, gently slide the old battery out with your fingernail or the edge of a plastic card. If it feels stuck, don’t pry with metal tools—that can bend connectors or short-circuit things. Be patient and nudge it free.
If you have a model with AAA or AA batteries, just slide or pop them out as you would for a TV remote. Pay attention to which way the positive and negative ends are facing. There might be tiny springs or metallic contacts that hold the batteries snugly; just be careful not to bend those out of alignment.
Take your new battery—fresh out of the package for best results—and place it in the compartment, matching the orientation of the old one. For coin cells, the positive (+) side usually faces up toward the cover, but double-check your specific remote. For cylindrical batteries, the flat side is typically the negative end.
When in doubt, refer to any small diagrams or markings inside the battery compartment—they’re there for a reason!
Once the new battery is settled in, close up the compartment. If there’s a screw, snug it down, but don’t over-tighten. Reattach the cover, making sure everything clicks back into place smoothly.
Testing the Remote and Troubleshooting Common Issues
With the new battery in, it’s time to test your work. Aim the remote at your Hampton Bay ceiling fan, press a few buttons, and watch for a response. If your fan turns on, lights blink, or you hear the familiar “beep,” you’re all set.
But sometimes, things don’t go perfectly. What if your fan still doesn’t respond? First, double-check that the battery is seated properly and installed with the correct orientation. Try removing and reinserting it, just in case a contact needed better alignment.
Still nothing? Don’t panic. Some Hampton Bay remotes require syncing or re-pairing with the fan after a battery change. Look for a small “reset” or “learn” button inside the battery compartment or on the fan receiver itself. Hold it down for a few seconds, then press a button on your remote to re-establish the connection.
Occasionally, interference from other remotes, nearby electronics, or even a weak battery (yes, it happens with new ones!) can cause problems. Try swapping in another fresh battery or moving to a different part of the room.
If the remote still doesn’t work, it’s possible there’s a deeper issue—like a bad remote, a malfunctioning fan receiver, or an outdated code. At this point, you might consider using a universal ceiling fan remote, which can be paired to many Hampton Bay models and avoids compatibility headaches.
Understanding Battery Types and Longevity
You might be wondering, “How long does a replacement battery usually last in a Hampton Bay ceiling fan remote?” The answer depends on the type of battery and how often you use the remote. Coin cell batteries (like CR2032) can last six months to a year with regular use, sometimes longer. Standard AAAs or AAs might stretch a bit further, but all batteries eventually wear down.
Keep in mind that extreme heat, humidity, or storing the remote in direct sunlight can shorten battery life. If your remote starts to act sluggish—buttons don’t respond immediately, or range drops—it’s a good hint the battery is getting weak.
When it’s time to swap batteries again, try using reputable brands instead of bargain-bin versions. Cheaper batteries might save a buck, but they rarely last as long or perform as reliably. It’s the classic “you get what you pay for” scenario.
Proper disposal matters, too. Don’t just toss old batteries in the trash. Lithium coin cells and alkaline batteries should be recycled at designated drop-off points—your local electronics or hardware store probably has a small recycling box near the entrance.
Syncing and Resetting Your Hampton Bay Ceiling Fan Remote
Here’s a situation I’ve seen trip people up: You’ve replaced the battery, pressed all the buttons, and the fan just stares back at you like nothing happened. Sometimes, a battery change causes the remote and the fan’s receiver to “forget” each other—like old friends who lost touch. This is where syncing (or pairing) comes in.
Most Hampton Bay remotes have a little “learn” or “sync” button tucked inside the battery compartment or under a sliding panel. Press and hold this button for about 5 seconds. Then, point the remote at the fan and press one of the main function buttons (like “Fan On” or “Light”) while still holding the sync button. This usually tells the receiver to recognize the remote again.
In rare cases, the fan itself might have a reset button, usually on the main body or near the receiver box tucked in the ceiling canopy. Cut the power at the breaker, wait 30 seconds, then restore power and try syncing again.
Here’s the thing: If you keep running into pairing issues, double-check that your remote and receiver are set to the same code or frequency. Some Hampton Bay sets use small dip switches (tiny white or black toggles) to match the remote and fan receiver. Make sure their patterns are identical—otherwise, the remote’s signals won’t reach the fan.
Always consult your specific remote’s manual for model-specific details. If you don’t have a paper copy, online PDF versions are often available with a quick web search.
Comparing Hampton Bay Remotes With Universal Ceiling Fan Remotes
If you’ve fought your Hampton Bay remote one too many times, you might be tempted to switch things up. Universal ceiling fan remotes can be lifesavers, especially if your original remote is lost, damaged, or just plain stubborn after a battery change.
Here’s a quick comparison:
| Hampton Bay Original Remote | Universal Ceiling Fan Remote |
| Designed for specific Hampton Bay models | Works with many brands, including Hampton Bay |
| Usually requires exact frequency or dip switch matching | Often features auto-sync or easy pairing process |
| Familiar button layout and feel | May offer extra features, timers, or smart home compatibility |
Universal remotes are especially useful if you have several ceiling fans from different brands, or if you’ve misplaced the pairing instructions for your Hampton Bay unit. Just be sure to buy a remote that lists Hampton Bay compatibility, and follow the included syncing instructions. Sometimes, “universal” remotes aren’t as universal as they claim, so a little research goes a long way.
Honestly, if your fan works fine and the remote responds after a battery swap, there’s no need to complicate things. But knowing your options can save you from headaches down the road.
Tips For Keeping Your Hampton Bay Remote Working Smoothly
Small habits make a big difference in the lifespan of your ceiling fan remote. Keep the remote clean and dry—spilled drinks, sticky fingers, or dust can gunk up the buttons and sensors. Store it somewhere safe, where it won’t slide under couch cushions or get stepped on.
If you notice the buttons sticking or the range decreasing, pop the batteries out, and gently clean the contacts with a dry cloth or a dab of rubbing alcohol on a cotton swab. Avoid soaking or spraying the remote—electronics and liquids don’t mix.
Replacing batteries as soon as the remote shows signs of lag prevents leaky, corroded cells from damaging the internal contacts. And if you have kids or pets, consider using a wall-mounted holder or magnetic dock to keep the remote from wandering off.
Most importantly, try not to force buttons if the remote isn’t responding—these devices are simple, but the tiny electronics inside don’t love rough treatment. Treat your Hampton Bay remote with a bit of care, and it’ll keep your fan humming for years.
Wrapping Up: Back In Control of Your Comfort
Replacing the battery in a Hampton Bay ceiling fan remote is a small act with a big payoff. It’s one of those home tasks—like changing a smoke detector battery or rethreading a stubborn window blind cord—that feels intimidating until you’ve done it once. Now that you know how to figure out your remote model, safely open it, swap out the battery, and handle any syncing hiccups, you’re set for a smoother, cooler experience.
Next time your fan doesn’t respond, you’ll know exactly what to check. A few minutes, a fresh battery, and a little patience are usually all it takes to get your ceiling fan remote back in working order. That way, you can go back to adjusting your comfort without breaking a sweat.