
Chamberlain has been a big name in garage door openers for years. Their products are sturdy, reliable, and everywhere—so much so that you’re probably holding one of their remotes or staring at the empty spot where it used to be. The good news? You can *remove* a lost or stolen remote from your Chamberlain opener pretty quickly. It’s not magic, and you don’t need to be a tech wizard. You just need a few steps, a ladder, and a little patience.
Why Removing a Lost Garage Remote Matters
Let me explain why this is actually a big deal—because some folks might leave that lost remote unchecked, figuring “what are the odds?” But here’s the thing: if someone finds your remote (or worse, if it was stolen), they could just waltz up to your house and open the garage like they own the place. It’s like giving out a VIP pass without knowing who’s holding it now.
Most Chamberlain garage openers use a “rolling code” technology. This means the code changes every time you press the button, making it tough for anyone to “clone” the remote signal. But the remote itself is still programmed to activate your garage door. If it’s gone, the risk is real. Taking action quickly is smart home ownership, pure and simple.
There’s also peace of mind to consider. You don’t want that nagging feeling every night before bed, wondering if your garage is truly secure. Removing the remote from your system is like changing the locks—it’s a reset for your peace of mind.
Understanding How Chamberlain Garage Remotes Work
Chamberlain remotes are surprisingly clever for little bits of plastic and circuitry. When you hit the button, your remote sends a unique code to the opener’s receiver in your garage. Most newer Chamberlain models pair with the opener using rolling codes, which means the signal is nearly impossible to intercept or replicate without access to the original remote or opener.
Here’s the key: your opener remembers each remote that’s been paired (or “synced”) with it. Pairing is just the process of linking your remote and the opener so they recognize each other. If you lose a remote, you’re not just losing a gadget — you’re losing a kind of “authorized access.” That’s why the remote needs to be specifically *removed* from the memory of your opener.
Older Chamberlain openers used dip switches or static codes, but pretty much everything from the last 15–20 years works off learn buttons, codes, and syncing. Knowing which model you have helps, but the removal process is similar for most.
How To Remove a Lost or Stolen Chamberlain Garage Remote
Okay, let’s get to the heart of the matter. Removing a lost Chamberlain remote comes down to clearing it from the opener’s memory. Since you can’t “unpair” a specific missing remote, you’ll erase all remotes from the opener and then reprogram only the remotes you still have in hand.
- Step 1: Grab a ladder (if needed) and locate your garage door opener’s main unit—it’ll be up near the ceiling.
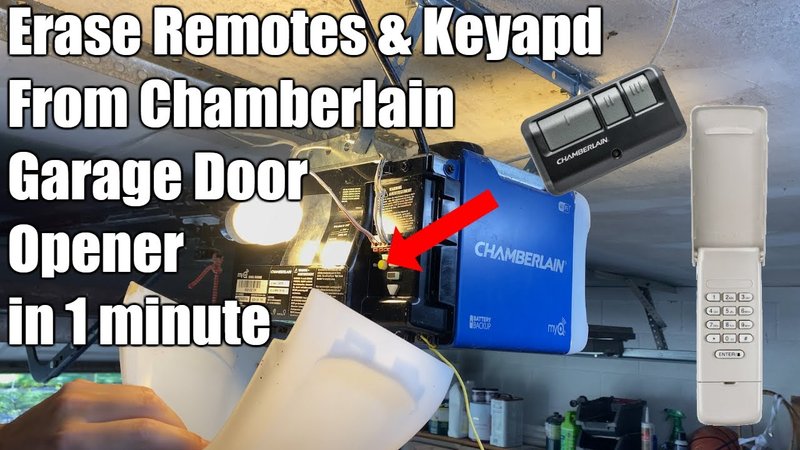
- Step 2: Look for the Learn button. It’s usually on the back or side of the opener, maybe under a light cover. The color of this button (yellow, purple, red/orange, or green) helps identify the operating frequency, but the removal process is pretty much the same.
- Step 3: Press and hold the Learn button until the adjacent LED light turns off (this can take about 6–10 seconds). When the light goes out, *all* remotes and keypads are erased from the opener’s memory. This is the “reset” step that cuts ties with your lost or stolen remote.
- Step 4: Now, reprogram (pair) the remotes or keypads you still have by pressing the Learn button once and then pressing the button on your remote. The opener’s light will blink or click to confirm a successful pairing.
Pro tip: If you have any wall-mounted keypads or HomeLink systems in cars, you’ll need to re-sync those, too. Don’t worry if you mess up—you can just repeat the steps.
Resetting vs. Removing: What’s the Difference?
You might be wondering—is “resetting” the same as “removing”? In the Chamberlain universe, they’re pretty much two steps of the same dance. There’s no surgical “delete one remote only” option on most openers. When you “reset” the opener’s memory using the Learn button, you’re clearing out *all* paired remotes and keypads. That’s why you have to re-pair the ones you still own.
The downside: it’s not as quick as just deleting one code, and if you forget to reprogram a remote, someone in your house might be stuck outside. On the upside, you’re getting a clean slate—your opener only listens to remotes you trust.
For folks who use universal remotes or have backup remotes stashed in cars, remember: anything not reprogrammed after the reset will no longer work. Make a list before you start, so nothing important gets left out.
Troubleshooting Chamberlain Opener Problems After Removing a Remote
Sometimes, things just don’t go smoothly. Maybe the Learn button doesn’t seem to work, or your remotes won’t pair again after the reset. Let’s walk through the usual hiccups.
If the Learn button doesn’t reset: Double-check that you’re pressing and holding it long enough (at least 6 full seconds). Sometimes a stubborn button or a stuck cover can throw you off. If nothing changes, unplug the opener for 30 seconds and try again.
If remotes won’t reprogram: Make sure you’re using a compatible remote model. Dead batteries are sneaky culprits, too, so swap in a fresh one. If you’re still stuck, check that you’re not exceeding the opener’s memory limit (most support 5–8 remotes).
If your keypad or car won’t sync: After a reset, all devices need to be re-paired. Follow the exact steps for your keypad or HomeLink system—sometimes you’ll need to clear their individual memories, too.
When in doubt, patience is your friend. Repeat the reset and pairing steps calmly, and you’ll get there.
What To Do If Your Chamberlain Remote Is Stolen
Losing a remote is stressful. Having one stolen amps it up a notch. But the steps are the same—reset the opener’s memory ASAP. If there’s any chance the thief knows where you live, take it seriously.
Consider changing the garage door’s lock code or even beefing up security temporarily. If you keep valuables in your garage, don’t leave the door open or unattended until you know the remote is removed. For peace of mind, some folks even disable the opener with the wall switch lock button (if your model has it) until everything’s reset.
After the dust settles, think about upgrading to a smart garage door opener. Chamberlain’s MyQ line, for example, lets you control and monitor access from your phone—so you can see if your door is opened when you’re not home, and even get alerts. That’s next-level security for folks who want the extra layer.
Comparing Chamberlain Remotes: Universal vs. Brand-Specific
If you’ve lost your Chamberlain remote and are shopping for a replacement, you’ve got two paths: stick with a Chamberlain-branded remote, or go with a universal model. Here’s a quick rundown.
- Chamberlain-branded remotes are guaranteed to work smoothly with your system. You just pair them using the same Learn button process. They’re a safe bet, and the instructions are straightforward.
- Universal remotes (from brands like Clicker) offer more flexibility. One remote can often control multiple openers, including Chamberlain, LiftMaster, or Craftsman. They’re great if you have different brands or want fewer gadgets in your life, but sometimes pairing is a bit trickier—especially if your opener uses a weird or older frequency.
If all you care about is a quick replacement, stick with the Chamberlain remote. If you love gadgets and want to consolidate, a universal might be worth a try. Either way, make sure your new remote is actually compatible with your specific model—usually listed in the opener’s manual or on the manufacturer’s website.
How To Keep Your Chamberlain Garage Opener Secure In The Future
Losing a remote feels like a wake-up call. Once you’ve removed a lost or stolen Chamberlain garage remote, take a few extra steps to keep your home safer.
- Change the opener code regularly. Even if you haven’t lost a remote, it’s smart to occasionally clear and re-pair devices.
- Don’t leave remotes in your car. Cars get broken into, and a visible remote is tempting. Stick to keychains or keep them out of sight.
- Upgrade to a smart opener. Devices like MyQ let you monitor and control access from your phone, making lost remotes less of a nightmare.
- Use the lock feature. Many Chamberlain openers have a wall control lock. Activating it disables remote operation temporarily, handy for vacations or extra caution.
Think of your garage as another front door, not just a storage space. Giving security the same attention as your main locks pays off in peace of mind.
Final Thoughts: Taking Control of Your Garage Security
Accidentally losing a Chamberlain garage remote—or worse, having it stolen—feels rough. But removing it from your system isn’t all that complicated. You don’t need an engineer’s degree or special tools. Just a little know-how and a willingness to climb a ladder.
After you’ve reset the opener, reprogrammed your remaining devices, and maybe upgraded your approach to remote security, your garage is back in your hands. Honestly, there’s something satisfying about taking control instead of leaving things to chance. So clear those remotes, check the batteries, and sleep a whole lot easier knowing your Chamberlain opener is secure again.