People buy Liftmaster remotes because they work smoothly with Chamberlain and Liftmaster openers, which are in millions of garages across North America. These remotes come with two to four buttons, each programmable—or “paired”—to a specific garage door, gate, or even a light module. But what if you switch to a new house? Or inherit the neighbor’s remote in a fit of friendly generosity? Suddenly, those buttons might need a fresh assignment. That’s where this unsuspecting little project comes in.
Understanding Liftmaster Garage Remote Features
Let’s get familiar with your Liftmaster remote before we start poking and prodding. Picture it sitting in your hand: it’s got one, two, or maybe four buttons, each waiting to be synced to a specific device. Underneath that plastic shell is a tiny circuit board designed to talk to your garage opener using a unique code. This code acts like a friendly handshake—if both the remote and the opener know the code, the magic happens.
Modern Liftmaster remotes use something called *Security+* or *Security+ 2.0*. In plain English, these are rolling code technologies. Each time you press the button, the code changes, making it almost impossible for someone to steal the signal. So, when you reassign a button, what you’re really doing is telling the remote and the opener to agree on a new handshake for that button.
Here’s the thing: not all Liftmaster remotes are created equal. If yours is older (think late ’90s or early 2000s), it may look different from the newer models with three little colored lights or a “learn” button. That doesn’t mean you can’t reassign buttons—it just means the steps might differ slightly. But don’t worry, I’ll guide you through both situations in a moment.
Why You Might Need To Reassign Buttons
So why bother? Honestly, there are plenty of reasons. Maybe you moved into a new house, and the previous owner’s garage code still lingers on your remote. Or perhaps you want to use one button to open your main garage and another to open a side gate or turn on garage lights. Sometimes, a button just stops working—possibly due to a dying battery, a lost pairing, or a little sibling playing remote DJ.
Here are some real-life situations where reassigning comes in handy:
- *You get a second garage door and want to use your existing remote for both.*
- *Your old button code isn’t working after a power outage or battery swap.*
- *The remote keeps opening the wrong door (awkward at family parties, trust me).*
- *You want to start fresh by resetting everything—remote and garage door—for peace of mind.*
Reassignment is about giving you control, improving security, and making daily life a bit less annoying. Nobody wants to fumble through three remotes just to get inside after groceries.
Step-By-Step: How To Reassign Button Functions On Liftmaster Garage Remote
Ready to get your hands a little dirty? Don’t worry; you won’t need a screwdriver or anything fancy. Here’s a clear, step-by-step approach for most Liftmaster models:
Note: Always check your owner’s manual, since exact steps can differ depending on model and production year. If you’re missing the manual, Liftmaster’s website is your best friend.
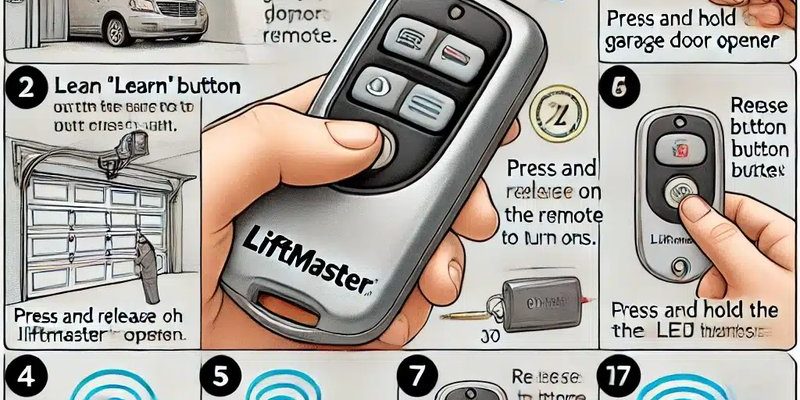
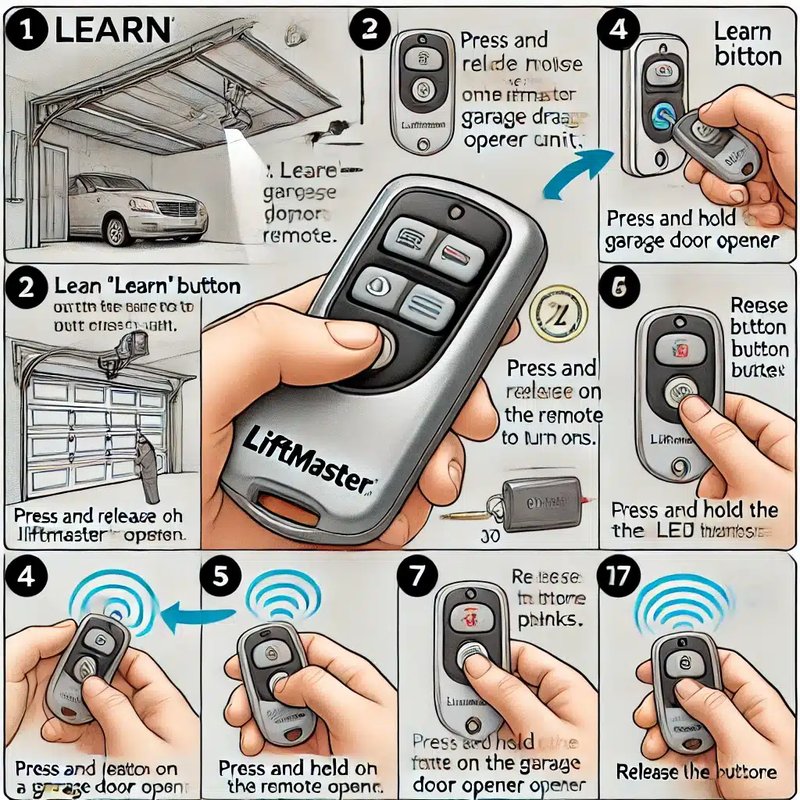
Step 1: Locate Your Opener’s “Learn” Button
Let me explain how to find this mysterious button. Go to your garage opener—the motor unit mounted to the ceiling. You’ll see a button usually labeled “Learn” (sometimes it’s purple, yellow, orange, or green). It might be behind a small light cover. This button sets your opener into pairing or sync mode.
Step 2: Clear The Old Button Function (If Needed)
If you want to “reset” a particular button on your remote, here’s what you do:
- Press and hold the button on your remote you want to clear.
- Keep holding while you press and hold the “Learn” button on your opener until the indicator light on the opener goes out (usually 6–10 seconds).
- Release both buttons. This erases the code stored for that button.
Some models only need you to hold the “Learn” button for six seconds to erase ALL remotes, so be careful not to wipe everything unless that’s your goal.
Step 3: Assign The New Function
Now for the main event:
- Press and release the “Learn” button on the opener (the light should glow steady for 30 seconds).
- Within those 30 seconds, press and hold the button on your remote you want to assign.
- Hold the button until you see the opener light blink or hear a click (usually about 3 seconds).
- Release the button. The new code is now paired.
Want to double-check? Press the remote button once and see if the garage responds. If you hear the motor or see the door budge, you’re golden.
Troubleshooting Common Issues With Liftmaster Remotes
Things don’t always go perfectly—remotes can be a bit moody. If your reassigned button isn’t working, consider these common hiccups:
- Dead battery: This sounds obvious, but remotes eat through batteries faster than you’d think, especially if they’ve been dropped or left in hot cars.
- Out of range: If you’re too far from the opener, the signal may not reach. Try standing right under the opener.
- Wrong opener model: Not all Liftmaster remotes work with every opener. If your opener was made before 1993 or uses DIP switches, the reassign process won’t work the same way.
- Opener memory full: Over time, openers can “remember” too many remotes. If you’ve paired a lot of remotes (or inherited a house with a busy garage), the opener might need to be reset before you can add new devices.
Here’s a tip: If you have multiple remotes or keypads, sometimes one can override or unpair another if you’re not careful during the coding process. Always work with one remote at a time to stay sane.
What To Do If Remote Reassignment Fails
Let’s say everything went sideways—your button refuses to listen, or the garage door is giving you the silent treatment. Try these steps:
- Reset the entire opener: Hold the “Learn” button for about 6–10 seconds until the light goes out. This will wipe all remote codes. You’ll need to re-pair every remote and keypad, so be sure you have them on hand.
- Replace the remote battery: Even a half-dead battery can mess up the signal. Swap it for a new CR2032 (or whatever your model uses) and try again.
- Check for interference: Wi-Fi routers, LED lights, and even baby monitors can interfere with garage signals. Move them if possible, or try pairing at a different time of day.
If all else fails, you might be dealing with a faulty remote or opener—at that point, a quick call to Liftmaster support or a local technician is your best bet.
Comparing Liftmaster Remotes With Universal Alternatives
You might be wondering: is all this effort worth it? There’s no shame in asking! Sometimes, switching to a universal garage remote solves weird compatibility headaches, especially if you’ve inherited a Frankenstein setup from previous owners.
- Liftmaster-branded remotes are built specifically for Liftmaster or Chamberlain openers. They’re often more secure (thanks to newer Security+ tech) and easier to pair or reassign.
- Universal remotes can work with different brands and older openers, but sometimes lack advanced security or can be trickier to program.
- Keychain or “mini” remotes are great for motorcycles, bikes, or people who want to keep a spare in their bag. The reassignment steps are similar, but check your manual.
If you value simplicity and strong security, stick with a brand-name Liftmaster remote. But if you’re juggling multiple openers from different manufacturers, a universal remote can be a lifesaver—just don’t expect every feature to work perfectly out of the box.
How Remote Button Reassignment Improves Security And Convenience
Here’s an underrated benefit to mastering this skill: peace of mind. Whenever you move, have a roommate leave, or suspect someone’s cloned your opener, reassigning your remote button functions erases old codes and locks down access. Think of it like changing a password, but for your garage.
It’s also just plain handy—controlling multiple doors or lights with a single remote means less clutter and more flexibility. Some newer Liftmaster systems even allow programming for home lights, gates, and more, all from the same remote. No more fumbling through your glove box while your coffee spills on your lap.
The process might seem intimidating at first, but it puts you back in control. And honestly, isn’t that what you want from your own garage?
Helpful Tips for Smooth Remote Pairing and Maintenance
A few practice-tested habits can save you headaches later. For one, always label your remote buttons with a sticker or marker, especially in busy households. You’d be surprised how fast “left button for main door, right button for side gate” gets confusing after a week.
Store your remote safely—don’t leave it in the car overnight, especially in extreme heat or cold, which can drain batteries or warp the casing. Keep a spare battery handy, because your remote will only quit when you’re running late. If you’re troubleshooting frequently, consider upgrading to a newer remote or opener; the latest models play nicer with phones and smart home setups.
Keep your owner’s manual or a digital copy saved somewhere you’ll remember. Trust me, it’s your best friend when memory gets fuzzy.
Wrapping Up: Taking Charge of Your Liftmaster Garage Remote
Getting your Liftmaster garage remote to do exactly what you want isn’t just a minor convenience—it’s a little victory in your daily routine. By understanding how to reassign button functions, you unlock new flexibility and boost your home’s security. Sure, the first time through might feel fiddly, but after that, you’ll have the confidence to tweak and pair without breaking a sweat. Whenever life changes—a move, a new garage, an unexpected battery meltdown—you’ll be ready, remote in hand, making your garage work for you instead of the other way around.