Honestly, you’re not alone in this. These remotes look simple but can be surprisingly fussy. Programming them is a bit like giving your fan its own secret handshake. Once you know what to do, it’s easy—but until then, it’s easy to feel like you’re just pushing random buttons. Let me break it down in plain English, step-by-step, so you can set things up and get back to relaxing.
Understanding Your Hunter Ceiling Fan Remote: Types and Features
Before jumping into programming, it helps to know exactly what you’re working with. Hunter makes a few different remote types—not all are created equal. The most common kind is the handheld remote with buttons for speed, light, and sometimes even a reverse function. Some models mount to the wall, acting more like a minimalist light switch with extra powers.
Here’s the thing: **the remote type affects the programming process**. For newer Hunter fans, most remotes rely on radio frequency (RF) signals, which means you don’t have to point them directly at the fan (kind of like magic). Older models might use infrared, which is more old-school and needs a clear line of sight. It’s worth peeking at your manual or the label on your remote. If you’ve got an extra button labeled “Learn” or “Pair,” you’re in the right spot for easy programming. If not, don’t worry—the basic steps are still approachable even for total beginners.
It’s also smart to check for any switches inside the battery compartment. Some Hunter remotes (especially older ones) use **dip switches**—tiny switches you can flip to set a matching code between your fan and remote. If you spot these, they’re important for the pairing process. Think of them as your fan’s “password” so nobody else in your building accidentally turns your fan on.
So, step one is understanding your remote model, because there are just enough differences to trip you up if you don’t look first. Grab your remote and let’s figure out what’s under the hood.
Getting Ready: What You Need Before Programming
You might be itching to mash buttons and get your Hunter ceiling fan remote working, but trust me—preparation saves you headaches. Programming goes a lot smoother if you deal with a few basics first.
First, check the batteries. Seriously, this sounds dumb, but weak batteries will mess with the whole process. If your remote is acting stubborn, new batteries are often the cure. Use fresh batteries matching what’s recommended by Hunter—usually AA or AAA. Slide off the battery cover, pop them in, and make sure the contacts are clean (no corrosion or dust).
Next, cut the power to your ceiling fan. Either use the wall switch or flip the breaker for that room. This step might seem like overkill, but it’s sort of like rebooting your laptop before fiddling with new software. It clears up old connections and makes the fan ready to accept new commands.
Finally, get close. Move a ladder or chair under your fan if you think you’ll need to press any buttons on the receiver. For most models, you’ll be doing all the work from the ground with the remote, but for some (especially those with dip switches or reset buttons), you might need to get hands-on with the fan itself.
Getting these steps done first means you can focus on the actual pairing, not scrambling around for batteries or tripping the breaker in a panic.
Finding and Setting Dip Switches: Matching Codes for Older Remotes
You might be wondering about those tiny dip switches inside the remote, or maybe you’ve never seen one before. Here’s the thing—**if your Hunter fan and remote are older, these switches are critical**. They’re the key to syncing the remote and fan, kind of like tuning two walkie-talkies to the same channel.
To find the dip switches:
- Open the battery compartment on your remote.
- Look for a small row of white switches, usually about 4–5 in a row.
- Repeat this for your fan’s receiver—often located up in the ceiling canopy (where the fan connects to the ceiling).
Here’s how to set the dip switches:
- On the remote, use a small screwdriver or pen tip to set a pattern with the switches (up or down—just aim for random if you’re starting from scratch).
- On the receiver inside the fan, set exactly the same pattern.
- Replace the battery and canopy cover, restore power, and test the remote.
If the pattern doesn’t match, nothing will work. Think of it as a lock and key—the code has to be identical on both ends. Once you’ve done this, your fan and remote should talk to each other. If you ever get interference from a neighbor’s remote (it happens in apartments!), just change the pattern on both sides and you’ve got a private code.
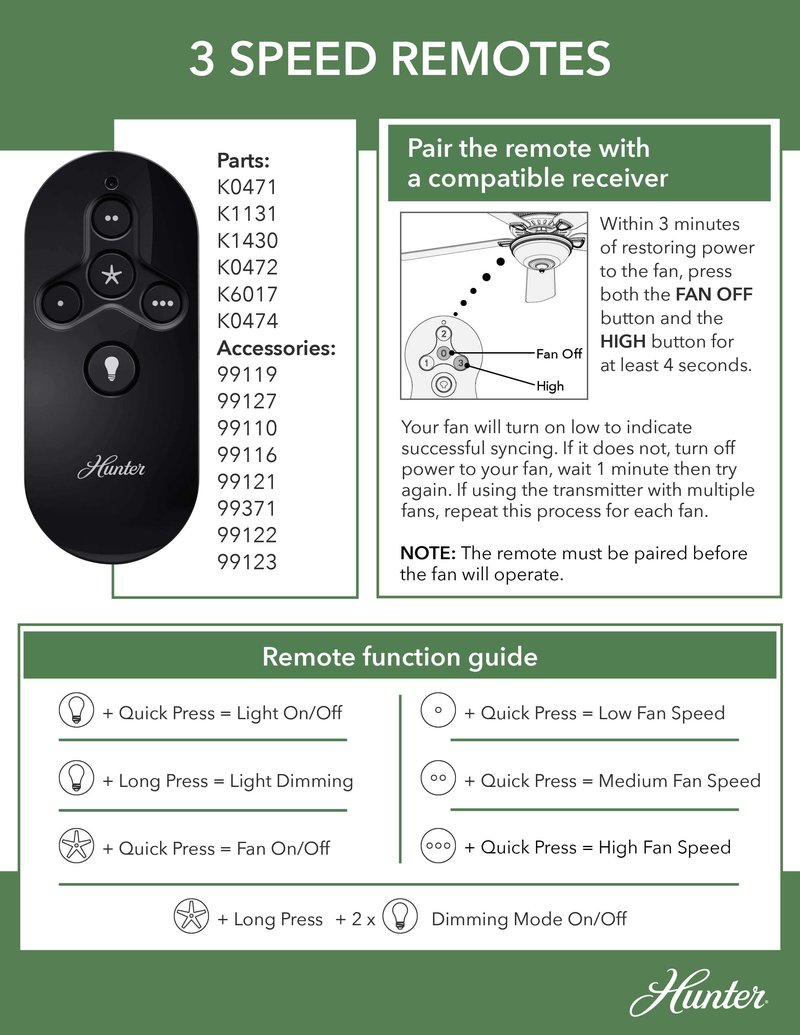
How To Program a Newer Hunter Ceiling Fan Remote (With Pair or Learn Button)
Most newer Hunter ceiling fan remotes make programming much less fiddly. Instead of dip switches, you’ll see a **Pair** or **Learn** button on the remote or inside the battery compartment. This makes syncing almost plug-and-play, but here’s the exact process.
Step-by-step for pairing:
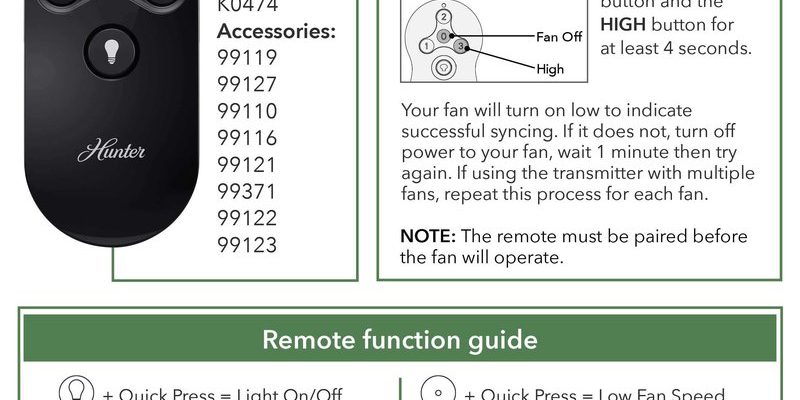
- Turn off power to the fan (use wall switch or circuit breaker), then wait about 30 seconds.
- Restore power to the fan; you’ll want to do this while holding the remote close by.
- Within 3 minutes of restoring power, press and hold the “Pair” or “Learn” button on your remote for about 3–5 seconds.
- You’ll usually hear a beep or the fan will wiggle, letting you know the signal worked.
- Test the remote: try speed, light, and power buttons to make sure it’s synced correctly.
Let me explain why the timing matters. The receiver inside the Hunter ceiling fan is listening for a pairing signal right after power comes back on. If you wait too long, it stops listening, and you’ll have to cycle the power again. It’s a little window, so have everything ready before you start.
If nothing happens, double-check that you’re pressing the right button. Sometimes it’s hidden under the battery cover, or even a combo like “Fan” and “Light” together. If you’re stuck, peek at your fan’s manual or model number online—Hunter’s support site covers most models.
The best part? Once you’ve paired the remote, it usually stays programmed unless you lose power for a long time, swap remotes, or reset everything.
Troubleshooting Common Hunter Remote Programming Problems
Stuff doesn’t always go as planned, right? If your remote refuses to cooperate, don’t panic. Here are some of the most common issues and how to fix them.
Remote won’t pair: Double-check the batteries first. (I know, but seriously, this fixes things a lot.) Make sure you’re following the timing—power cycle, then pair within 3 minutes. If the fan still ignores you, try moving closer to the fan or holding down the button longer.
Fan or light controlled by wrong remote: If your neighbor’s fan remote is messing with yours, it’s probably a dip switch or code issue. Change the pattern in both your remote and receiver, restore power, and pair again. This is especially common in apartments.
Nothing happens at all: If you hear no beeps, no movement, and nothing lights up, check the breaker, light switch, and make sure the remote isn’t damaged or worn out. Sometimes, the receiver in the fan can fail—this is rare, but it does happen, especially in older fans.
Remote suddenly stops working: Battery change time! If that doesn’t help, try resetting: turn the power off for a minute, then back on and re-pair the remote. Still stuck? Some fans have a manual reset button on the receiver—check your model.
Programming a Hunter ceiling fan remote is a bit like convincing your dog to listen to new commands—sometimes it works on the first try, and sometimes you’ve got to be patient and try again.
How To Reset or Re-Pair Your Hunter Ceiling Fan Remote
Maybe you’re moving, swapping remotes, or just want a fresh start. Resetting your Hunter ceiling fan remote wipes out old pairings and lets you start clean. The steps are pretty close to the initial pairing but with a focus on erasing any old “codes” or settings.
Here’s what to do:
- Turn off the fan’s power at the breaker for at least 30 seconds.
- Turn the power back on—your fan’s receiver is now in “listening” mode for a new code.
- Within 3 minutes, press and hold the Pair/Learn button on the remote until you hear a beep (or see lights flicker/fan blades move slightly).
- Release the button; your remote should now be reset and paired with the fan’s receiver.
A quick tip: If your remote has lots of buttons, some models use a combo (like “Fan” and “Light” held together) to start a reset instead of a single Pair button. Check your remote layout for clues—Hunter usually tucks the instructions under the battery cover or in the manual.
If nothing works after several tries, there’s a small chance your receiver needs replacing. It’s rare, but after years of use, these parts can wear out. In that case, Hunter sells replacements, or you can use a universal remote kit—but always check compatibility.
Comparing Hunter Original Remotes to Universal Fan Remotes
You might be curious if you can ditch your Hunter remote for a universal one. Here’s the skinny: Hunter’s original remotes are designed to work perfectly with their fans, using specific codes and signals. Universal remotes claim to support most major brands, but results can be a mixed bag.
Original Hunter remotes:
- Guaranteed compatibility if you match the model.
- Full access to unique features—reverse function, dimming, etc.
- Easier sync, pair, and reset steps (because instructions match the fan).
Universal fan remotes:
- Cheaper in some cases, especially if the original is discontinued.
- Can work, but sometimes only basic functions (on/off, speed) and not dimming or reverse.
- Programming may involve extra steps—matching frequency, finding the right code, or even re-wiring the receiver.
If you just want simple on/off controls, a universal might do the trick. But for full-featured Hunter ceiling fans (especially models with lights or reverse), the original remote is usually the safer bet. If you’ve lost your remote, check Hunter’s official replacements first—they’re often not as expensive as you’d think, and they guarantee all functions will work.
Maintaining and Caring for Your Hunter Ceiling Fan Remote
Here’s the thing: once you’ve got your Hunter remote paired and working, you want it to stay that way. A little care goes a long way. Let me explain how you can make your remote last for years without hiccups.
Swap batteries yearly: Even if the remote still works, low batteries can cause lag or failed commands. Mark a date to swap them out—maybe when you set your clocks for daylight saving.
Keep it clean: Dust and grime can get inside the battery compartment or jam the buttons. Wipe the outside gently with a dry cloth. For the inside, take out the batteries first and use a soft brush for the contacts.
Store it wisely: Wall-mount remotes are harder to lose, but handhelds tend to disappear into couch cushions. Consider using the included wall mount or tray. Keep the remote away from extreme heat or moisture—that can ruin the electronics.
If it falls and stops working: Open the battery cover and check for loose contacts. Sometimes a simple battery reseat fixes minor issues. If the remote still won’t work, try re-pairing it to the fan.
Caring for your remote might sound boring, but honestly, a little maintenance saves you from having to re-learn programming after every tiny mishap.
Hunter Ceiling Fan Remote Programming: Final Thoughts
Figuring out how to program a Hunter ceiling fan remote isn’t rocket science, but it does have its quirks. Whether you’re flipping dip switches or holding down a pair button, the main thing is matching the remote’s signal with your fan’s receiver. Go slow, prep carefully, and don’t be afraid to double-check the manual or try a reset if things get weird. Once it’s paired, you get to enjoy breezy comfort and adjustable light—all without standing up. With just a bit of patience, you’ll have your Hunter ceiling fan remote working like a charm, every single time.