Think of it like pairing new headphones to your phone. At first, it’s a jumble of buttons and blinking lights, but once you get the hang of the sequence, it’s almost second nature. Liftmaster garage door remotes, whether they’re the common three-button model or a bigger universal type, all use a simple process to sync with your opener. If you’re patient and willing to poke around for a minute, you can completely bypass the missing manual—and still get your garage door humming up and down again.
Understanding Liftmaster Garage Door Remotes: Models and Features
Before you start mashing buttons, let’s get familiar with the type of Liftmaster remote you’ve got in your hand. Most homeowners have either a single-button version (for just one door), a multi-button model (which can control two or three doors), or even a universal remote designed to work with different brands. The programming process is slightly different for each, so identifying yours makes life easier.
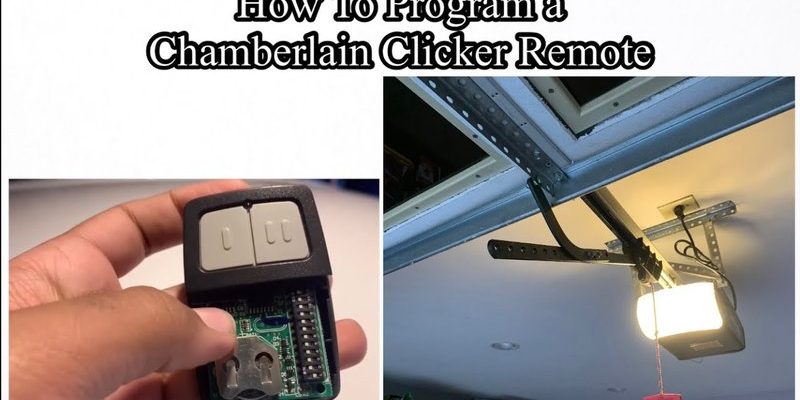
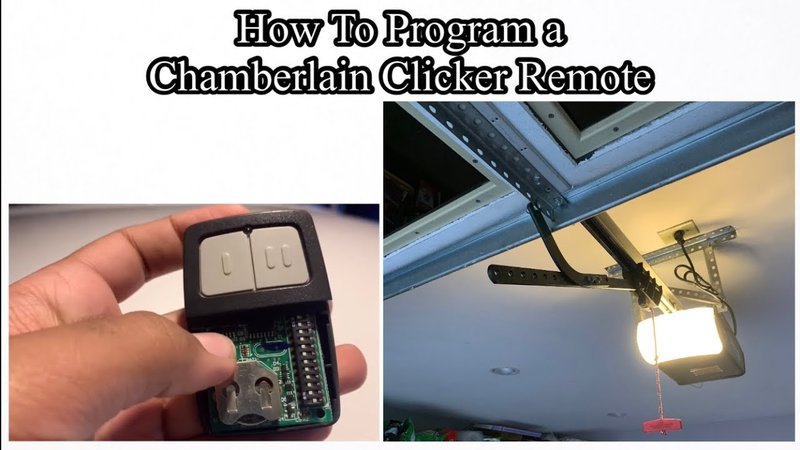
Liftmaster remotes typically feature a sleek, rectangular design with clearly marked buttons. Some older models just have a single big button, while newer ones offer options like “MyQ” compatibility for smart homes. The battery compartment is usually on the back—snap it open with your thumb if you’re curious. The real magic, though, happens with the “Learn” button on your actual garage door opener unit. This button is your secret weapon for syncing your remote, and it’s usually hidden right on the opener itself—think of it like the pairing button on a Bluetooth speaker.
Why does the model matter? Because not all remotes talk to the opener in the same “language.” For example, a modern rolling-code remote is much more secure than an older fixed-code one. If your remote is a universal type, it’s designed to pair with multiple brands—but you’ll still rely on the same “Learn” button technique. Knowing your remote’s personality upfront helps you avoid confusion and saves time when you get to the actual programming steps.
Locating the Liftmaster “Learn” Button on Your Garage Opener
You might be wondering, “Where the heck is this ‘Learn’ button everyone keeps talking about?” Here’s the thing: it’s not actually on the remote—it’s on the garage door opener motor unit itself, up on the ceiling of your garage. Finding this button is the first real step to programming a Liftmaster garage door remote without the manual.
Grab a sturdy stepladder and take a look at the unit hanging over your garage door. You’ll usually see a small panel or light cover you can slide open (no tools needed). Inside, look for a button labeled “Learn,” often near a tiny LED light. Depending on your model, the button might be orange, yellow, green, or purple—Liftmaster seems to love color-coding these. If you see several buttons, pick the one actually marked “Learn”—ignore the ones labeled “Lock” or “Light.”
Pro tip: Take note of the color of the button and whether the LED next to it is solid or blinking. Some programming steps change slightly based on the color, especially if your opener was made after 2011. If you’re still not sure, take a quick photo and look it up online—most Liftmaster learn buttons are pretty standard but it helps to double-check.
Once you’ve found the “Learn” button, you’re halfway there. This button tells your garage door opener to look for a new remote signal and “learn” it—sort of like hitting “scan for devices” on your phone. That’s the core of the whole process.
Programming Your Liftmaster Remote: Step-by-Step Instructions
Now, for the part you actually need—how to program your Liftmaster garage door remote without a manual. Don’t worry, it won’t be like trying to decode ancient hieroglyphics. Here’s a breakdown you can follow, whether you’re holding a single-button original or a universal model.
- Step 1: Climb up and press the “Learn” button on your garage door opener. You’ll usually see the LED light next to it turn on—either solid or blinking. Don’t hold it down for too long; a quick press starts the pairing mode. (Holding it for 6 seconds will erase all remotes!)
- Step 2: Within 30 seconds, grab your remote and press the button you want to program—hold it for about 2–3 seconds, then release. If your remote has multiple buttons, you can assign different garage doors to each button by repeating the process for each.
- Step 3: Wait for the garage opener’s LED to blink or you might hear a click—that’s your signal the code has been accepted. If you see no response, try again, making sure you’re within that 30-second window.
- Step 4: Test your remote by pressing the programmed button to ensure the garage door moves as expected.
If nothing happens, don’t panic. It might mean you pressed the “Learn” button too long, waited too long between steps, or your remote battery is dead (happens more often than you’d think). Swap in a fresh battery and repeat the process if needed.
Troubleshooting Common Programming Problems
Here’s where things can get frustrating. You follow the steps, but your remote just won’t cooperate. Why? There are a few usual suspects when pairing a Liftmaster garage door remote without the manual.
First up, check your remote battery. If it’s weak or dead, the signal just won’t reach the opener. Swapping in a fresh battery is quick and often solves the problem. Next, consider your opener’s memory—if you’ve programmed and erased remotes a bunch of times, the system can get cluttered. In that case, hold the “Learn” button down for about six seconds until the LED goes off. This wipes all remotes from memory (handy if you suspect someone else has a rogue remote).
Obstructions matter, too. Metal shelves or thick walls between your opener and remote can block the signal. Test the sync process standing right under the opener for best results. Another quirky detail: if you have a newer “Security+ 2.0” rolling code remote, you can only program it to openers with compatible technology (usually made after 2011). Mixing old and new sometimes just won’t work.
If your remote still refuses to pair, check that you have the right model for your opener—or try a universal Liftmaster remote, which often supports both old and new systems. Sometimes, just switching remotes makes all the difference.
Resetting a Liftmaster Garage Door Remote
Let’s say you want a total do-over—maybe you moved into a new house and don’t trust that the old owners didn’t keep a spare remote. You can reset your Liftmaster opener and clear out every paired remote in one go. This isn’t just for paranoia—it’s good security hygiene.
To reset, climb up to your opener and hold down the “Learn” button for about 6–10 seconds. You’ll see the LED light turn off. Once it’s out, you’ve wiped the opener’s brain. All remotes and wireless keypad codes are now gone. You’ll need to reprogram any remotes you actually want to keep (use the steps from earlier). It’s a bit tedious, but sometimes peace of mind is worth it.
If you have a universal remote, reset it by removing the battery, pressing all the buttons at once for a few seconds, and then reinstalling the battery. This clears any codes stored on the remote itself but doesn’t erase memory from the opener—it just gives you a clean slate to start pairing again.
Programming Universal vs. Liftmaster Brand Remotes
You might have grabbed an off-the-shelf universal remote instead of an official Liftmaster one—maybe yours broke, or you just wanted a backup. Good news: most universal remotes can sync with Liftmaster openers, but there are still a couple of quirks compared to the official brand.
Universal remotes sometimes need an extra step or two, like entering a code or toggling a frequency switch inside the remote before pairing. Always check the included instructions, but usually, the “Learn” button sequence on the opener stays the same. If your garage door opener is very old (from the 90s or early 2000s), you may need to match the DIP switches on the remote to a pattern inside your opener—think old-school Nintendo cheat codes.
Authentic Liftmaster remotes, on the other hand, are purpose-built for your opener. The pairing process is almost always the “Learn” button method, and you get the extra peace of mind that your opener’s rolling code security works seamlessly. If you’re dealing with a universal remote, look for brands or models labeled as “Liftmaster compatible”—they’re designed to make pairing less of a guessing game.
When to Replace Your Remote Battery: Signs and Quick Fixes
It sounds obvious, but a weak or dead battery is the
Most Liftmaster remotes use a standard coin-cell battery, like CR2032 or CR2016. Popping open the back is easy—a small screwdriver or even your fingernail can do the trick. Just make sure to keep the battery facing the right way (usually marked inside the compartment). After swapping in a fresh battery, re-test the sync—many times, this alone solves those mysterious programming failures.
Always keep a spare remote battery handy, especially if you live in an area with cold winters—low temperatures drain batteries faster than you’d expect.
What To Do If You Can’t Program Your Liftmaster Remote
Let me explain—sometimes, despite your best efforts, the remote just won’t pair. Maybe the opener is too old, the memory is full, or there’s a technical issue inside the unit. Here’s what you can try next.
- Try another remote: If you have a spare, see if that one syncs. If two different remotes fail, the problem might be your opener, not the remote.
- Check for interference: Electronics near the opener—like Wi-Fi routers or LED lights—sometimes mess with signal pairing. Move them away while programming.
- Look up your opener’s model number: Sometimes, certain models have unique reset or pairing steps. Jot down the model and search for a free online manual or Liftmaster’s support site.
- Contact a pro: If all else fails, a local garage door technician can program remotes in minutes. It might cost a little, but it saves you the headache and helps if your opener has special quirks.
You’re not alone in struggling with this. Even tech-savvy folks get tripped up by these remotes—so don’t feel bad if you need a bit of help.
Bringing It All Together: Easy Programming Without the Manual
Programming a Liftmaster garage door remote without the manual isn’t some dark art. It’s just knowing where to look (that sneaky “Learn” button), what steps to follow, and when a fresh battery or a soft reset might solve your pairing frustrations. Whether you’re holding an old-school single-button remote or a shiny universal model, the core process is the same—put the opener in pairing mode and teach it to recognize your remote’s code.
Honestly, once you figure it out, you’ll wonder why you ever bothered searching for the manual in the first place. Just keep this process in mind for next time (or jot it down and tape it inside your garage!) so you’re never caught scrambling again. Happy syncing, and enjoy the sweet relief of a garage door that listens to you—and not just your neighbor with the same remote.