
Think of your Liftmaster garage remote and opener like two friends who only speak in secret handshakes. When the handshake (programming code) gets lost, the door stops listening. For folks new to this, the process might sound like something only a tech wizard could unravel. But honestly, once you know what to look for, it clicks into place surprisingly well.
The Liftmaster brand is everywhere—those familiar black or gray remotes with a slidey cover, usually hiding in your car’s cupholder. Most people want to sync (or reprogram) their Liftmaster garage remote after replacing it, swapping batteries, or moving into a new house. But that mystery “programming code” almost always trips people up the first time. Let me explain how to find it, why it matters, and how to avoid getting locked out—or worse, locked in!
Understanding Liftmaster Garage Remote Codes
Here’s the thing: Liftmaster doesn’t use one universal “code” like you’d use a PIN on your phone. The term “programming code” usually refers to the unique wireless signal or “handshake” between your remote and the opener’s logic board. Earlier Liftmaster openers (think pre-1990s) used DIP switches—tiny white toggles inside the remote and opener—to set a matching code manually. If your remote looks ancient and has a battery cover hiding little switches, you’re in the DIP switch era.
Newer Liftmaster models use rolling code technology, also called “Security+” or “Security+ 2.0.” Instead of one constant code, the remote and opener change codes every time you press the button. It’s like a secret handshake that always changes, making it much harder for anyone to eavesdrop or hack. So, if you’re searching for a static “programming code,” it helps to first figure out whether your Liftmaster system is old-school DIP switch or rolling code.
The process you follow—resetting, pairing, or syncing—depends on your opener’s age and technology. Most people discover this when a new remote won’t work, or when you’re desperately swapping batteries and nothing changes. If you’re not sure how old your opener is, check the back panel for a model number and search online. Otherwise, let’s break down how to spot the difference and move forward.
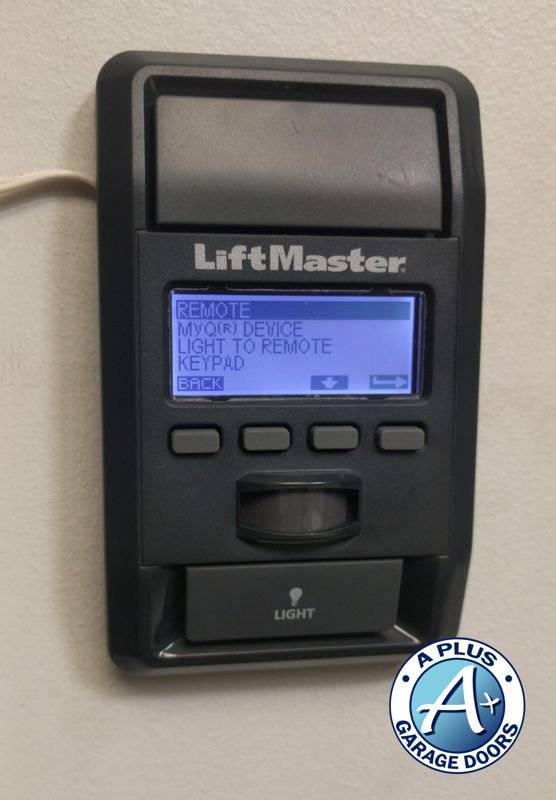
Locating the Learn Button on Your Liftmaster Opener
To sync a modern Liftmaster garage remote, you’ll need to find the Learn button on the opener unit itself. This is where all the magic happens. Picture this: you’re balancing on a wobbly ladder, looking up at a contraption bolted to the ceiling. That’s your garage door opener. The Learn button is usually a small, colored button—often yellow, orange, green, or purple—somewhere near the antenna wire.
You might be wondering, “Why does the color matter?” The color tells you what kind of system you’re working with (and what type of remote is compatible). For example, yellow usually means Security+ 2.0, while purple indicates older Security+.
- Unplug a work light so you can see the opener’s back or side panel.
- Look for a flip-down or snap-off light lens cover near where the wires connect.
- Once you spot the colored button, avoid pressing it randomly. That can erase all programmed remotes if you hold it too long.
Sometimes the Learn button is labeled, but other times it just sits there, quiet and mysterious. If you can’t spot it after a few minutes (or your opener is buried in insulation), check the model number. A quick search can show you an image of what your Learn button should look like.
Pro tip: Always keep the garage door closed while programming. You don’t want it opening or closing by surprise—especially if pets or kids are around.
Programming a Liftmaster Remote with Rolling Code
Once you’ve found the Learn button, it’s time to pair your new or reset remote. This step works for most Liftmaster rolling code models made after the late ’90s.
- Press and release the Learn button on the opener (don’t hold it down—one quick press is enough).
- Within 30 seconds, press and hold the button on your remote you want to program.
- Wait for the garage door opener light to blink (or for a click sound). That’s the sign the handshake was successful.
It’s a bit like teaching a dog a new trick—you press, the remote responds, and suddenly they understand each other. If you wait too long between steps, the opener “forgets” to listen. You might have to try a couple of times, but patience is your friend here.
Some remotes have more than one button. You can repeat the steps above for different doors or functions. And if you have a keyless entry keypad, there’s usually a slightly different programming sequence in the manual. Don’t worry if things don’t work on the first try—most people have to run through the steps a few times, especially if the battery is weak or the remote is finicky.
If your remote still refuses to pair, double-check the model compatibility and look for any sticker residue or dust blocking the battery contacts. Sometimes it’s the little things.
Programming a Liftmaster Remote with DIP Switches
Older Liftmaster remotes, those made before rolling code tech became standard, use DIP switches. Here, “find the code” means opening up both your remote and opener unit to compare the switches. Each small switch can be set to ON or OFF, creating dozens of possible code combinations.
Here’s the step-by-step for DIP switch models:
- Pop open the battery compartment on your remote. You’ll see a row of 8–12 tiny switches.
- Climb up to your opener and remove the light cover. You should see a similar row of switches somewhere on the circuit board.
- Use a small flathead screwdriver or a pen to match each switch to the exact same pattern as the opener. Every ON and OFF must match perfectly.
- Pop the battery cover back on, and give the remote a try.
If even one switch is flipped wrong, the opener won’t recognize the signal. This system is less secure than modern rolling code, but it gets the job done if you have an older house or inherited an old opener. Still, if you’re worried about someone else having a matching code, consider upgrading for peace of mind.
Note: If you lose or misplace your DIP switch remote, you’ll need to buy a compatible model—universal remotes often work, but they still require matching the switches manually.
Common Liftmaster Remote Problems and Troubleshooting
Let’s say you’ve followed all the steps above and your Liftmaster remote still isn’t working. Time to put on your detective hat. Most issues with garage remotes boil down to a few culprit categories: battery problems, interference, distance, or a mis-programmed code.
First, check the battery. Even a brand-new remote can ship with a weak cell. Swapping the battery is often a five-minute fix. If your opener works better close up but not from the end of the driveway, the problem is almost definitely the battery.
Second, watch out for signal interference. Nearby Wi-Fi routers, LED bulbs, or even your neighbor’s opener can mess with the rolling code signal. If the opener suddenly stops responding after you install new electronics, interference might be to blame.
Next, check that you aren’t out of range. Some Liftmaster garage openers have a limited signal radius—especially if you have brick walls or lots of metal in the garage.
Finally, if you’ve recently pressed and held the Learn button (instead of a quick press), you might have accidentally erased all existing paired remotes. Yes—it happens to the best of us. Simply reprogram your remotes one at a time and the issue should resolve itself.
Still no luck? Sometimes the logic board in the opener goes bad or the remote itself is defective. At that point, replacement might be cheaper than endless troubleshooting.
Resetting Your Liftmaster Remote and Opener
There are times when you need to wipe the programming slate clean. For example, maybe you lost a remote, moved into a new home, or suspect unwanted access to your garage. Resetting is straightforward but permanent—so only do this when necessary.
- Hold down the Learn button for about six seconds. You’ll see the opener’s light blink, or sometimes hear a click.
- This will erase all stored remote codes from the opener. Every remote and keypad will need to be re-paired.
- After the reset, follow the programming steps above for each remote you have.
Don’t forget: if you erase the codes, you’ll need access to every remote you want to use. If you bought the house with remotes missing, this step is a good way to make sure nobody else has entry.
Tip: Keep your remotes labeled if you have multiple family members. Saves you a headache when you reprogram in the future.
Universal Garage Door Remotes vs. Liftmaster Remotes
You might be wondering if you really need a Liftmaster-branded remote, or if those cheaper “universal” remotes from the hardware store will do the job. Here’s my take: universal remotes can be a smart option, as long as they list Liftmaster compatibility on the package (or have online confirmation).
Universal remotes work by mimicking the code or pairing process of popular brands. For Security+ and DIP switch models, they almost always have a simple pairing sequence, usually involving pressing the Learn button as above. Some even let you copy signals from an existing working remote directly.
However, newer Security+ 2.0 systems sometimes require a specific Liftmaster remote or a universal remote that supports the latest rolling codes. If you pick the wrong kind, programming just won’t work—no matter how many times you press the buttons.
Bottom line: If you want less hassle, stick with a Liftmaster remote that specifically matches your opener’s age and technology. If you’re techy and enjoy saving a few bucks, a universal remote can do the trick—just check those fine-print details.
When To Call A Professional For Garage Remote Programming
Sometimes, all the YouTube videos and step-by-step guides in the world won’t fix your remote woes. If you’ve tried fresh batteries, programming, and resets—yet the garage is still ignoring you—it’s time to consider calling in a pro.
Garage door techs deal with these issues daily. They can tell at a glance if your opener needs a new logic board, if there’s interference in your garage, or if wiring has gone wonky. If your garage door opens randomly in the middle of the night, or if none of your remotes will sync, professional help can save you hours of frustration.
Honestly, safety matters too. If your opener is ancient, repairing it might not be worth the risk, especially if it lacks modern safety sensors. Professionals can recommend upgrades, handle the electrical side, and make sure nobody’s getting squished by a runaway door.
The best part? Once a pro sets up your remotes and opener, you’ll know the programming code is correct, and your garage will work seamlessly again—no more climbing ladders at midnight or cursing at tiny DIP switches in the dark.
Final Thoughts: Finding and Programming Liftmaster Garage Remotes
Fixing up a Liftmaster garage remote sometimes feels like chasing down a secret password in a video game. Whether you’re using an old DIP switch remote or a snazzy rolling code model, the heart of the process is simple: match the handshake, pair the device, and don’t forget your battery basics.
Trust your instincts: Take your time, check those model numbers, and use the Learn button with a light touch. Don’t let a stubborn remote convince you you’re out of your depth—it’s all just a series of tiny puzzles, each with a clear solution.
If all else fails, there’s no shame in calling a garage door pro or trying a universal remote as a backup. Most importantly, keep your opener secure and your family safe. With a little patience and a few button presses, that “secret handshake” will open the door to a smoother, less stressful garage experience.