Here’s the thing: figuring out how to *enter setup mode* on a Viewsonic projector remote is like learning the handshake at an exclusive club. At first it’s confusing, but soon it’ll be second nature. I promise, you don’t need a degree in rocket science—or even in “remote control logic”—to master this. The process is mostly about knowing which buttons to press, understanding what those mysterious blinks mean, and maybe, just maybe, swapping batteries once in a while. So, if you’re ready to finally make peace with your Viewsonic remote, let’s walk through it together, step by step.
Getting Familiar With Your Viewsonic Projector Remote
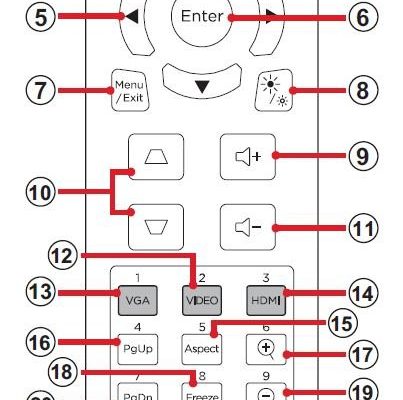
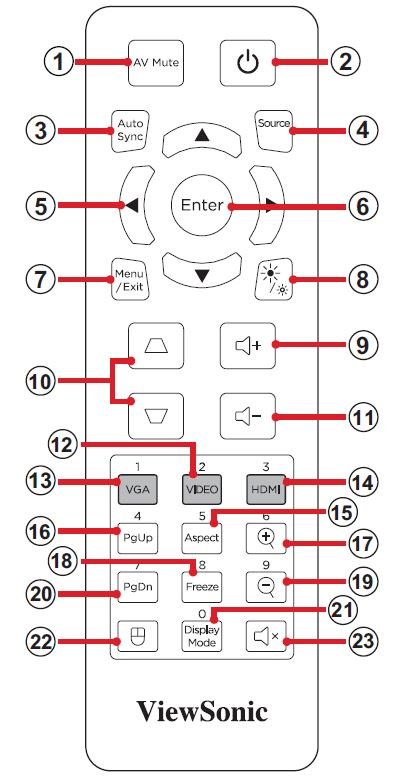
Before you even think about setup modes or secret codes, you’ve got to know your tools. The Viewsonic projector remote is usually small, thin, and covered with what feels like a hundred buttons. It’s not all that different from a normal TV remote—except there’s a bit more focus on projecting, syncing, and source selecting.
Most Viewsonic remotes feature a standard power button, directional arrows, and menu access. But, tucked away alongside those everyday controls, there might be dedicated buttons for *menu*, *setup*, or even a combination (like “Menu + Enter” at the same time). Knowing where these are saves you from wild button-mashing when time matters.
You might be wondering, “Does every Viewsonic remote look and behave exactly the same?” Not quite. Some are wide and chunky, others sleek and minimal—older models sometimes have more physical switches, while the latest remotes rely almost entirely on digital codes. If in doubt, check which series you own (it often says right on the back or under the battery cover). Honestly, just holding the remote and looking for unlabeled buttons or odd symbols can reveal a lot. It’s like hunting for Easter eggs… for grown-ups.
Why Entering Setup Mode Matters
So, why go through the trouble of getting into “setup mode” at all? Simple answer: it unlocks all the cool stuff your projector can do. Instead of being stuck at whatever settings your projector shipped with, setup mode lets you tweak picture quality, input sources, pairing, and more. Without setup mode, you’re basically using a sports car in first gear.
Here’s a real-life example: let’s say you want to connect your remote to a new projector—fresh out of the box. Or maybe you need to *reset* your remote because it stopped syncing with the main unit. In both of those situations, setup mode is your best friend. Without it, pairing fails, and your fancy device becomes a fancy paperweight.
Even better, setup mode can help you troubleshoot. If the projector suddenly ignores your remote, entering setup mode gives you a way to re-establish control—almost like rebooting a stubborn computer. Let me say it plainly: if you avoid setup mode, you’re missing out on the real power and customizability of your Viewsonic system.
How To Enter Setup Mode: Step-by-Step Walkthrough
Alright, time for the handshake. While there are a few remote variations out there, most Viewsonic projector remotes follow a similar logic for accessing setup mode. The process is fiddlier than, say, opening a bag of chips—but way more satisfying once you get it right.
- Check the Batteries: Let’s not overthink it—half of all “broken” remotes just need fresh batteries. Pop off the back cover and swap in a new set, making sure they face the right direction. If you skip this, you might chase problems that don’t exist.
- Locate the Setup or Menu Button: On most Viewsonic remotes, there’s a button labeled “Menu,” “Setup,” or even a gear symbol. Sometimes, you’ll need to hold this button for 3-5 seconds. You’ll usually see the projector screen change or a tiny LED blink to show you’re in setup mode.
- If All Else Fails, Try the Combo: Some remotes want you to press two buttons at once—like “Menu” and “Enter”. Hold both down, wait for a blinking light, and then release. It’s not always as dramatic as defusing a bomb, but the timing does matter!
- Watch for Visual Or LED Feedback: The projector will usually display a setup menu, or you’ll see a status LED on the remote or projector flash a few times. This is your sign that you’ve made it in. If nothing happens after 10 seconds, go back and try again (or swap those batteries, seriously).
If you’re lucky, you’ll be staring at the main setup menu in no time—where you can adjust everything from picture color to input source, or even pair a new remote entirely. If you’ve ever wondered why tech support always asks if you see any blinking lights, this is why.
Common Setup Mode Problems and How to Fix Them
Let’s be honest, things don’t always go as smoothly as instructions suggest. Sometimes, even after following steps perfectly, the remote and projector just refuse to “talk.” You press buttons, but nothing happens—or worse, the wrong thing happens.
- Remote Not Responding: First, double-check those batteries. It sounds repetitive, but even a slightly weak battery can cause weird behavior. If fresh batteries don’t help, make sure there’s a clear line of sight between the remote and the projector’s IR sensor—books, fingers, or a glass of water in the way can stop the connection.
- Projector Not Entering Setup: Sometimes, the projector might be locked (for example, if it’s been used in a school or office). If you see a lock icon or password prompt, you may need to reset the projector entirely. This usually means holding down the power button for 10 seconds or unplugging it for a minute—yes, that old “turn it off and on again” trick actually works.
- Remote Out Of Sync: If your remote controls the wrong projector (say, in a conference room with multiple units), entering setup mode lets you pair it to the correct device using a simple code displayed onscreen. Make sure you’re standing close to *your* projector, not the one next door.
Let me confess: I once spent 20 minutes trying to troubleshoot my remote, only to realize I’d been pointing it at my soundbar, not the projector. So, if you feel silly, don’t! Double-check your aim and setup—everyone’s done it.
Using Setup Mode to Pair or Sync a New Remote
Buying a replacement Viewsonic remote? Or maybe you grabbed a universal remote as a backup. Here’s the trick: *setup mode* is where you connect or “pair” your remote to the projector, so the two devices know to listen to each other and not the rest of the gadgets in your house.
- Enter Setup Mode on the Projector: Usually, you’ll need to use the onboard buttons to hop into settings if your old remote is broken. Once there, find the “Pair Remote” or “Remote Setup” option.
- Follow the Onscreen Code: Many projectors will display a code you need to enter on your new remote—think of it as a secret passphrase. Sometimes, you’ll just need to hold down the remote’s “Pair” button near the projector’s IR sensor until you see confirmation.
- Finish the Sync: Wait for the projector to confirm successful pairing. If there’s an error, try restarting both devices and watch for typos or missed steps in the process. Universal remotes may need a different code or manual setup, so double-check compatibility.
This step feels a bit like introducing two friends at a party—sometimes they hit it off right away, other times you need to nudge them together a few times before they click.
Troubleshooting Battery and Signal Issues
Not gonna lie, most remote problems boil down to battery drama or signal jams. Setup mode can’t fix everything, but it can help you diagnose whether you’re looking at a quick fix or a deeper issue.
If your remote only works from certain angles or distances, that’s often a battery warning. Try swapping in a good quality pair—cheap batteries sometimes can’t keep up with the demands of modern remotes. Next, check the sensor on both the remote (usually a little window at the front) and the projector itself. Gunk, fingerprints, or scratches can block the infrared signal.
If you’re still seeing weird behavior—like lag, double clicks, or total silence—it might be worth resetting the remote itself. On many Viewsonic models, this means holding down “Power” and “Menu” together for a few seconds in setup mode, until the remote blinks rapidly. Don’t worry, this doesn’t erase your entire projector, just the remote’s memory.
It might sound silly, but I always give my remote a gentle tap against my palm when things get weird. No clue if it helps the circuit, but sometimes it helps *me* feel better.
Comparing Viewsonic Remotes With Universal Alternatives
Alright, here’s a little reality check: sometimes, the original remote just disappears into furniture limbo. In that case, a universal remote comes to the rescue. But how do they match up, especially when it comes to entering setup mode?
Original Viewsonic remotes are made to pair seamlessly, often with just a button combo and a quick setup code. Their buttons are labeled for projector-specific features, like input switching or keystone correction. Entering setup mode is usually a direct affair: press-and-hold, blink, done.
Universal remotes, on the other hand, require a few extra hoops. You’ll need to enter a setup code—sometimes several times—until you find the perfect match for your projector. Not all features are guaranteed to work, especially special buttons. But if you’re patient and the original is truly lost, a universal remote running the right code can save the day.
My advice? If you’ve still got the original remote, use it for setup mode and tricky functions. Keep a universal as backup, just in case your main one vanishes the night before a big meeting.
Resetting Your Viewsonic Remote If Setup Mode Fails
Every now and then, nothing seems to work. Maybe the remote got dropped one too many times, or a glitch in the system just won’t clear. Here’s where a full reset can help. It’s the digital version of unplugging and replugging—old school, but weirdly effective.
For most Viewsonic projector remotes, the reset process is simple:
- Take out the batteries and wait at least 60 seconds. This fully discharges the remote’s memory.
- Reinsert the batteries, then immediately enter setup mode using your preferred button combo (“Menu,” “Setup,” or “Menu + Enter”).
- If the remote blinks rapidly or the projector shows a reset message, you’ve done it right. Sometimes, you’ll need to re-pair the remote after a reset.
Quick tip: If your remote asks for a code after reset, check the manual or the projector’s onscreen instructions. Don’t worry, you can’t “break” anything as long as you follow the prompts—worst case, you’ll just need to try the process again.
The Last Word: Making Setup Mode Work For You
Setting up a Viewsonic projector remote can feel intimidating at first, but it gets easier the more you do it. Once you’ve successfully entered setup mode, paired your remote, and maybe even tackled a reset, you start to realize it’s not about being a tech expert—it’s about patience, curiosity, and sometimes a little trial and error.
If you ever get stuck, remember: swap the batteries, check your aim, and don’t be afraid to start over. Most problems aren’t as mysterious as they seem, and setup mode is your toolkit for fixing everything from signal hiccups to full-on remote meltdowns. And hey, next time someone at work has remote troubles, you’ll be the expert—coffee in one hand, remote in the other, explaining it all like it’s no big deal.
So, next time your Viewsonic projector gives you the silent treatment, just breathe, channel your inner “remote whisperer,” and walk through setup mode with confidence. Your next movie night, classroom lesson, or big meeting is only a few button presses away.