So here’s the thing: learning to enter setup mode on a Philips universal remote isn’t rocket science, but it does help to have a friendly guide. Maybe you just replaced the batteries or bought a shiny new TV, and now the remote doesn’t seem to recognize anything in your living room. Or maybe you’re helping your grandma, and you both want to watch your favorite sitcom—*if only* the remote would play along. Let me explain exactly how this works, step by step, so you never have to feel lost in a sea of buttons again.
What Is Setup Mode and Why Does It Matter?
Let’s start from scratch. Setup mode on a Philips universal remote is kind of like opening your computer’s control panel. It’s where you tell the remote, “Hey, here’s what you need to control.” Without actually entering setup mode, your remote just sits there—powerful, but a bit clueless. Setup mode is basically the brain behind the magic, allowing you to program the remote to work with different devices like your TV, DVD player, or even old-school VCRs (if you’ve still got one hiding somewhere).
Think of setup mode as the moment where you teach your remote how to speak to your devices. You’re syncing it up using codes—special numbers assigned to each brand and type of device. Without this step, pressing “power” or “volume up” is like shouting across a canyon. But once you enter setup mode and program the right code, it’s more like having a direct walkie-talkie connection.
You might be wondering, “Can’t I just use the remote out of the box?” Sometimes, yes, if you’re very lucky or buy a new TV that magically matches the default code. But 99% of the time, you’ll need to enter setup mode, especially if you’re pairing a Philips remote with devices from other brands. Setup mode is the only way to truly unlock all those features you bought the remote for—otherwise, it’s just an extra piece of plastic on your coffee table.
Identifying Your Philips Universal Remote
First things first: not all Philips remotes look the same. There are a few styles floating around, and knowing which one you have can save you a headache. Most Philips universal remotes have model numbers printed on the back or hidden inside the battery compartment. It’s usually something like “CL035A” or “SRP2024.” Go ahead and flip your remote over, maybe pop off that battery cover, and check for a little white sticker with some numbers and letters.
Why does this matter? Well, some remotes have a dedicated “Setup” button, while others blend the setup feature into the device buttons (like TV, DVD, or AUX). Honestly, it’s a little like cars—some have push-button ignition, others need a key. Looking up your specific model online can help you find the right instructions and the right codes for programming.
If you’re shopping for a new universal remote, keep in mind that Philips makes several types. The basic ones let you control two or three devices; fancier ones can handle up to eight or more. The programming steps are similar, but knowing your model helps when troubleshooting or when searching for the device codes online. Trust me, that little bit of detective work will make the whole setup process so much smoother.
Preparing to Enter Setup Mode: Batteries and Buttons
Before you rush into pressing setup buttons, let’s slow down and check a couple of basics. I know, it sounds obvious, but weak or dead batteries are the number one culprit behind remote-control headaches. Grab some fresh AA or AAA batteries (whichever your remote takes), open the battery compartment, and pop them in. That satisfying little click? Music to the ears. If the remote has been lying around in a drawer, a quick battery swap can save you from a ton of head-scratching later.
Next, clear a little space on your couch or table—you’ll need to see both the remote and the device you’re syncing (like your TV). If you have the manual, keep it handy, but don’t sweat it if it’s missing. Most Philips universal remotes follow a similar process, and the codes can be easily found online with your model number.
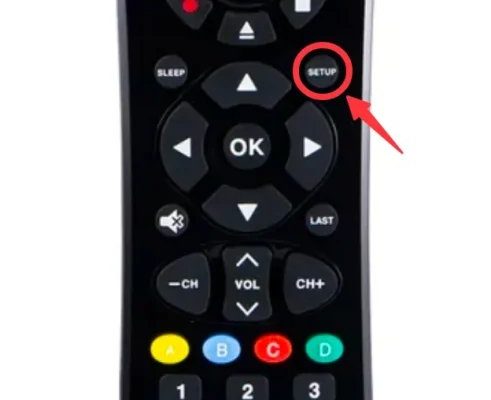
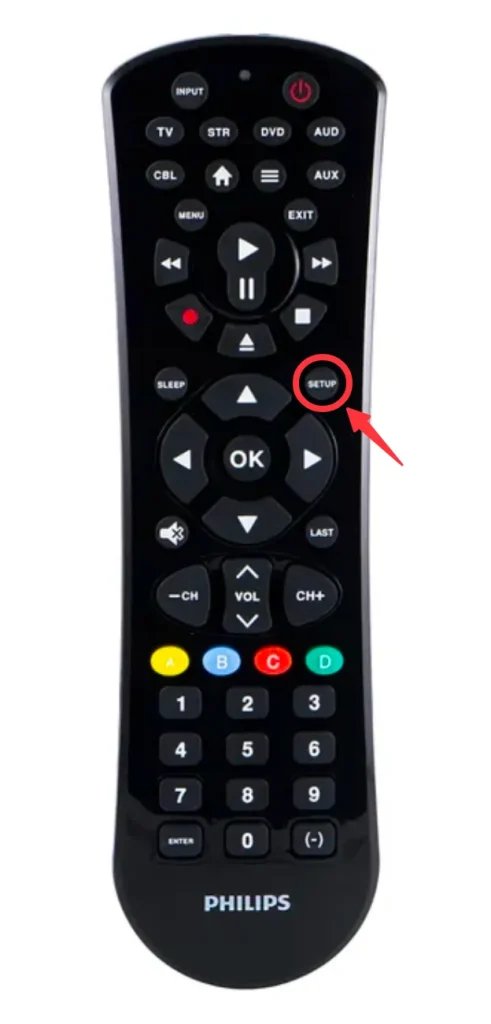
Now, locate the “Setup” button (sometimes labeled “Code Search” or even just a little red button). On some remotes, you’ll need to hold down a device button (like TV or DVD) instead. If your remote has rubbery, squishy keys, press gently but firmly to avoid any accidental button jams. The goal here is to get the remote’s little brain ready to accept the next command—entering setup mode.
Step-By-Step: How To Enter Setup Mode On Philips Universal Remotes
Alright, moment of truth. Here’s the classic way most Philips universal remotes enter setup mode:
- Press and hold the “Setup” button until the indicator light (usually at the top of the remote) stays on. Sometimes it blinks first, then glows steady. That steady light means you’re officially in setup mode.
- If you don’t see a “Setup” button, try holding down the device button you want to program (like “TV” or “AUX”) for about 5-10 seconds until the light turns on.
- Once the light is on, it’s ready for a code. Enter the code for your device using the number buttons. The indicator light should blink or turn off after you type in the last digit—that’s your signal it worked.
- If the light flashes repeatedly or stays on, double-check the code and try again. Sometimes a wrong code just means pressing “Setup” again to restart.
Here’s a little storytelling moment: I once tried programming my old Philips remote for a TV in a vacation rental. The light wouldn’t stay on and I nearly gave up. Turned out the batteries were loose. Lesson learned—always check those contacts!
The process might feel a bit robotic at first, but once you see that steady indicator light, you’ll know you’re on the right track. If your model does things differently, like using “Code Search” instead of “Setup,” the steps are very similar—so don’t stress.
Finding and Entering the Right Code
So you’ve got setup mode activated—now what? You need the secret code that tells your Philips remote how to “talk” to your device. Each TV, DVD, or streaming box has its own code, kind of like having a unique phone number. If you don’t have the little code booklet, don’t panic. Just search online for “Philips universal remote codes” with your model number and device brand. Most lists are organized by brand, so scroll until you find yours.
Sometimes you’ll see a list of 3-digit, 4-digit, or even 5-digit codes. Try the shortest first. Type each code slowly, pausing after each button press. If you’re lucky, the first one works. If not, keep trying the next code on the list for your brand. Think of it as playing a guessing game, but with better odds and far less frustration.
If you enter the correct code and the indicator light blinks off, that means pairing is successful. Test the remote—try turning the TV on and off, changing the volume, or hitting “Mute.” If buttons don’t work right, try a different code. Some brands have several codes, and sometimes only one gives you full control (power, volume, input, etc.). It’s a bit of trial and error, but once you hit the jackpot, you’ll feel like a remote-control wizard.
Troubleshooting: When Setup Mode Won’t Work
Here’s where things can get a little sticky. Sometimes, no matter how many times you press “Setup,” your Philips universal remote refuses to cooperate. Don’t worry—most issues have simple fixes.
- Batteries: Double-check that your batteries are fresh and installed correctly. Weak batteries cause the indicator light to flicker or not come on at all.
- Button Response: If buttons feel mushy or don’t “click,” they might be stuck. Gently wiggle them or tap around the keypad to loosen things up.
- Wrong Code: If you’re sure you’re in setup mode, but none of the codes work, make sure you’re using the right ones for your device brand and model. Cross-check online or try the “Code Search” process, where the remote automatically scans through codes (hold “Setup” and another key, then press “Power” repeatedly until your device turns on).
- Remote Reset: Still stuck? Many Philips remotes can be reset by removing the batteries and holding down the “Power” button for 10 seconds, then reinstalling the batteries. This clears out any old syncing errors and lets you start fresh.
Honestly, if you’ve tried everything and your remote still won’t enter setup mode, it might be time for a replacement. But nine times out of ten, a little patience (and a lot of code-trying) will get things working.
Universal vs Brand-Specific Remotes: What’s the Difference?
You might be asking yourself: “Why bother with a Philips universal remote when my TV came with its own?” Great question! Here’s the scoop. Universal remotes like Philips models are designed to control multiple devices—so if you’re juggling a TV, soundbar, streaming box, and maybe a DVD player (hey, I still use mine!), you can operate them all from one remote. It saves you from that classic “where did I put the other remote?” scramble.
Brand-specific remotes, meanwhile, only work with devices from the same company. That’s fine if you only use one brand. But most of us mix and match—Samsung TV, LG soundbar, maybe a Roku. In those cases, a universal remote just makes life simpler. Plus, Philips universal remotes are budget-friendly and easy to find at most big box stores or online.
Of course, universal remotes take a little setup work—specifically, entering setup mode and finding the right codes. But once you’ve done it, you get the satisfaction of using a single clicker for everything. If you ever lose the codes or change devices, just pop back into setup mode and reprogram it. It’s flexible, and honestly, kind of fun once you get the hang of it.
Tips for Keeping Your Philips Remote Running Smoothly
You’ve set up your Philips universal remote—so what now? Don’t just toss it on the couch and forget about it. Keeping it in good shape will save you time (and headaches) in the long run.
- Keep Batteries Fresh: Old batteries can leak and ruin the contacts. Swap them out every year, even if the remote seems fine. It’s one less thing to worry about when setup mode is acting up.
- Clean the Buttons: Remotes can get grimy, especially if you snack while binge-watching. A soft cloth and a dab of rubbing alcohol can keep those buttons responsive.
- Store Your Codes: After you find the right device code, write it on a sticky note or snap a photo. That way, if you need to re-sync or reset the remote later, you won’t have to dig through manuals or scroll through endless online lists again.
- Avoid Drops: I know, easier said than done, but dropping your remote can crack the circuit board or jam buttons. Try to keep it in one spot—maybe a remote caddy or basket on the coffee table.
You’ll thank yourself later when setup mode works perfectly the next time you move, replace a TV, or just need to reset things.
Wrapping It Up: Confidence With Your Philips Universal Remote
Learning how to enter setup mode on a Philips universal remote isn’t some secret only tech pros can figure out. Once you know what to look for—the right button, the steady indicator light, the correct code—it’s all pretty straightforward. Sure, there might be a little trial and error, and maybe a few moments when you question if that glowing light is mocking you. But most folks find that, with a little patience and a quick battery check, syncing their remote is actually pretty satisfying.
The real reward? When you finally control all your devices from that single, trusty Philips remote. No more hunting down three remotes or juggling button combos. Just you, your couch, and your favorite show—no tech stress required. If you ever need to re-enter setup mode or pair a new device, you’ll know the drill. And hey, maybe you’ll even be the one helping a friend or family member next time. Now, go grab some popcorn (and maybe a backup set of batteries), and enjoy that seamless home theater control!