The thing about Chamberlain garage remotes is, they’re everywhere. Those little rectangular gadgets have helped people enter and exit their homes with the click of a button for decades. But when you start having issues—remotes that won’t sync, codes that won’t pair, or you just want to be sure who has access—knowing how to clear all settings is pretty important. Don’t worry if you’re not super techy. We’ll walk through everything at a pace that feels more like a chat than a tech manual.
Understanding How Chamberlain Garage Remotes Store Codes
Let me explain what’s actually happening behind the scenes with your Chamberlain remote. Every time you pair a remote to your garage door opener, the system stores a unique code. It’s a bit like adding someone to a guest list—they get in until you tell the system otherwise. Over time, you might end up with a tangled guest list: old remotes, lost clickers, or codes from previous owners.
Here’s the thing: the codes aren’t stored in the remote itself, but inside the big opener box mounted to your garage ceiling. Your remote just sends a signal; the opener is what remembers who’s allowed in. So, clearing all settings means erasing the memory in the opener, not just the remote. This way, any remote that was programmed will no longer work—unless you add it again.
Why does this matter? Well, if you’ve got an old remote floating around (or you’re worried someone else might), clearing settings gives you peace of mind. It’s like changing the locks, but way less expensive.
Reasons To Clear All Settings On Your Chamberlain Garage Remote
Honestly, most people don’t think about resetting their garage remote—until something goes sideways. If your opener starts acting up, you find remotes that shouldn’t have access, or you just moved in, wiping everything is the cleanest fix.
Some common reasons people want to clear all codes and settings include:
- Security concerns, like lost or stolen remotes: if you aren’t sure who has access, it’s safest to wipe the slate clean.
- Remotes not syncing: sometimes, you try to pair a new remote and it won’t work. Clearing the opener’s memory can solve weird bugs or glitches.
- Moving into a new home: you have no idea how many remotes the previous owner gave out. Resetting everything guarantees you’re in control.
- Garage door acting oddly: maybe your remote opens the neighbor’s garage, or vice versa. Wiping all codes can fix accidental cross-programming.
No matter the reason, starting over is less mysterious than it sounds. It’s usually a single button you hold down, and a few minutes of your time.
Step-By-Step: How To Clear All Settings On Chamberlain Garage Remote
Here’s how you clear all settings—think of it as hitting the reset button for your garage’s memory. You’ll need a ladder or step-stool, since most openers are ceiling-mounted. Take it slow; no need to rush.
- Unplug the garage door opener (optional, for extra safety): This isn’t strictly necessary, but if you’re nervous around electricity, pull the plug. Otherwise, you can usually leave it powered on.
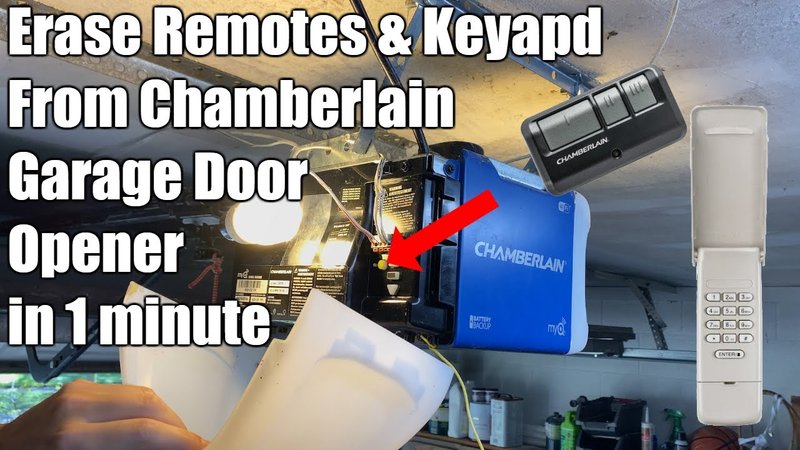
- Locate the “Learn” button: This is the key to the whole process. The “Learn” button is usually on the back or side of your garage opener unit (not the remote). It might be under a light cover. It’s small, and often colored yellow, red, green, or purple.
- Press and hold the “Learn” button: Hold it for about 6–10 seconds. You’ll usually see an LED light next to the button—a steady light means it’s in learn mode, but blinking or turning off completely means you’ve cleared the opener’s memory.
- Release the button: All paired remotes, keypads, and wireless accessories are now wiped. Nothing will open your garage until you program a remote again.
Here’s a tiny word of warning: some Chamberlain models are a bit particular. If your opener has a MyQ smart system, you might need to confirm the reset in the app, or repeat the steps. Always check your specific model’s manual if things look different.
Pro tip: Clearing the opener’s memory erases all paired devices—not just remotes, but also wireless keypads and vehicle HomeLink buttons. Make sure you’re ready to pair everything again!
How To Re-Pair Your Chamberlain Remote After Clearing
After you clear all settings, your garage door opener is basically a blank canvas. Nothing’s connected, so it won’t respond to any remotes until you pair them again. This part is honestly super easy.
Here’s how to pair your Chamberlain remote back to the opener:
- Press the “Learn” button once (don’t hold it this time). The LED light should turn on or blink to show it’s in pairing mode.
- Within 30 seconds, press the button on your remote that you want to use for the garage door. You should see the opener’s lights blink, or hear a click. That means the remote and opener are now synced.
- Test the remote. If the door opens or closes, you’re set! If not, try the steps again or replace the remote’s battery—sometimes they’re finicky.
Need to add more remotes, or a wireless keypad? Just repeat the process. Each accessory gets added one by one.
Quick story: Last year, I cleared and re-paired my own Chamberlain system after a remote went missing. I thought it’d be a huge chore, but the whole thing took less than ten minutes. No drama, just a little patience and a steady ladder.
Troubleshooting: What If Clearing Doesn’t Work?
You might be wondering, “What if I hold the button and nothing happens? Or the opener acts weird?” Honestly, Chamberlain systems are sturdy, but even the best electronics have quirks. If the memory doesn’t clear, don’t panic.
Here’s what to check:
- Did you really find the right “Learn” button? Some openers have multiple buttons; only one is for memory resets. Look for a label, or check your manual.
- Are you holding it long enough? Sometimes you need a solid 10 seconds. If you release too quickly, it might only enter learn mode, not clear memory.
- Is your opener plugged in and working? Sounds obvious, but occasionally a tripped breaker or loose plug is to blame.
- Try unplugging it, then re-trying. Sometimes a power cycle helps stubborn electronics reset properly.
- Still stuck? Look up your opener’s model number. Some have odd quirks and might need a different process—or, very rarely, a service call.
A lot of people worry they’ll “break something” by resetting. The truth? Chamberlain designed their openers so you can always start over if you need to. There’s no risk of erasing anything you can’t fix later.
Comparing Chamberlain Remotes: Universal vs. Brand-Specific
Not all remotes are created equal. If you’re clearing the memory, you might wonder: can any remote be re-programmed? Here’s the backstory.
Chamberlain sells both brand-specific remotes (designed just for their openers) and universal remotes that work with many brands. Universal remotes can be handy if you like having fewer gadgets on your keychain. But they sometimes need an extra step or a code sequence to pair correctly.
- Brand remotes: These are usually plug-and-play. After a reset, they sync up without any drama.
- Universal remotes: You’ll need to set the right mode or code before pairing. The instructions are usually in the box, but they can be a bit fiddly. Not all universal remotes work with every Chamberlain model, especially older ones or smart openers with rolling code tech.
Bottom line: After a reset, always start by re-pairing the remote type you already have. If you’re buying new, check compatibility with your opener’s exact model number. It’s less about the brand name on the remote, and more about whether it speaks the right “language.”
When To Replace The Battery Or Remote Instead Of Resetting
Sometimes the remote isn’t the problem—it’s just the battery. Before you go through the full clearing/reset process, it’s worth checking the basics. If your Chamberlain remote works only sometimes, or only when you’re really close to the garage, swap in a fresh battery. Those coin-sized batteries (usually CR2032) are easy to find.
If a new battery doesn’t solve it, and the remote still refuses to pair—or buttons get stuck, or it looks battered—it might be time for a new remote. Remotes, like any gadget, have a lifespan. If yours is old (or you bought the house secondhand), replacement can be easier than endless troubleshooting.
Of course, if you’re dealing with odd garage door behavior beyond just the remote—like the door reversing, or moving erratically—resetting the opener can clear up glitches. But if the remote itself is physically damaged, no reset will fix that.
What Happens After You Clear Chamberlain Remote Settings?
So now you’ve hit the big reset, cleared all codes, and are ready to start fresh. What’s next? Well, your garage is secure—anyone who had an old remote now has a useless hunk of plastic. Only the remotes you re-pair will work.
Here’s what changes:
- All old remotes and keypads stop working. You’ll need to re-pair any devices you want to use.
- MyQ and smart device access may require re-linking through the Chamberlain app. If you use smart features, check your app for instructions.
- Fresh start for troubleshooting. Many garage door problems magically solve themselves after a full reset, from weird glitches to sync issues.
If you made it this far, you’ve done more than most homeowners ever will for their garage security (and peace of mind). It’s a simple process, but knowing exactly what’s happening—and why—makes a world of difference.
Wrapping Up: Why Clearing Your Chamberlain Garage Remote Is Worth It
Clearing all settings on your Chamberlain garage remote isn’t some secret handshake only the pros know. Really, it’s a built-in safety feature that anyone can use. Whether you lost a remote, moved into a new place, or just want a fresh start, the process is straightforward and quick.
Give yourself permission to take control of who gets in (and out) of your garage. With a ladder, a steady hand, and maybe a little patience, you’ll have your Chamberlain opener cleared and re-paired in no time. The next time you click that remote and the door glides open, you’ll know exactly who has access—and you won’t be second guessing a thing.