Here’s the thing: changing the remote frequency for your Hunter ceiling fan isn’t as scary or high-tech as it sounds. It’s basically like changing the channel on a walkie-talkie, so your fan stops picking up the wrong signals. Whether you just installed your fan or it’s suddenly acting buggy, understanding how to sync and reset the remote frequency is something every Hunter fan owner should know. It doesn’t matter if your remote is the classic dip switch style or a newer, code-paired type—once you get the hang of it, fiddling with frequencies feels a lot less mysterious.
Most Hunter ceiling fan remotes use either little switches inside (called dip switches) or a digital pairing process to “talk” to your fan. Don’t worry, you don’t need to be an electrician. Grab a small screwdriver and a cup of patience, and you’ll get your remote and fan back in sync in no time.
Understanding How Hunter Ceiling Fan Remote Frequencies Work
Let me explain why this even matters. A Hunter ceiling fan remote uses radio frequencies to send instructions—think of it like a secret handshake between your remote and the fan receiver. Each handshake (or frequency code) should be unique, but sometimes, two remotes end up with the same code. That’s when the mix-ups begin: your fan might respond to someone else’s remote, or vice versa.
Most Hunter remotes use a set of small dip switches inside the battery compartment. These tiny switches can be flipped up or down to create a unique combination—kind of like a secret PIN. Older models almost always have these. Newer remotes might use a “learn” button instead, letting the remote and receiver pair up digitally.
You might be wondering: why not just have one code for every fan? Well, imagine if every remote in your apartment building used the same frequency. Chaos! That’s why Hunter gives you a way to customize the frequency, so your fan listens to only your commands. If you ever notice odd behavior—like your fan responding to the wrong remote—or just want to avoid potential interference, it’s good practice to set a new code from day one.
Identifying Your Hunter Remote Type: Dip Switch vs Digital Pairing
Before you start changing anything, you need to know which kind of Hunter remote you have. Honestly, this is the step that trips up most folks. The two main types are:
- Dip Switch Remotes: These are the “old school” style. Pop open the battery cover, and you’ll see a tiny row of slider switches. Usually, there are four or five, sometimes even more. Each one can be up or down, giving you dozens of possible combinations.
- Digital Pairing Remotes: These are newer and a little more high-tech. Instead of switches, there’s usually a “learn” or “sync” button inside the remote or on the fan’s receiver unit itself.
If you’re not sure, just open the back of your remote. No switches? It’s probably digital. Seeing tiny switches? Dip switch style. Don’t overthink it—Hunter remotes are built simply so users can make changes themselves. If you still can’t tell, check your fan’s manual or model number (usually on a sticker inside the battery compartment or on the fan canopy).
Understanding which remote you have is key, because the steps to reset or change the remote frequency are different for each type. You don’t want to be searching for a “learn” button if your remote is happily hiding four dip switches.
Step-By-Step: How To Change Frequency on a Hunter Dip Switch Remote
Ready to get hands-on? Here’s exactly how to change the frequency code if your Hunter remote uses dip switches. Think of it like setting a new combination lock on a suitcase, except with zero risk of forgetting a password.
Step 1: Safety First! Turn off your fan’s power at the circuit breaker. Sure, you could just hit the wall switch, but cutting the breaker is safer since you’ll be poking around wires.
Step 2: Open Remote and Fan Receiver
- Remove the battery cover from your remote. Find the dip switches—usually four or five tiny toggles.
- Next, unscrew the fan canopy (the part closest to the ceiling) and carefully lower it to access the receiver. You’ll find another set of dip switches here.
Step 3: Set New Code
- Pick a new pattern for the dip switches. It doesn’t really matter what you choose, as long as both the remote and receiver match exactly. Make a note or snap a picture—trust me, you’ll thank yourself later.
- Flip the switches on both the remote and receiver to the new pattern.
Step 4: Put It Back Together
- Replace batteries, reattach the fan canopy, and restore power at the breaker.
Step 5: Test Your Fan
- Press any remote button. If the fan responds, you’re good to go. If not, double-check your switch pattern—one wrong dip and the code won’t match.
It’s that simple—no tools beyond a screwdriver and your own patience. The key is always making sure the code matches on both ends.
If your fan suddenly stops responding, don’t panic—just retrace your steps. Nine times out of ten, a mismatch or loose battery is to blame.
How To Pair a Hunter Ceiling Fan Remote With Digital Code or Sync Button
Let’s talk about the other half of Hunter’s remote lineup: those slick digital models with a “learn” or “sync” button. These remotes ditch the tiny switches in favor of an easier digital pairing process. If you’ve ever paired Bluetooth headphones, you’ll get the idea.
Step 1: Cut the Power
- Again, turn off the fan’s power at the breaker for safety.
Step 2: Prep the Remote
- Make sure your remote has fresh batteries. Weak batteries can interrupt the pairing process.
Step 3: Power Up and Press the Learn Button
- Restore power to the fan.
- Within 30 seconds, press and hold the “learn,” “pair,” or “sync” button (usually inside the remote or on the receiver in the fan canopy) until the fan blinks or beeps.
Step 4: Test the Connection
- Try the remote. If the fan responds to your commands, you’re done. If not, try the process again—sometimes timing is everything.
Honestly, digital remotes are fast and user-friendly, but you need to move quickly—if you miss that 30-second window, just restart from the top.
That’s it! Digital pairing is less fiddly than dip switches, but still relies on matching the “code” between your remote and fan receiver.
Troubleshooting Common Hunter Fan Remote Frequency Issues
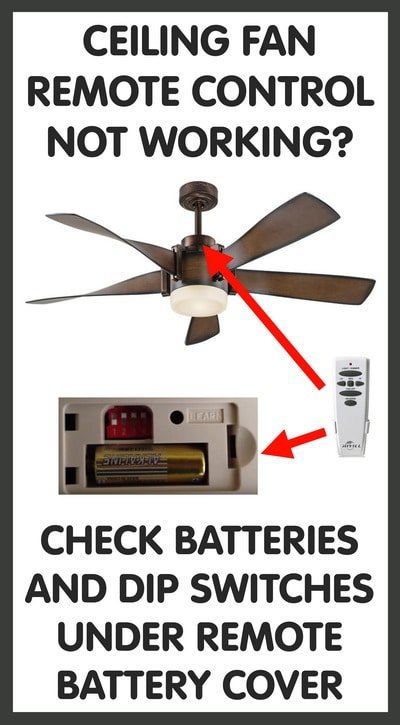
You might be wondering: what if your Hunter ceiling fan remote still isn’t working? Before you toss the remote in frustration (or worse, call for expensive service), check these common troubleshooting tips:
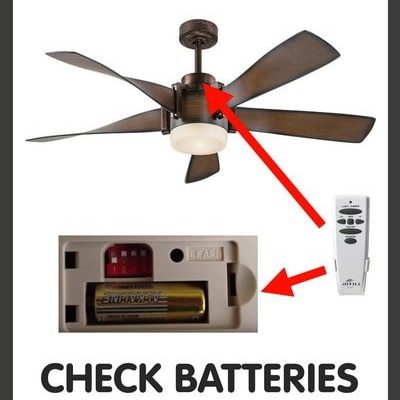
- Battery Problems: Old or weak batteries are often the culprit. Change them first before messing with the code.
- Code Mismatch: Double-check that both the remote and receiver have the exact same dip switch pattern, or that the digital code paired correctly.
- Range Issues: Some Hunter remotes only work within 20-30 feet. Obstructions or thick walls can cut this down even more.
- Interference: Wi-Fi routers, cordless phones, and even other remotes can cause signal issues. Changing frequency helps, but sometimes you’ll need to move devices around.
- Receiver Failure: Very rarely, the receiver inside the fan fails. If everything else checks out and your remote is working, you may need a replacement receiver.
If you’ve worked through everything and it’s still not syncing (pun intended), consider resetting both the remote and receiver. For dip switches, this means picking a totally new code. For digital remotes, try pairing again with the power cycle.
Don’t forget: patience is your best tool. Nearly every “broken” fan remote I’ve seen was actually a simple mismatch or battery hiccup.
Comparing Hunter Universal Remotes vs Original Brand Remotes
There’s a good chance you’re wondering if you can swap in a universal remote instead of dealing with Hunter’s codes and sync steps. Universal ceiling fan remotes look tempting, especially if you already lost the original. Here’s the honest rundown:
Original Hunter Remotes:
- Work seamlessly with Hunter fans—no compatibility drama.
- Follow Hunter’s frequency and pairing method, so you always know what to expect.
- Support full features (fan speed, light dimming, etc.).
Universal Remotes:
- Claim to work with almost all ceiling fans, including Hunter models.
- May lack some specialty functions (like dimming or reverse spin).
- Pairing process is similar: set dip switches or digital code to match the universal receiver.
Honestly, if you want a hassle-free experience, stick with the original Hunter remote meant for your fan model. Universal remotes are a good backup, but I’ve seen them cause confusion—especially around advanced features. If you go universal, always replace both the remote and receiver together, and set the matching code.
Why Changing The Hunter Ceiling Fan Remote Frequency Matters
You might be thinking, “Why bother changing the frequency at all?” Here’s the real-world answer: it’s about control, privacy, and sanity.
- Prevent Cross-Talk: If your neighbor uses a similar fan or remote, you might end up controlling each other’s fans. Not ideal.
- Troubleshooting Weird Behavior: Random fan starts, lights flickering, or inconsistent response usually means frequency issues.
- Adding Multiple Fans: If you have more than one Hunter fan in your home, assigning each a unique frequency prevents remote overlap.
- Security Concerns: It’s rare, but a unique code means less chance of someone else hijacking your fan or light controls.
Setting your own frequency code, whether with dip switches or digital pairing, puts you in the driver’s seat. And when something does go wrong, you’ll actually know how to fix it.
Step-By-Step Instructions: Resetting Hunter Ceiling Fan Remote Frequency
If your fan and remote get totally out of sync, it’s time for a frequency reset. This is the “hard reboot” when other fixes don’t work.
For Dip Switch Remotes:
- Turn off power at the breaker.
- Choose a brand new code (don’t reuse the old one).
- Set switches in both the remote and receiver to the new pattern.
- Reconnect everything and restore power.
- Test, and repeat if needed.
For Digital Remotes:
- Turn off power for 30 seconds.
- Turn power back on, and immediately press and hold the “learn” or “pair” button inside the remote or on the receiver.
- Wait for the fan to confirm (light blink, beep, etc).
- If it doesn’t work, try again—timing is everything here.
Think of resetting as a relationship “do-over”—you’re helping your devices forget the old code and learn a new one. It clears up lingering glitches and ensures both parts match.
Key Takeaways: Changing Your Hunter Fan Remote Frequency With Confidence
Syncing the frequency on a Hunter ceiling fan remote isn’t some dark art. Whether your remote uses old-school dip switches or a slick digital pairing process, the real challenge is matching up the “codes” on both the remote and the fan’s receiver. The rest is just patience and paying attention to detail.
If your Hunter fan starts acting possessed, responds to the wrong remote, or just won’t listen, nine times out of ten, changing or resetting the frequency solves it. Always double-check your model (dip switches versus digital), use fresh batteries, and match up the code—or hold the sync button—exactly as described. And if you ever get stuck, retrace your steps and breathe. You’ve got this.
Fixing your Hunter ceiling fan remote frequency is one of those little home tasks that seems intimidating until you’ve done it once. After that, it’s like riding a bike—or, more accurately, like turning on a fan with your own remote, just the way it should be.