Here’s the thing: most Samsung air conditioner remotes use standard AAA batteries, but the process to replace them feels fiddly if you’ve never done it. Maybe you’re worried about messing up the remote or even accidentally resetting your settings. Totally reasonable! It’s like opening a TV remote, except somehow scarier because it controls the one thing that keeps summer from turning miserable. Let me walk you through it in plain, un-scary language, so you’ll never have to sweat (pun intended) about replacing those batteries again.
Why Changing Remote Batteries Is Worth Doing Yourself
Honestly, changing the batteries in your Samsung AC remote is one of those little DIY jobs that pays back in convenience and peace of mind. When the remote stops working, most people panic or start searching for replacement codes or try resetting and pairing, thinking something’s broken. Nine times out of ten, it’s just the batteries—seriously, it’s almost always that basic.
Fixing it yourself means no waiting for someone else to troubleshoot or paying for unnecessary service. Plus, there’s a weird sense of accomplishment in getting your AC remote back online. It’s like rescuing a stranded friend. You grab some fresh AAA batteries, pop open the case, swap them out, and suddenly, the remote is back to its old self—ready to sync, code, and reset your AC to that perfect chilly temperature. No tech skills required, and you’ll save yourself a headache.
Changing the batteries is really the first thing you should try if your Samsung AC remote is on the fritz. It’s quick, safe, and almost impossible to get wrong once you know where to look.
Getting to Know Your Samsung AC Remote
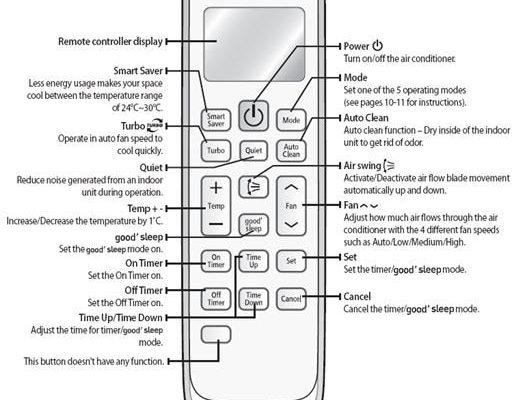
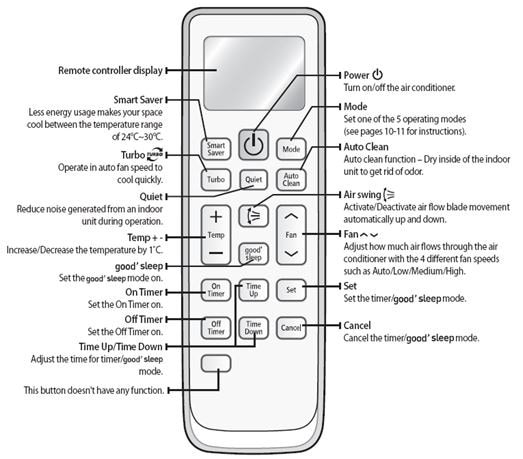
Let’s take a closer look at the star player here—your Samsung AC remote. Most models are slim, lightweight, and have a sliding or pop-off battery cover on the back. If you’ve got one in hand, flip it over and see what you’re working with. The good news? Nearly all Samsung air conditioner remotes share the same design language. So if you’ve changed batteries in a different remote before, you’re already halfway there.
Inside, you’ll usually find two AAA battery slots with tiny metal contacts. Some remotes have a little diagram showing which way the batteries should face (those plus and minus symbols are life-savers). Don’t worry about damaging anything: the plastic is tough, and it takes more than a curious thumb to break it. And if you’re using a universal remote that’s paired or synced to your Samsung AC, the battery change process is nearly identical, though the reset or pairing steps afterward might be a little different.
What You’ll Need to Change the Batteries
Let me break down what you need for this. Spoiler alert: it’s not much.
- Fresh AAA batteries — Always swap in a new pair, preferably the same brand and type for best results.
- Your Samsung AC remote — Whether it’s the original unit or a synced universal remote, the process is similar.
- A flat, well-lit surface — Trust me, you don’t want batteries rolling off into the void under your couch.
- Maybe a tissue — In case you find dust bunnies in the battery compartment (it happens!).
You don’t need any fancy tools or hidden tricks. If the battery cover feels stuck, use your thumb or a plastic tool (never anything metal) to pry it gently. Samsung made these things durable, so you usually won’t break anything with a little gentle persistence.
Step-by-Step: How to Change Batteries in Samsung AC Remote
Here’s where the magic (well, basic maintenance) happens. I’ll walk you through each step—no skipped details, I promise.
- Turn the remote over so the back faces up. You’ll see a small panel or cover at the bottom third.
- Slide or pop open the battery cover. This can feel stiff the first time, especially if it’s been a while. Just use your thumb and push gently downwards. If it’s a universal remote, check for a tiny latch or button you might need to press first.
- Remove the old batteries. They might slide right out, or you might have to tap the remote gently against your hand. If they’re corroded or stuck, use a tissue to ease them out—never use sharp metal objects, since you don’t want to damage the contacts.
- Check the battery symbols inside the compartment. You’ll see a little plus (+) and minus (–) sign for each slot. Match the new batteries accordingly. This is more important than you might think—reversing the batteries won’t work and could mess with the remote’s tiny code circuits.
- Slide the new batteries in, pressing lightly until they click into place. Make sure both are seated firmly.
- Replace the battery cover. It should snap or slide back without much effort. If it feels wobbly, take it off and try again—you might just need to realign it.
- Test the remote by pointing it at your AC and pressing the power or mode button. If everything lights up, you’re all set. If not, double-check the battery orientation or try a different set of batteries.
What If It Still Doesn’t Work? Troubleshooting Tips
You’ve swapped the batteries, but the remote still acts like a brick? Annoying, but don’t panic. Sometimes, AC remotes need a quick reset or fresh sync with the air conditioner to get their groove back. Here’s how I handle those curveballs:
- Reset the remote: Remove the batteries, press and hold any button for 5–10 seconds, then reinsert the batteries. This drains any lingering power and helps the code circuit reboot.
- Check the battery contacts: Are they dusty, corroded, or bent? Clean gently with a dry tissue or cotton swab. No liquids, please!
- Try another set of fresh batteries: Occasionally new batteries are duds or mismatched. If possible, use high-quality brands for longer life.
- Check the AC unit: Is it plugged in and working? If the remote still won’t sync, code, or pair, the issue might be on the AC’s side. Some models require you to press a reset button on the main unit. Refer to your user manual for pairing or resetting codes if you suspect the remote lost its connection.
- Consider a universal remote: If your Samsung remote is truly dead, you can pair a universal remote by following the instructions that come with it—most modern ones are easy to code or sync with just a few button presses.
Universal vs. Brand Remotes: Does It Matter For Changing Batteries?
You might be wondering, “What if I’m using a universal remote for my Samsung AC?” Great question! The process barely changes. Universal remotes (like those you can buy online or in electronics stores) use the same type of battery compartment—usually AAA or AA—and just as easily pop open. The main difference is after changing the batteries, you might need to re-sync or pair the universal remote with your AC by entering a code or following on-screen instructions.
Brand-specific remotes, like the one that comes with your Samsung AC, will keep their code and sync after a normal battery change, so you rarely have to worry about re-pairing or resetting. But with universals, it’s always smart to keep the pairing instructions handy. Either way, batteries are still the lifeblood, and changing them is a no-brainer once you know the trick.
If you ever lose your original Samsung AC remote, a universal is a solid backup—just double-check that it supports Samsung codes before buying.
How Long Do The Batteries Last (And When Should You Replace Them)?
Right, let’s talk timing. How often should you even think about swapping batteries in your Samsung AC remote? In my experience, and what most manufacturers say, a pair of fresh AAA batteries can last anywhere from six months to a year, depending on how much you use the remote. If you’re like me and love cycling through every cooling mode before picking one, you’ll go through batteries a bit faster. If you only use the remote twice a day, you can probably stretch them out for months.
But here’s the trick: don’t wait until the remote totally dies. Signs the batteries are dying include:
- Laggy or slow response from your AC when you press buttons
- The display on the remote dims or goes blank for a second before coming back
- You have to press harder or closer to the unit for it to work
- It randomly loses sync or needs to be reset more often
When in doubt, just swap them out. Fresh batteries mean fewer headaches—simple as that.
Storing Your Remote and Batteries—Best Practices
Here’s a little wisdom I learned after losing a remote to a leaky battery (RIP, old friend): how and where you store both your remote and your spare batteries really matters. Don’t just toss the remote onto the nearest windowsill, where the sun will bake it all summer. Likewise, don’t leave batteries loose in a drawer where metal items can short them out.
- Keep the remote somewhere cool, dry, and easy to find—like a coffee table drawer or a wall-mounted remote holder. This avoids accidental falls and keeps dust out of the buttons.
- Store spare batteries in their original packaging until you need them. This keeps them fresh and prevents them from discharging by accident.
- If you won’t use the remote for a season (say, for the winter), take the batteries out and store them separately. This stops leaks and keeps the remote working like new when you need it again.
When to Replace the Remote Instead of the Batteries
If you’ve faithfully tried every trick in the book—fresh batteries, resets, cleaning, even a universal remote—and your Samsung AC remote still refuses to work, you might have a bigger problem. Sometimes the internal circuits fail, or the remote gets dropped one too many times. Frustrating, I know.
When that happens, replacing the remote is the next logical option. You can order a genuine Samsung remote (which usually pairs instantly) or buy a universal remote that supports Samsung code and sync. If you’re handy, reprogramming or pairing a universal might be a fun little side project. Otherwise, just make sure the new device is compatible, and follow the simple instructions to set it up.
Pro tip: Keep the old remote (minus batteries) for a few weeks, just in case you find the issue and can bring it back to life.
Wrapping Up: Don’t Fear the Battery Change
Changing batteries in a Samsung AC remote really is a small but mighty fix. No need to call support or stress out over troubleshooting—most problems start (and end) with those little AAA batteries. Now you know how to open the remote, check the polarity, replace the batteries, and troubleshoot any post-swap weirdness. Next time your remote isn’t responding, you’ll have the confidence (and know-how) to sort it yourself. Sometimes, it’s the easiest fixes that save the day—kind of like finding your lost keys in the fridge. Stay cool, and keep your remote happy!