Let me break it down like I’m showing a friend how to get their smart remote and phone speaking the same language. No robotics, no code wizardry, just clear steps and a little patience. The goal is simple: get that **Nest smart remote** up and running within your mobile app, so you’re spending less time fiddling with buttons and more time in full control—literally.
Understanding The Nest Smart Remote And Its App Features
Before we get into pairing, it helps to know what makes the **Nest smart remote** tick. This isn’t just your average plastic wand; it’s a bridge between your smartphone and all the compatible Google Nest devices around your home. Think of it as the remote that can learn, adapt, and even sync with other devices.
The real magic starts when you connect this remote to the **Google Home mobile app**. That’s your digital dashboard, letting you rename devices, create routines, and—my favorite—update settings from anywhere. With the app, you can even check battery levels or reset the remote if something goes wonky.
Here’s the thing: while universal remotes can control lots of brands, the Nest smart remote is like a VIP pass for Nest and Google Home products. It’s not trying to juggle everything in your house, but what it does, it does well. That focus is what makes the pairing process and the app experience far simpler, even for absolute beginners.
Getting Your Phone And Nest Remote Ready
You might be tempted to jump straight into the pairing, but trust me, double-checking a few basics saves a lot of “why won’t this work?” headaches. First off, make sure your smartphone is running the latest version of the **Google Home app**. Updates add features, squash bugs, and can smooth out the syncing process.
Now, grab your **Nest smart remote**. If you just took it out of the box, remove any plastic tabs covering the battery. An old or low battery can throw a wrench into the pairing dance—so if your remote feels dead or unresponsive, try a fresh battery. It’s amazing how often that fixes things.
Pro tip: Put your phone and the remote close together during setup—think coffee cup distance, not across the room. Bluetooth pairing relies on proximity. And if you’ve got other Google devices nearby, unplug them for a minute so there’s no confusion during syncing.
Opening The Google Home App And Starting Setup
Ready for the main event? Open up the **Google Home app** on your Android or iPhone. If you’ve never used it, you’ll need to sign in with your Google account—the same one linked to any other Nest or Google Home devices you already own. Honestly, that’s usually the trickiest part if you’ve got multiple accounts.
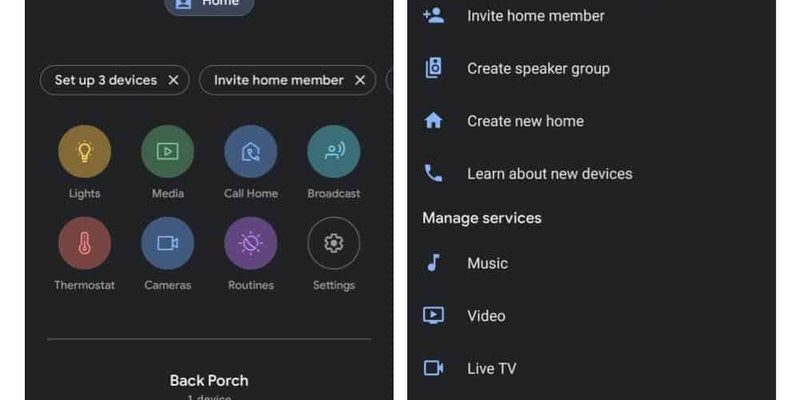
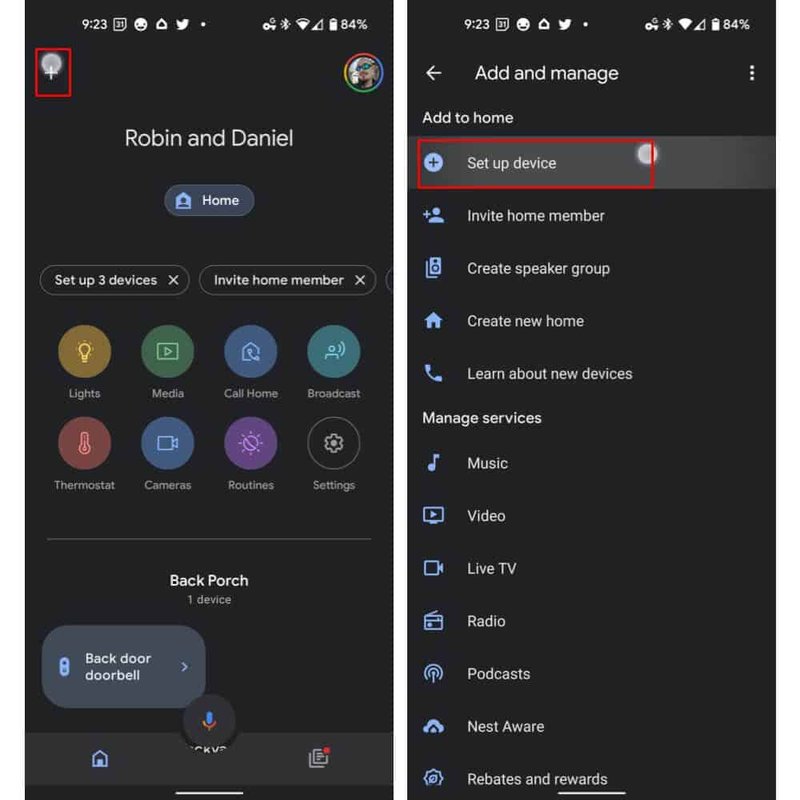
Look for the plus (+) icon, often at the top left of the screen. This is where you add a new device. Tap it, and you’ll see an option for “Set up device.” Choose “New device,” then select the home or location if the app asks.
You might be wondering why the app cares about location. Here’s why: It helps Google Home organize and control your gadgets room-by-room, which is useful if you want to create routines (like turning off everything in the living room at bedtime). Once you’re in the right spot, the app will start scanning for nearby devices in pairing mode.
Putting The Nest Smart Remote Into Pairing Mode
Here’s where the process gets a little hands-on. To connect, your **Nest smart remote** needs to be discoverable—think of it as raising its hand to say, “I’m here!” Usually, you do this by holding down the main button on the remote until you see a blinking LED light. This is a universal language for “ready to pair” in the world of smart gadgets.
Keep holding the button for about five seconds, or until the light starts flashing. If nothing happens, double-check that battery again. Sometimes, a quick battery reset (remove, wait 10 seconds, replace) helps. If you’ve tried everything and the light won’t go on, it could be a faulty remote—it happens, though rarely.
Once the remote is blinking, your phone should spot it in the app’s scanning screen. It’ll show up as “Nest Remote” or something similar. Select it and follow the on-screen instructions. You may be asked to enter a pairing code (printed in the remote’s battery compartment or on a sticker). This step is about security—it makes sure you’re not accidentally connecting to your neighbor’s smart remote.
Completing The Sync And Final Checks
After pairing, the app does its bit of “handshaking” with the remote. You’ll usually see a progress bar or a swirling animation for 10–30 seconds. Don’t panic if it takes a minute—Bluetooth syncing sometimes needs a second try, especially in crowded wireless environments.
Once the app says “Success” (or something equally triumphant), you’ll have a few extra options: give your remote a nickname, assign it to a specific room, or test basic controls. I’d suggest running a quick check—use the remote to turn a Nest device on or off via the app. This isn’t just for fun; it confirms that everything is talking smoothly.
If something doesn’t work, don’t immediately assume you messed up. Sometimes it’s as simple as restarting the app, toggling Bluetooth off and on, or moving a bit closer to your Wi-Fi router for a stronger signal.
Reminder: If you change your Wi-Fi password or move homes, you might need to reset and repair the remote. There’s usually a tiny reset button on the back or inside the battery compartment—just hold it down until the light flashes yellow, then start fresh in the app.
Troubleshooting Common Nest Remote Pairing Problems
Let’s be real: technology never works perfectly on the first try, and the **Nest smart remote** is no exception. Here are a few snags you might hit—and how to fix them without launching the remote across the room.
- The remote won’t appear in the app: Double-check that Bluetooth is enabled on your phone. Move other wireless devices away to reduce signal clutter. If that doesn’t work, try restarting both your phone and the remote.
- The pairing code doesn’t match: Enter it exactly as printed—sometimes 0 and O or 1 and I get mixed up. If it still fails, check the app for a “manual entry” option or look for a reset button.
- The remote pairs but won’t control devices: Make sure the devices you want to control are also set up in the Google Home app and that they’re compatible with the remote. Sometimes, syncing fails if firmware is out of date—update everything via the app if possible.
Honestly, most pairing bugs boil down to “try turning it off and back on again.” It’s old advice, but it works. The secret is to go slow and not skip the basic steps—fresh battery, close range, correct app account.
How The Nest Smart Remote Connects Differently Than A Universal Remote
You might be wondering what sets the **Nest smart remote** apart from an old-school universal remote—the kind you programmed with codes from a booklet. Here’s the key: instead of blasting infrared signals, the Nest remote pairs over Bluetooth or Wi-Fi and integrates directly with your phone and smart home network.
This means there’s less fiddling with device codes or pointing the remote at just the right angle. With the app, you can manage and update your remote’s settings anytime. If Google updates their system or adds new features, your remote stays current. Universal remotes, meanwhile, are stuck with whatever codes they launched with.
Here’s the thing: while universal remotes are great for controlling TVs and soundbars from any brand, the Nest remote is all about deep integration with the Google ecosystem (think Nest thermostats, speakers, displays, cameras). If you mainly use Nest and Google Home devices, this remote and app combo just… works. There’s no guesswork or endless button pressing.
Maintaining And Resetting Your Nest Smart Remote
Keeping your smart remote running smoothly isn’t hard, but it does require a bit of attention now and then. The **Google Home app** makes this easier by letting you monitor battery life and offering a quick way to reset or **re-pair** the remote if something goes sideways.
Batteries first: If your remote ever starts acting sluggish, or the range isn’t what it used to be, don’t overthink it—just pop in a new battery. The app may even send you a notification when juice is running low. The type of battery is usually AA or AAA, but check the manual or sticker inside the device to be sure.
Resetting: If you move, get a new phone, or the remote gets stubborn, locating the reset button can save the day. Hold it down for 10–15 seconds, wait for the blinking light, and start the pairing process in the app from scratch. It’s like giving your remote a fresh start.
Pairing a remote is never anyone’s idea of fun, but a little routine maintenance means fewer headaches—and less time digging through couch cushions for the old remote you thought you’d left behind.
Alternatives: When The Nest Remote Isn’t The Right Fit
While the **Nest smart remote** is fantastic with Google devices, it’s not the right fit for every living room. If you’ve got a mix of smart home brands—say, some Amazon Echo speakers, a Samsung TV, or Philips Hue lights—you might want to consider a universal remote that supports multiple platforms.
There are also *virtual remotes* inside the Google Home app itself—these let you control devices using just your phone, no physical remote required. These virtual tools can come in handy if you misplace the physical smart remote, or need an extra set of controls in a pinch.
If you’re struggling to get all your tech to play nicely, sometimes the best move is to stick with a single ecosystem (all Nest/Google, all Alexa, etc.) for the smoothest pairing and syncing experience. Mixing brands is possible, but it takes more patience and a bit more technical know-how.
Making Your Smart Home Work For You
Adding your **Nest smart remote** to your mobile app is a bit like setting up a universal pass for your favorite amusement park rides—suddenly, the barriers disappear, and everything just feels smoother. Sure, there are a few steps to get through, and maybe a battery or code to wrangle, but the payoff is real: simple, one-touch control with all your Google Nest gadgets working in concert.
The better you understand how pairing, syncing, and troubleshooting work up front, the fewer surprises you’ll hit down the road. And let’s be honest—once you get that remote working through your app, you’ll wonder how you ever put up with the old routine of switching remotes, yelling across the house, or fiddling with buttons in the dark. Here’s to fewer headaches, more control, and a living room that finally listens as well as you do.