Adding a *new* Westinghouse ceiling fan remote to your existing fan isn’t rocket science, but it does mean getting comfortable with a screwdriver and a bit of patience. If the words “dip switch” sound like a snack, don’t worry—I’ll explain everything in plain language. By the time you’re done, you’ll have your fan back under control, without breaking a sweat (or the bank). Whether you’re using a standard Westinghouse remote kit or considering a universal one, this step-by-step primer will help you match the right signals and enjoy cool breezes again.
Understanding Westinghouse Ceiling Fan Remote Systems
Here’s the thing: *not all* ceiling fan remotes work the same way. Westinghouse, like most big ceiling fan brands, relies on radio frequency (RF) remotes to send signals to a receiver inside the fan. That receiver listens for a certain “code,” which is why you can’t just grab any remote off the shelf and expect magic.
Inside both the remote and the fan’s receiver, you’ll usually find a set of tiny switches—called dip switches. These little toggles set the sync code, making sure your remote only talks to your fan and not your neighbor’s. Some newer models use “learning code” or “pairing” buttons instead. The Westinghouse brand still relies mostly on dip switches, especially in standard replacement kits.
This all sounds a bit technical, but let me break it down: matching the code on both devices is like making sure two radios are tuned to the same frequency. Get these codes in sync, and you’re halfway there. If you’re dealing with a universal remote, the process is often similar, but I’ll touch on the differences when we get there.
Gathering the Right Tools and Materials
Before you start, take a quick inventory. It’s a bit like prepping for a simple DIY project—everything goes smoother if you have the right tools at arm’s reach. Here’s what you’ll need for most Westinghouse ceiling fan remote installations:
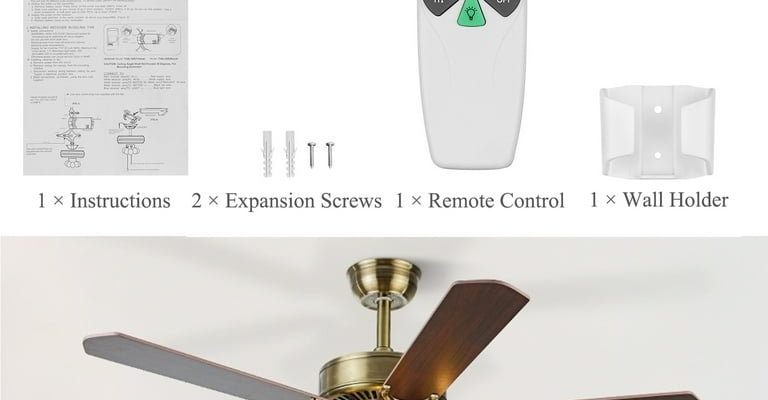
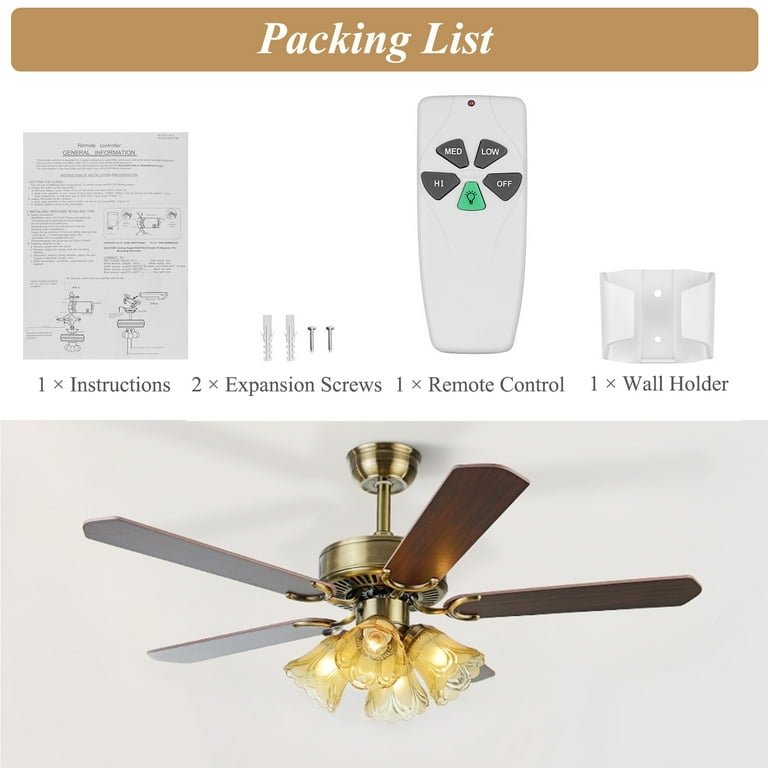
- The new remote control (make sure it’s compatible with Westinghouse fans or labeled as universal)
- The receiver module (often comes with the remote, but some remotes work with the existing one)
- Batteries for the new remote (usually AAA or 9V—double check the packaging)
- Phillips screwdriver (or whatever fits your fan’s mounting screws)
- Stepladder (unless you have very long arms or a very short ceiling)
- Electrical tape (optional, but handy for securing wires or labeling)
You might be wondering: “Do I need to turn off the power?” Absolutely. Safety first. Always flip the breaker before messing with any wiring. Even if you’re only popping off the fan’s cover, it’s not worth the shock. And let me be clear—if you’re uncomfortable with electrical work, there’s no shame in calling a pro for the install. It’s your ceiling, not a science experiment.
Removing the Old Receiver and Remote Pairing
Let’s get into the meat of it. Most Westinghouse ceiling fans have the receiver tucked into the canopy—the part closest to the ceiling. You’ll want to make sure you have space to work and a secure place to stand. Here’s how the typical process goes:
First, use your screwdriver to loosen the screws on the canopy. Gently lower the cover to expose the wiring and that black or gray receiver module. Take a minute to snap a photo of the wiring connections—trust me, your future self will thank you.
Carefully disconnect the receiver from the fan’s wires. Usually, these involve simple wire nuts and color-coded cables. The receiver will have input wires (from the house wiring) and output wires (to the fan and light kit). Set the old receiver aside, and check if your new remote kit comes with a replacement receiver. If it does, you’ll want to swap it out for best results. If the instructions say your new remote is compatible with the old receiver, you can skip this part and jump to syncing the code.
Some folks just want to pair a new remote with an existing receiver. In that case, you’ll need to match or reset the code. But for most people, replacing both parts is the surest way to avoid signal conflicts or weird glitches (like your neighbor controlling your fan).
Installing the New Westinghouse Remote Receiver
If your new Westinghouse remote kit comes with a fresh receiver, now’s the time to wire it in. Here’s a step-by-step breakdown:
- Double check that the power is off at the breaker. Seriously—double check.
- Take a look at the wiring diagram in the manual. If there’s no diagram, the wires are usually labeled as follows:
- Black (hot) and white (neutral) wires from the house
- Black (fan) and blue (light) output wires to the fan and light kit
- White (neutral) to both the fan and receiver
- Connect the new receiver’s wires to the matching wires using the wire nuts provided. Twist each connection firmly and wrap with electrical tape if desired.
- Once all wires are secure, gently tuck everything back into the canopy, making sure nothing is pinched or exposed.
- Reattach the canopy cover, tightening screws securely but not over-torquing them.
Tip: If your receiver doesn’t fit easily, stop and reposition it. Forcing it can damage wires or block the canopy from sealing. A little patience here goes a long way.
Setting and Syncing the Remote Code
Let me explain something important. This is the heart of making a new Westinghouse ceiling fan remote work: getting the code set right, so the remote and receiver “speak the same language.” Most Westinghouse remotes use a series of dip switches—a row of teeny-tiny on/off toggles, often four or five in a row.
Here’s what to do:
- Pop the battery cover off the new remote. You’ll see the dip switches inside. If you installed a new receiver, set the remote’s switches to any combination you like.
- Open the receiver (if accessible) and set its dip switches to exactly match the remote. If you can’t open it once installed (some are sealed), set the code before wiring.
- Replace the battery cover on the remote and fully reinstall the fan canopy up top.
- If your fan or receiver uses a “pairing” or “learn” button instead of switches, press and hold it for several seconds until you hear a beep or see a light flash, then press a button on your remote to sync.
Pro insight: Mixing up the code means your remote won’t work—or could accidentally control a neighbor’s fan. Always make sure both the remote and receiver share the *same* code, whether via dip switches or a pairing sequence.
Testing the New Remote and Troubleshooting Common Issues
Okay, now comes the moment of truth. Flip the breaker back on, grab your new Westinghouse remote, and test every button. The fan should turn on and off, and if you’ve got a light kit, that should respond too. Sometimes this part feels like flipping a coin—either it works perfectly, or nothing happens.
If you hit snags, don’t panic. Here are some common troubleshooting tips:
- If the fan or light doesn’t respond, check if the batteries are installed correctly—or try a fresh set.
- Double-check the receiver’s wiring. Even pros sometimes mix up the black and blue wires.
- Review the dip switch code—did you set the same code on both devices?
- If you’re using a universal remote, read the manual for any extra pairing steps. Some require holding multiple buttons during setup.
- If you hear odd buzzing or humming, check if the receiver is securely installed and not pinched by the canopy.
Sometimes, it’s the tiniest thing—a loose wire nut or a battery in backwards—that brings a project to a halt. Go slowly and retrace your steps before getting frustrated.
Universal vs Branded Westinghouse Remotes: What’s Best?
You might be wondering if it’s okay to use a universal ceiling fan remote instead of a Westinghouse brand remote. Honestly, it depends on your specific fan model and how much patience you have for tinkering. Universal remotes are designed to work with a range of brands—including Westinghouse—by using compatible receivers and programming steps.
Universal kits often have some extra features (like dimming lights or scheduling), but they also add a touch more complexity to the installation and pairing process. If you’re not keen on trial and error, sticking with a branded Westinghouse ceiling fan remote and receiver is often the smoother route. The wiring, code, and instructions are a closer match.
That said, if your local store only has universal options, don’t stress. The steps are largely the same: remove the old receiver, wire in the new one, set the code, and test. Just be sure the kit specifically lists Westinghouse compatibility and follow its pairing directions to a tee.
Maintaining Your Westinghouse Ceiling Fan Remote for Long-Term Use
Now that everything is running, a little regular care will keep your new remote working for years. For starters, keep spare batteries handy and swap them out as soon as you notice range or signal issues. Clean the remote every few months—a gentle wipe removes dust and stops buttons from sticking.
You might be tempted to mount the remote on the wall or keep it in a handy spot. If you have kids, pets, or a tendency to misplace things (guilty as charged!), consider using the included wall cradle. And if your remote ever stops syncing with the fan, a quick “reset” by matching the code again or repeating the pairing steps often solves the problem.
Don’t forget: even electronics need a little love. Staying ahead of battery, code, and cleaning issues beats scrambling when your fan won’t listen.
Final Thoughts: Enjoying Your Upgraded Westinghouse Fan
Adding a new Westinghouse ceiling fan remote to your existing setup isn’t just about convenience—it’s your ticket to less hassle and more comfort. Once you’ve tackled the steps, it’s hard not to feel a little proud every time you flick that fan on from across the room.
If you ran into a few bumps along the way, that’s normal. The process always feels more technical on paper than in action. The pay-off? Smooth air flow, lights that obey your every push, and a fan that’s once again under your control.
The next time you’re lounging on the couch and reach for your new Westinghouse remote, you’ll know all the little secrets inside—no more mystery, just a cool, easy breeze at your command.