Here’s the thing: Westinghouse ceiling fan remotes are designed to be user-friendly, but only if you know the right process. Most use a small set of buttons and some clever little switches inside called “dip switches.” Once you understand how these work together, syncing your remote and fan becomes a lot less mysterious. If you’re ready to reclaim power over your fan—literally—let’s break it down, step by step.
Understanding How Westinghouse Ceiling Fan Remotes Work
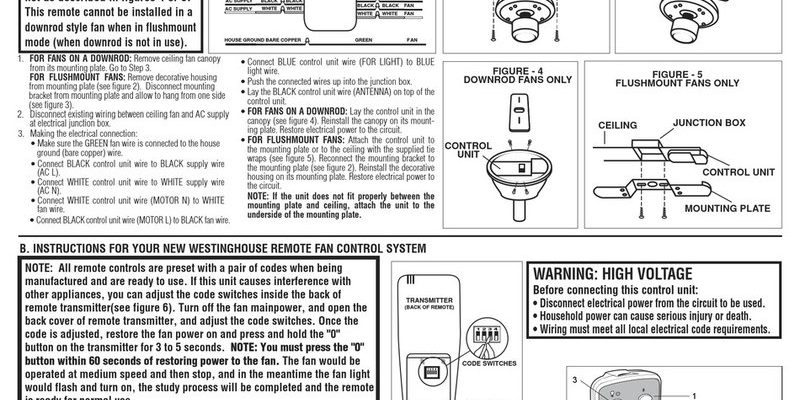
Before you start pressing buttons, it helps to know what’s actually happening when you program a Westinghouse ceiling fan remote. Think of the remote and the fan like two walkie-talkies. They need to be tuned to the same “channel” to talk to each other. This “channel,” in tech-speak, is set by something called a code, which is usually chosen by matching the position of dip switches in both the remote and the fan’s receiver.
These dip switches are tiny toggles hiding under the remote’s battery cover and inside the fan canopy. Each switch can be up or down, giving you loads of possible code combinations. The whole goal is to make sure both devices are speaking the same “language”—no crossed wires, no remote controlling your neighbor’s fan by accident.
Not every Westinghouse model is identical. Some newer remotes use digital pairing instead of dip switches (a bit like how Bluetooth connects). But the concept is the same: sync the fan and remote so the signals match. Knowing which type you have will save you some trial and error.
If you ever notice your remote acting strangely—maybe it only works from certain spots, or not at all—sometimes the code is simply out of sync. Don’t panic! Reprogramming is usually quick once you know what to look for.
Gathering Everything You Need to Sync Your Remote
Let me explain—before climbing up on that wobbly kitchen chair, it’s smart to gather the right tools. You’ll need a few things within arm’s reach:
- Your Westinghouse remote (make sure it works and isn’t missing the battery cover!)
- Fresh batteries—weak batteries can cause all sorts of weird problems and failed attempts
- A small screwdriver (usually a Phillips or flathead)
- Sturdy step stool if your fan is ceiling mounted
- Patience—because you don’t want to rush and accidentally flip the wrong switch
You might be wondering why you need a screwdriver. Most Westinghouse fans hide the receiver (where you’ll check or set the code) inside the canopy—the metal cover at the ceiling. It’s not tricky, but you’ll need to unscrew it. Don’t forget to turn off the power to your ceiling fan at the breaker. Safety first. No one wants an accidental shock while fiddling with wiring.
Honestly, it’s worth double-checking the model of your remote and fan before starting. If you still have the manual, keep it close. If not, look for the model number on a sticker inside the battery compartment or on the fan itself. Some universal remotes look similar but use different codes—make sure everything matches.
Setting and Matching Your Remote and Fan Codes
Here’s where the real action begins. If your Westinghouse ceiling fan remote uses dip switches, programming the code is a hands-on process. It’s not exactly rocket science, but it pays to go slow and steady.
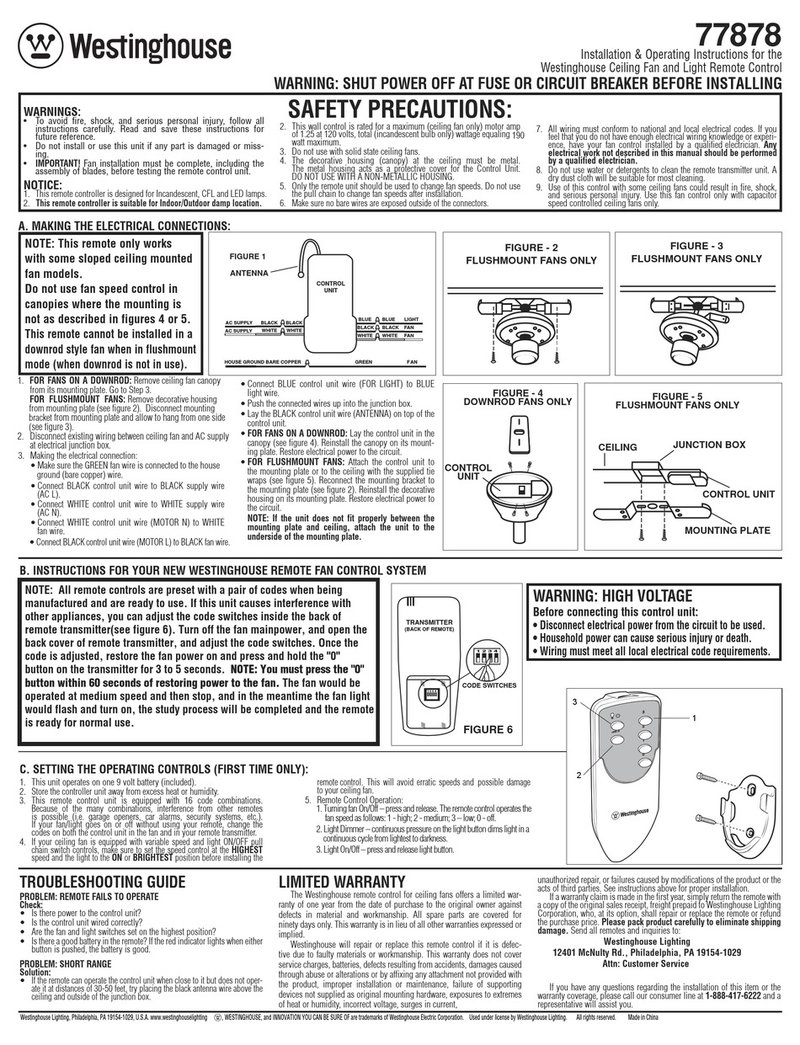
First, take the back cover off your remote. You should see a little bank of tiny toggle switches—usually four or five in a row. Each switch can flip up or down. This combination is your “code.” Think of it like a secret handshake. Write down or snap a photo of the current pattern, just in case.
Next, with the power off, climb up to the fan and carefully open the canopy. Inside, you’ll spot a similar set of dip switches on the receiver. Use your screwdriver to gently adjust the switches. You want the pattern in your fan to match exactly with your remote—every single switch in the same position.
Once the codes are identical, put everything back together. Slide the canopy back in place, pop the battery cover on the remote, and restore power at the breaker. You might be surprised how often a tiny mismatch causes huge headaches—seriously, double-check each switch.
If your remote or fan doesn’t have visible dip switches but instead has a “pair” or “sync” button, don’t stress. The process just looks a little different (more on that soon).
Programming a Westinghouse Remote with the Sync or Pair Button
Some Westinghouse ceiling fans—especially digital or newer models—use a pair or sync button instead of those old-school dip switches. Honestly, this makes things a little easier. Here’s what you do:
First, make sure your fan is getting power but the fan and light are both turned off via the remote. On the receiver (inside the canopy), look for a small button labeled “pair,” “learn,” or “sync.” It might be tiny and require a pen or paperclip to press.
With the remote nearby, hold down the pair button on the receiver for a few seconds until you hear a beep or see the fan lights blink. Within 30 seconds, press a button (like the power or speed button) on your remote. If everything’s working, the fan should respond right away—spinning up or blinking its lights.
Don’t walk away just yet. Test all the remote’s functions. Change the speed, toggle the light, and check for proper response. If the remote doesn’t sync the first time, try repeating the process a little slower—sometimes timing is touchy.
This pairing method is great if you’re dealing with interference issues (maybe your neighbor also has a Westinghouse). It assigns a fresh, clean code unique to your devices. The whole thing usually takes less than five minutes.
Changing the Batteries for Reliable Remote Performance
Believe it or not, dead or weak batteries cause most remote problems. If your Westinghouse ceiling fan remote is sluggish, unreliable, or just plain dead, always start by swapping out the batteries.
Slide open the back cover and pop out any old batteries. Check for rust or corrosion around the terminals—if you see white powder or green gunk, carefully clean it off with a cotton swab and a little vinegar. Make sure your replacement batteries are the correct type (usually AA or AAA, but check your manual or the compartment).
Install the new batteries, watching for the plus and minus signs to get the polarity right. Give the remote a quick test before closing it up. Sometimes simply changing the batteries will snap everything back to life, especially if your remote was working fine before.
Here’s the thing: consistent battery problems can sometimes mean the remote isn’t making a good connection inside, or there’s another issue (like a loose wire or worn-out contacts). But honestly, most of the time, fresh batteries fix things right up.
What To Do If Your Remote Still Won’t Work
You might be wondering, “What if I try all the above and my Westinghouse remote still refuses to cooperate?” Don’t panic. There are a few more things to check before calling it quits.
First, double-check that the dip switches (or sync buttons) are truly in matching positions, and that the battery is fresh and installed correctly. Next, make sure the receiver inside the fan is actually getting power—sometimes a tripped breaker or loose wire is the real culprit. Try resetting the fan by switching the breaker off for a minute, then turning it back on.
If you have another Westinghouse remote handy—maybe from a similar fan—try syncing that one. If it works, your original remote may be faulty. On the other hand, if neither works, the receiver in the fan might need replacement.
If your remote and receiver refuse to pair, consider reaching out to Westinghouse support or checking if your hardware is covered under warranty. Swapping out a faulty receiver is sometimes the best (and safest) fix.
Exploring Universal Remotes vs. Original Westinghouse Remotes
Here’s an honest opinion: while universal ceiling fan remotes are tempting, nothing beats sticking with the original Westinghouse remote designed for your fan. But sometimes, you simply can’t find the exact model, so going universal makes sense.
Universal remotes often use the same dip switch system, but not always. Double-check compatibility before buying. If you do go universal, program it the same way—matching dip switch patterns or following the manufacturer’s pairing instructions. Just know that advanced features (like dimming, reversing the fan, or special speed settings) may not always work with off-brand remotes.
In my experience, pairing a universal remote is a bit of a gamble. When it works, it’s fantastic. But if you hit a wall, it can turn into a headache. Whenever possible, use the Westinghouse code system for the smoothest syncing.
Troubleshooting Common Westinghouse Remote Issues
Let’s talk about those moments when things don’t go by the book. If your Westinghouse ceiling fan remote starts acting up—randomly turning the fan on or off, or ignoring your commands—there are a few fixes to try.
- Signal interference: Anything from another remote to a Wi-Fi router can mess with the fan’s signal. Try switching the dip switch code to a different pattern to avoid conflicts.
- Dirty contacts: If your remote falls behind the couch or lives in a humid room, contacts may get dirty. Open the battery compartment and gently clean the contacts with a dry cloth.
- Receiver glitches: Occasionally, the fan’s receiver just needs a reset. Cut power at the breaker, wait a minute, then power it back up.
- Battery issues: Even fresh batteries can have dud cells. Try a new pack if all else fails.
If you’ve checked every step—code synced, batteries fresh, everything connected—but problems continue, jot down your exact issue. Is it a single button not working? The fan behaving oddly at certain speeds? These details help if you need to contact support or consider a hardware replacement.
Safety Tips and Best Practices for Ceiling Fan Remote Programming
Here’s an important point: working with ceiling fans means dealing with electricity. Turn off the circuit breaker every time you open the canopy or touch wiring. Even a quick zap can ruin your day.
Take your time with small screws and switches. Keep pets and little hands away from the workspace, especially when you’re up on a stool. When in doubt—say, if you spot frayed wires or the receiver looks burned—call an electrician before proceeding.
Lastly, keep a record of your remote and fan code somewhere safe. Write it on a piece of tape inside the remote cover or snap a photo with your phone. If you ever have to reset, having the code handy saves you a world of guesswork.
Closing Thoughts: Enjoying Full Control Over Your Westinghouse Ceiling Fan
Programming your Westinghouse ceiling fan remote doesn’t have to be an epic quest. Once you understand how codes, dip switches, and pairing buttons work, it’s a straightforward process that just takes a little attention to detail. Swapping batteries and keeping your remote in sync with your fan receiver usually solves 90% of common problems. And if things ever get tricky, a quick reset or a fresh code pattern can work wonders.
Honestly, there’s something satisfying about taking on a small home project and getting it right. Next time your fan starts spinning (or stops) exactly when you ask, you’ll know it’s thanks to your own handiwork. So sit back, relax, and enjoy the breeze—knowing your Westinghouse ceiling fan and remote are perfectly in sync.