Here’s the thing with Genie remotes: their buttons don’t have to be stuck to just one garage door or function forever. The model doesn’t really matter—most Genie garage remotes (often the skinny three-button kind or the handy little Genie G3T or GITR remotes) can be programmed, reset, and “told” which door or opener you actually want them to work with. You don’t have to call a pro or replace the remote. You just need a little know-how, a dash of patience, and maybe a paperclip (more on that soon).
Understanding Genie Garage Remote Buttons And How They Work
Let’s demystify what’s going on under those little plastic buttons. When you press a button on a Genie garage remote, all it’s really doing is sending a unique wireless code to your opener. Every button can be programmed (or “paired”) to a specific opener, or even to different doors if you’ve got a multiple-door setup. Think of each button as a direct line—like speed-dialing your favorite pizza place or calling your cousin across town.
Here’s where it gets interesting: these remotes are designed with flexibility in mind. It’s not like a one-way street where once you program a button, it’s set in stone. Each button has its own memory, and you can reset or reassign that memory whenever you need. For folks who move, upgrade their garage opener, or just want to swap things around, that’s a lifesaver.
Honestly, it’s way less technical than it sounds. The Genie brand puts a lot of care into making this stuff “DIY-friendly.” You don’t need to read blueprints or memorize codes (though you will work with “learn” buttons and little flashing lights). It’s about knowing the right sequence of presses, which we’ll walk through step by step.
Common Reasons To Reassign Genie Remote Buttons
You might be wondering *why* you’d want to bother with all this in the first place. Here are some everyday scenarios:
- New Garage Door Opener Install: You’ve upgraded your opener, but your remote is still thinking “old opener.” Time to pair up again.
- Multiple Openers or Doors: If you’ve got two or three garage doors, it’s handy to assign one button per door.
- Accidental Button Swap: Maybe a button opens the wrong door now, or got mixed up after a battery change or reset.
- Universal Remote Troubleshooting: Universal remotes (like Chamberlain or clickers) sometimes conflict with Genie codes and need a fresh start.
Reassigning button functions lets you take back control. No more guessing which button does what, or getting stuck outside when it’s raining because you pressed the wrong one. And if you ever sell your house or lend a remote to a guest, erasing codes is a must for security. You get peace of mind, plus a remote that fits your life—not the other way around.
Finding The Learn Button And Setting Up For Reassignment
Every Genie garage door opener has what’s called a “Learn” button. This button is the brain behind the pairing process. You’ll usually find it on the main opener unit mounted on your garage ceiling—often under a light cover or near the antenna wire. It might be labeled “Learn,” “Set,” or even “Program,” depending on your model. Some models use a small LED next to the button to give you cues.
Before you get started, make sure:
- You have fresh batteries in your remote. A weak battery leads to intermittent pairing or random failures.
- There are no big metal obstructions between you and the opener. Wireless signals need line-of-sight.
- You’ve cleared time: You only have a short window (about 30 seconds) to complete the assignment after pressing the Learn button, so no distractions.
Let me explain why this matters. If the remote isn’t picking up the code, or the opener can’t “hear” the signal, you’ll be stuck in a pairing loop that never ends. Give yourself the best shot by prepping ahead.
For safety, always keep a ladder stable and unplug the opener before poking around the unit—no one wants a zapped hand or a bumped head.
Step-By-Step: How To Reassign A Button On Genie Garage Remote
Here’s the step-by-step process for reassigning button functions—think of it as teaching your dog a new trick. You’ll be “unlearning” the old function and pairing it with your opener’s memory.
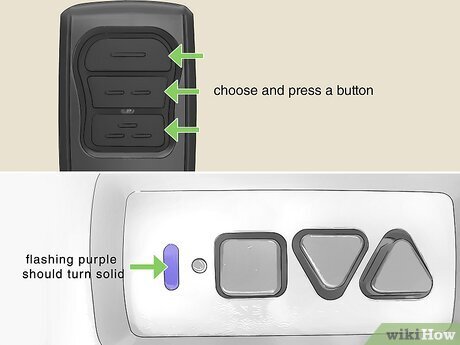
- Locate The Learn Button on your garage door opener (see tips above).
- Press and release the Learn button. A small LED will usually light up, blink, or stay steady. This tells you the opener is now listening for a code. You typically have 30 seconds.
- On your Genie remote, press and hold the button you want to assign. Hold it for several seconds until you see the light on the opener flash (or hear a click). This means the opener “learned” this button’s code.
- Test the button. Press the newly programmed button to make sure the door operates as expected.
If you want to assign more buttons, repeat the process for each button and each door. If you make a mistake, don’t panic—you can reset and start over.
Resetting Or Erasing Old Button Functions
Sometimes, you don’t just want to reassign—you want to *wipe* a button’s memory. To fully erase all remote codes from the opener, press and hold the Learn button until the LED goes out (usually 8–10 seconds). This removes all paired remotes. You’ll need to reprogram any remotes you still want to use.
But if you only want to change what a specific button does, just pair it again using the standard instructions above. The new pairing will *overwrite* the old one for that button.
Troubleshooting Genie Garage Remote Pairing Issues
Things don’t always click perfectly on the first try. Sometimes the Genie remote refuses to sync, flashes its LED but won’t open the door, or acts like it’s in another time zone. Here’s what usually causes the headaches:
- Battery Issues: Low batteries don’t deliver a strong enough signal. Always swap in a fresh set if something’s not working.
- Distance/Obstructions: If you’re standing too far or something big (like your car, the neighbor’s fridge, or the family dog) is in the way, the signal weakens.
- Incorrect Button Use: Press the correct button for the opener each time. After reassigning, double-check which button is programmed for which door.
- Remote/Opener Incompatibility: Genie remotes and openers aren’t always cross-compatible, especially if you’ve mixed older and newer tech. Universal remotes add another layer of confusion with their multi-brand syncing codes.
If you get stuck, don’t hesitate to start from the top and erase the opener’s memory so you get a clean slate. Sometimes, a *reset* is the fastest fix.
Comparing Genie Brand Remotes And Universal Remotes
Not all garage remotes are created equal. While Genie remotes and openers are built to play nicely together, universal remotes (like those from Chamberlain or Liftmaster) claim to “work with everything.” In practice, though, universals make the pairing process a bit more complicated.
Genie remotes usually offer:
- Quicker programming—just follow the “Learn” button steps.
- More reliable pairing and fewer glitches with Genie openers.
- Easier troubleshooting if something doesn’t work.
Universal remotes can be handy if you have a mix of brands in the garage or want a single fob to control both gate and door. But they often require extra steps—inputting a Genie sync code, selecting a frequency, or following cryptic instructions in the manual. If you’re troubleshooting, always check the remote’s battery, make sure it’s actually set to “Genie mode,” and be patient with the pairing cycle.
In most cases, if you’re using a Genie brand opener, sticking with a Genie remote saves time and hassle.
Best Practices For Long-Term Genie Remote Use
After you reassign your Genie garage remote buttons, a little ongoing care goes a long way. Garage remotes live rough lives—they get dropped, lost, or left in hot cars. Here’s how to keep yours working smoothly:
- Replace batteries every 12 months or whenever the range drops. A weak signal often means a dying battery, not a programming issue.
- Keep your remote clean and dry. Water or dust inside the case leads to sticky buttons and failed connections.
- Label each button if you control multiple doors or openers. A little piece of tape or a marker helps avoid confusion later on.
- Erase codes before lending or selling your remote. For security, always unpair before handing a remote to someone else.
If you ever run into trouble, the Genie support site and their manuals provide clear steps. But honestly, once you’ve reassigned a button or two, you’ll have the process down for next time. It’s a five-minute task that can save you tons of frustration.
Wrapping Up: Take Control Of Your Genie Garage Remote
Programming and reassigning button functions on your Genie garage remote isn’t rocket science—it’s more like rearranging furniture until your routines just “fit.” With a few simple steps, you can sync, reset, and pair your remote so it matches your changing needs, no matter what life throws at you. Whether you’re juggling multiple openers or just want to undo a programming mistake, knowing how to reassign a button puts you back in the driver’s seat—literally and figuratively. And let’s be honest, that’s a pretty satisfying feeling.