If you’re holding a Genie remote in your hand and it’s blinking weakly or not responding, there’s a good chance the battery is running low. The good news? Swapping in fresh batteries isn’t rocket science. Think of it like replacing batteries in a TV remote, but with a few quirks to watch for. Genie is a popular garage opener brand with remotes that look a bit different from your average clicker, but the process is beginner-friendly and takes just a couple of careful minutes.
Understanding Your Genie Garage Door Remote Model
Before diving into the battery change, it helps to know which Genie remote you’ve got. Genie remotes come in a few shapes and sizes—some are compact keychain models, and others are larger, with two or more buttons. The most common types are the Genie G1T-BX, G3T-R, and older AT85 models. Each has a slightly different battery compartment; some slide open with a push, while others need a little prying with a coin or screwdriver.
Here’s the thing: if you have a universal remote or a Genie-branded one, the steps will be similar, but the exact battery type might differ. Most Genie remotes use a round lithium coin battery, like a CR2032. Others, especially older models, might use smaller 12V batteries. You can usually check the back of your remote for a model number and battery info. And if you’re still stumped, Genie’s website or your garage door opener manual usually has a diagram to match.
Knowing your model saves time. You don’t want to open the case, only to realize you bought AAA batteries for a remote that takes a coin cell. It also helps to recognize if your remote is one that requires a reset or re-pairing after battery replacement, as some do. So, before anything, flip over your remote and take a peek at the fine print.
Gathering the Right Tools and Batteries
Let me explain—the right tools make battery replacement quick and drama-free. For most Genie garage remotes, you don’t need a massive toolkit. What you do need is:
- The correct replacement battery (usually CR2032 or A23 12V—check your device to confirm)
- A small flathead screwdriver or a coin to pry open the battery compartment
- A clean, dry surface to work on
Honestly, it’s annoying to get halfway through only to realize you don’t have the right battery. If you’re unsure, just bring your remote to the store for a match-up. While you’re at it, give those AAA and AA batteries a pass—Genie remotes almost never use them.
If your remote is clipped to the car’s visor, unclip it first. For those keychain styles, detach them so you’re not juggling keys, bags, and tiny screws. Find a spot with good lighting, since those small battery numbers can be tough to see. A kitchen table or workbench is perfect. Trust me, you don’t want to be chasing a rolling battery under the stove.
Step-by-Step Guide: Changing Batteries In Genie Garage Remote
Let’s get practical. Here’s how to swap out your old Genie remote battery for a new one:
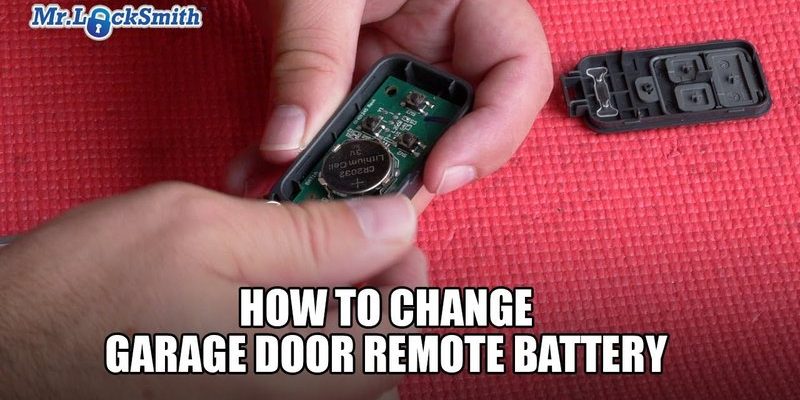
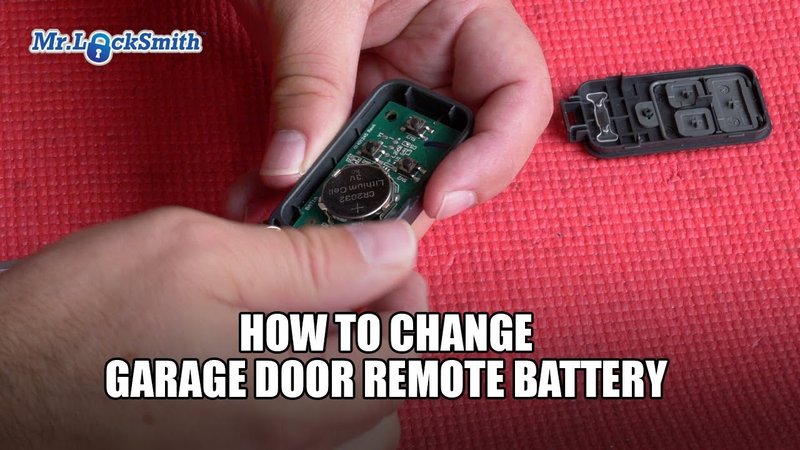
- Remove the back cover. Most Genie remotes have a panel that slides or snaps off. If it’s stubborn, use a coin or small flathead screwdriver to gently pry it open. Don’t force it—if it feels stuck, try from a different edge.
- Take out the old battery. Note the orientation: look for a + or – symbol on both the battery and compartment. Some models use a spring clip that pops the battery out with a gentle push. Avoid bending the metal contacts.
- Insert the new battery. Slide or press it in exactly like the old one, matching the + symbol. A coin cell usually clicks right into place, while cylinder-style batteries may need a small nudge.
- Snap the cover back on. Press until you hear a soft click, or slide the panel back over the opening. Make sure there’s no gap; a loose cover can let in dust or moisture.
You might be wondering—what if you drop the battery or can’t get the door to snap closed? Stay patient. If something isn’t lining up, double-check that the battery is seated flat and the cover matches up with the edges. No part should feel forced.
Testing, Syncing, and Pairing Your Genie Remote
After swapping the battery, most Genie garage remotes should work instantly. Just point it at your garage door opener and hit the main button. If the door doesn’t move or the light on the remote doesn’t blink, don’t panic—sometimes the remote needs to be re-synced with your garage door opener.
Here’s how to pair or reset your remote:
- Find the “Learn” button on your Genie garage door opener motor (usually on the ceiling unit). It’s often near the antenna wire.
- Press and hold the “Learn” button until the indicator light turns on, then release.
- Within 30 seconds, press the button on your Genie remote you want to program. Hold for a few seconds, then release.
- The opener’s light will usually blink or click, showing it’s paired. Test by pressing the remote again.
Honestly, this step can trip people up. Some Genie models require a quick code input (a series of button presses) or a sequence to fully reset or sync, especially if it’s a universal remote. If it doesn’t work the first time, double-check your user manual for that specific model. Most of the time, a simple pairing solves the problem.
Troubleshooting: When Your Genie Remote Still Doesn’t Work
So you’ve changed the battery, but nothing’s happening. Frustrating, right? There could be a few reasons your Genie garage remote is still silent. Here’s what to check:
- Dead or weak battery: Sometimes new batteries are duds, especially cheap ones. Try another fresh battery to rule this out.
- Dirty battery contacts: If you see any corrosion (white or green stuff), gently clean it with a cotton swab and a tiny dab of rubbing alcohol.
- Re-sync needed: Not all remotes auto-connect after a battery change; run through the pairing steps again.
- Physical damage: If you’ve dropped the remote or see visible cracks, something inside might be loose or broken.
If your Genie garage remote still isn’t responding after all this, it could be time for a replacement. Universal garage remotes work in a pinch, but you’ll need to program them using your Genie opener’s code.
How Genie Remotes Compare To Universal Garage Remotes
Let’s get into the nitty-gritty—are you better off with a Genie-branded remote, or should you pick up a universal model next time? Genie remotes are designed to work seamlessly with Genie openers, so the battery compartment, pairing process, and codes are pretty much foolproof if you stick to the brand.
Universal remotes, on the other hand, can be handy if you have different brands of openers in the same home or you’ve lost the original. They usually support syncing and code input for multiple garage systems, including Genie. Just keep in mind, programming can sometimes be trickier, and instructions aren’t always clear for beginners.
My two cents? If you only have Genie equipment, stick with their remotes—they’re reliable, simple, and replacement batteries are easy to find. If you’re juggling a few brands or need a backup, a universal remote will do the trick, but expect to spend a little time with the manual to get the code and pairing right.
When To Replace vs Repair Your Genie Remote
It’s tempting to keep fussing with a remote that’s acting up, but sometimes a fresh start is best. If you’ve changed the battery, cleaned the contacts, tried syncing codes, and it still refuses to work, the remote itself might be at fault. Age, wear, and that time it got left outside in the rain can all take their toll.
Here’s an easy way to decide:
- If the remote looks physically damaged (cracked plastic, rattling inside), replacement is usually cheaper than repair.
- If it works intermittently, try a new, good-quality battery first. Some remotes are picky about off-brand batteries.
- If everything else in your garage opener system is working fine, but the remote doesn’t respond after resetting and pairing, it’s time for a new one.
A functional garage remote shouldn’t be a daily headache. Genie remotes aren’t meant to last forever; batteries are their weak point, but electronics wear out too.
Steps To Keep Your Genie Garage Remote Battery Lasting Longer
A little care can stretch your Genie remote battery’s life, saving you time and hassle down the road. You don’t have to baby it, but a couple of commonsense habits go a long way. For starters, avoid leaving your remote in direct sunlight, like on your car dashboard. Heat drains batteries faster than you’d think.
Also, don’t press buttons longer than needed. Holding down the button for five seconds doesn’t make the garage open any faster, but it does burn through battery life. If you’re not using the remote for a while (maybe you’re heading on vacation), remove the battery so it doesn’t drain slowly on standby.
Finally, if you notice your Genie remote responding more slowly or the indicator LED looking dim, swap the battery early. Don’t wait for total failure—you’ll save yourself from being locked out at the worst possible time.
Changing the batteries in a Genie garage remote is one of those small chores that pay off every single time. With a little patience and the right tools, you’ll have your remote working like new and avoid those groan-worthy moments stuck outside. Remember to check your Genie remote’s model before buying batteries, follow the steps carefully, and don’t hesitate to re-sync or troubleshoot if things don’t work right away. A working garage remote isn’t just about convenience—it’s about peace of mind. Here’s hoping your next battery swap is smooth, simple, and stress-free.