If you’ve got a Hampton Bay ceiling fan and the remote’s acting like a party crasher, you’re probably dealing with frequency interference. Don’t worry—changing the remote frequency isn’t rocket science. Sure, the inside of your remote and fan might look a little intimidating, but with a steady hand and a bit of patience, it’s honestly not much more complicated than changing the channel on an old TV… once you know where to look.
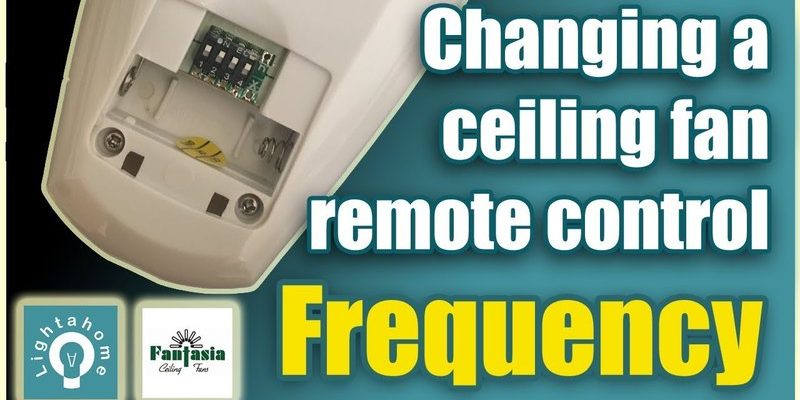
Most Hampton Bay ceiling fan remotes use tiny “dip switches” (little toggles that look like minuscule piano keys) to set their frequency. By matching the pattern of these switches between your remote and the fan’s receiver, you create a “secret code” so only your remote talks to your fan. Let me break down how this works, when you’d need to mess with it, and exactly how to change your Hampton Bay remote’s frequency step by step.
Why Hampton Bay Ceiling Fan Remote Frequencies Sometimes Need Changing
You might be wondering—do you really need to tinker with your remote’s frequency? It’s not just a “techy” thing. The frequency, set by those tiny dip switches, is basically a handshake between your remote and your fan. When they agree, everything works. When they clash or overlap with your neighbor’s system (or even another remote in your own home), you get weirdness—lights flickering, fans spinning at random, or nothing working at all.
Common interference issues pop up when ceiling fans are installed in apartments, condos, or houses where units are close together. Sometimes, even just adding a second Hampton Bay fan in your own home will cause both to react to the same remote if their frequencies match. And let’s not forget, electrical “noise” or interference from other wireless devices can sometimes cause the remote and fan to lose sync.
The short version: if your remote controls more than one fan, or doesn’t control yours at all (but seems to work the neighbor’s), it’s time to change the frequency. This process is also handy if you buy a replacement remote, pair a universal remote, or do a reset after battery issues or electrical storms.
How Hampton Bay Ceiling Fan Remote Frequencies Work
Let me explain what’s actually happening inside your remote. Hampton Bay remotes use a series of dip switches—usually four, sometimes more—each of which can be toggled up or down. Each arrangement creates a unique binary “code.” The fan receiver, located in the fan housing above the blades, has its own set of dip switches. For things to work, those codes need to match—think of it as both ends of a walkie-talkie being set to the same channel.
Changing the frequency means opening both the remote and the fan canopy to access these switches. It’s a simple physical process, but a bit delicate because the parts are small. If you don’t match the code exactly, the remote won’t talk to the fan.
Don’t worry—there’s zero programming involved. No apps, no Bluetooth, no holding down mystery buttons hoping for a beep. We’re talking pure, old-school hardware.
Honestly, once you realize it’s just about copying a dip switch pattern, the process starts to make sense. That pattern is what makes your Hampton Bay remote “yours”—so any time you reset, re-pair, or swap out remotes, you’ll need to check that code.
Tools You’ll Need To Change Your Ceiling Fan Remote Frequency
Before you roll up your sleeves, make sure you’re set up for success. Here’s what you’ll need:
- A small Phillips-head screwdriver (for removing the fan canopy and remote battery cover)
- Stepladder (for safe access to the ceiling fan)
- Your Hampton Bay remote (with working batteries)
- Optional: Tweezers or a toothpick (the dip switches are tiny!)
Safety first: Always turn off power at the wall switch or breaker before poking around the fan. You don’t want a surprise zap or moving blades overhead. And if you’re not comfortable with heights or ceiling fixtures, it’s fine to ask for help.
Here’s a quick story: I once watched a friend try to do this with a butter knife and a kitchen stool. Neither is recommended—get the right tools, and you’ll thank yourself later.
You might spot a little plastic baggie inside the remote packaging with instructions and a diagram of the dip switches—keep that handy if you have it. If not, don’t worry. The remote and receiver are usually marked clearly inside.
Step-by-Step: How To Change Remote Frequency On Hampton Bay Ceiling Fan Remote
Changing the frequency boils down to two key actions: changing the dip switches in the remote, and matching them inside the fan’s receiver. Here’s how to do it step by step:
1. Cut The Power
Don’t skip this part—even if you’re just popping open the remote! Flip the wall switch off, and for extra peace of mind, switch off the circuit breaker that powers the fan.
2. Remove The Remote Battery Cover
Flip your Hampton Bay remote over and slide or pop off the battery cover. You’ll see a row of very tiny dip switches, each labeled with numbers (1–4 or more). Jot down the current pattern, or snap a quick picture—just in case you need to undo changes.
3. Access The Fan Receiver
Set up your ladder, then gently remove the canopy (the bowl-shaped cover) that meets the ceiling. Usually, you’ll find small screws holding it in place. Lower it slowly to reveal the wiring and a small plastic receiver box. You don’t need to disconnect any wires—just make sure you can see the receiver’s dip switches.
4. Set The Dip Switches To A Unique Code
Using your finger, tweezers, or a toothpick, flip the dip switches inside the remote to any random (but unique) pattern—a good idea is to change just one or two switches for simplicity. Then, set the exact same pattern on the receiver’s dip switches inside the fan. Make sure every switch is firmly up or down—no “in between” positions.
5. Reassemble and Restore Power
Slide the remote battery back in and replace the cover. Screw the fan canopy back into place. Turn the power back on at the wall switch and breaker.
Test your remote! If the fan and light respond perfectly, you’ve successfully changed the frequency and re-paired your remote. If not, double-check that the dip switch patterns match and nothing got jostled during reassembly.
Troubleshooting Common Hampton Bay Remote Frequency Problems
You might run into a few hiccups—honestly, that’s normal the first time. If your Hampton Bay ceiling fan remote isn’t working after changing the frequency, don’t panic.
- No response: Double-check both sets of dip switches. Even one out-of-place switch means a failed code.
- Fan or light flickers but doesn’t fully respond: Weak batteries or poor contact inside the remote can cause signal issues. Try fresh batteries and reseat them.
- Other fans still respond: Make sure you chose a truly unique dip switch pattern not shared by other nearby remotes. A “one switch different” approach is usually enough.
- Remote flashes or beeps but nothing happens: Some newer Hampton Bay remotes have an indicator light. Flashing can signal either a code mismatch or low battery.
If you continue to have problems, it’s possible there’s a hardware issue—either a bad receiver in the fan or a faulty remote. Replacements are available, and most universal ceiling fan remotes use the same dip switch code method to pair and sync. Always check model compatibility before buying a new remote.
When To Reset Or Reprogram Your Hampton Bay Remote
Sometimes, changing the dip switches isn’t enough—especially after a big power surge, major battery drain, or if the remote seems “dead.” In these cases, a full reset or re-pair is in order. Hampton Bay doesn’t usually use digital “reset” buttons, but you can manually “restart” the sync by:
- Turning off power to the fan completely for at least 30 seconds, then restoring it
- Removing the batteries from the remote for a minute before reinserting
- Ensuring the dip switch codes match exactly after power is restored
On rare models, there may be a “pair” or “learn” button in the canopy receiver—if so, press it after turning the fan power back on, then immediately press a button on the remote. This will sync the codes.
If nothing works after a reset, and you’ve checked all the basics, it might be time for a new receiver or remote entirely.
Universal Remotes vs Hampton Bay Brand Remotes: What’s the Difference?
Let’s face it, sometimes you lose the original remote, or it breaks. The good news is, most universal ceiling fan remotes can work with Hampton Bay fans as long as they use dip switch codes.
Universal remotes often come with their own receiver for the ceiling fan. If you go this route, you’ll need to swap out the old receiver for the new one and set a fresh dip switch code in both the remote and receiver. Most folks find universal remotes work well for basic fan and light control, though you might lose advanced features like speed memory or reverse settings.
Original Hampton Bay remotes tend to be easier if you’re looking for guaranteed compatibility, especially if your fan has extra features. Still, both use the same frequency pairing process—it’s all about matching those dip switches.
If you’re thinking long-term, I’d say stick with the original if you can, but universal remotes are a solid backup. Just always keep the instruction sheet and a photo of your dip switch pattern handy.
What To Do If You Can’t Find The Dip Switches or Receiver
Here’s a curveball: not all Hampton Bay ceiling fans look the same inside. Sometimes, the receiver’s tucked away behind wiring, or the dip switches are under a sticker. Some newer “smart” models may have digital codes instead of physical switches. If you’re stuck, double-check your fan’s manual or look up the model number online for diagrams.
- If the receiver is buried, carefully move the wiring to peek at the dip switches, but don’t disconnect anything unless you’re absolutely sure what you’re doing.
- Older models might have dip switches in the wall transmitter instead of the remote. Same method applies—match the code to the receiver.
- If there are no dip switches at all and you see a little “pair” or “learn” button, follow the syncing instructions for your specific model.
If after 10 minutes you’re cursing and sweating on a ladder, it’s perfectly fine to call a handyman or the manufacturer for help—no judgment. Some things just aren’t worth a pulled muscle or snapped wire.
Closing Thoughts: Take Charge of Your Ceiling Fan Remote
Having control over your ceiling fan remote frequency can feel almost magical. No more random flickers, no more competing for air with a neighbor’s remote, and no more mad dashes to the breaker box. Changing the frequency on a Hampton Bay ceiling fan remote is a bit like setting a new password—private, secure, and surprisingly simple once you know where the switches are.
It all comes down to patience, matching those tiny dip switches, and making sure your remote and receiver are perfectly in sync. If you ever replace the remote or add another fan, remember these steps. And if you hit a snag, just retrace your process—usually, it’s something as small as a dip switch not flipped all the way.
With your Hampton Bay fan listening to your remote and your remote alone, your home just feels a little smarter—and a lot more your own.