If you’re holding a Genie garage door opener remote, wondering how to program it without the manual, you’re not alone. Genie is one of the most popular garage door brands in the U.S., and its remotes—like the Genie G3T, G1T, or Genie Master remotes—are everywhere. Luckily, programming these remotes isn’t rocket science. With a little patience and the right steps, you can sync a new remote, reset an old one, or even troubleshoot without flipping through pages of confusing instructions.
Understanding How Genie Garage Door Remotes Work
Before you start pressing buttons, it helps to know what’s actually going on under the plastic shell of your Genie remote. Garage door remotes work by sending a radio signal to your opener’s “learn” receiver. When you program the remote, you’re effectively introducing your remote’s unique code to your garage door’s brain—kind of like adding a new friend to your phone contacts.
Genie remotes use rolling code technology, which means every time you press the button, the code changes. This keeps things more secure and prevents someone from copying the signal to gain access. The opener and remote stay in sync by following the same formula to generate each new code. If you ever notice your remote stops opening the door, it could be a syncing issue or a battery problem.
For most Genie systems, the process of pairing or resetting the remote involves both the remote itself and the garage opener unit hanging on your ceiling. Don’t worry, you won’t need fancy tools—just a sturdy ladder, maybe a flashlight, and your trusty Genie remote.
Identifying Your Genie Remote Model
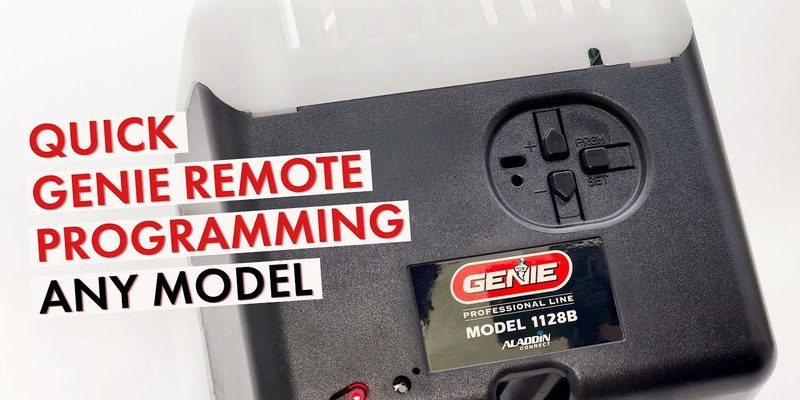
Here’s the thing: Genie has released a bunch of remotes over the years, and each might look a little different or have an extra button. If you threw out the packaging and aren’t sure which model you have, look for a model number on the back or inside the battery compartment.
- G3T: Three-button remote, often with a blue LED.
- G1T: Single button, simple design.
- Genie Master: Usually marked “GM3T” and works with multiple opener types.
If you don’t see a model number, don’t panic. Most Genie remotes from the last decade use a similar programming process, especially if your garage opener isn’t ancient. However, universal remotes or “off-brand” replacements might have different instructions, so keep that in mind if this method doesn’t seem to fit.
Finding the Learn Button on Your Genie Garage Door Opener
The next step is to locate the “learn” button on your Genie opener. This button is the key to getting your remote and opener to talk to each other. Think of it as the handshake at the start of a meeting—it lets the opener know, “Hey, I want to add a new remote.”
Climb up and look at the motor unit (the box attached to your garage ceiling). The learn button is usually behind a light cover or side panel. On Genie models, it’s often labeled as “Learn,” “Program,” or sometimes just a square or circular button.
- Color: It might be black, red, purple, or green.
- Location: Behind a lens or panel—sometimes you need to slide or pop something off.
- Nearby Lights: There’s usually a small LED next to the button that blinks or glows when pressed.
You might need both hands for this, so wedge your ladder somewhere steady. If your opener is over 20 years old, you could see a series of tiny switches called “DIP switches” instead. That’s a different programming beast (and not covered here). For most people, you’re looking for that simple learn button.
Step-by-Step: How to Program Genie Garage Door Remote Without Manual
Here’s where the magic happens—and honestly, it’s simpler than setting up a smart TV. Just don’t rush, and double-check each step if the door doesn’t open at first.
- Press the Learn Button:
Press and release the “learn” button on your Genie opener. You’ll typically see a small LED light begin to blink. This means the opener is now listening for a new remote. - Press and Hold Remote Button:
Within 30 seconds, grab your Genie remote. Press and hold the button you want to pair. Hold it for a few seconds—sometimes you’ll see the opener’s light blink or hear a click/clunk noise. - Wait for Confirmation:
Release the remote button. If successful, the garage light will blink, or the LED near the learn button will stop flashing. If nothing happens, try again (timing can be a little fiddly). - Test the Remote:
Hop down and press your remote. The door should open or close. If not, repeat the steps or check the battery inside your remote.
Tip: If you’re pairing multiple remotes, you’ll need to repeat these steps for each one. And always give yourself a minute between tries—opener circuits can be finicky.
What To Do If Programming Doesn’t Work
Sometimes, no matter how closely you follow the instructions, your Genie remote just won’t program. Here’s where troubleshooting comes into play, and trust me, you’re not cursed—it happens to the best of us.
First, check the basics: Is the remote battery fresh? Genie remotes use standard coin-cell batteries (like CR2032 or CR2016). Weak power can mess with the signal and make programming impossible.
Next, confirm you’ve got the right sequence. If the opener’s learn light doesn’t blink or times out too quickly, you might not be pressing the learn button correctly. Start over and take your time.
If you’re using a universal remote, double-check it’s compatible with Genie openers. Some universal models require a different pairing process or extra setup steps.
Finally, consider interference. Nearby Wi-Fi routers, LED light bulbs, or even metal shelves can mess with signals. If you’re still stuck, unplug these devices (temporarily), move your remote closer to the opener, and try again.
Resetting or Erasing Genie Garage Door Opener Remotes
Let me explain why this step matters: if you move into a new house or lose a remote, you’ll want to erase old codes to prevent strangers from having access. Erasing all paired remotes is a smart safety move and doesn’t require the manual.
Here’s how to reset your Genie opener and wipe all remotes:
- Press and Hold the Learn Button: Hold it down for about 10–15 seconds. The LED next to the button will turn solid, then go out.
- Release and Wait: This wipes all synced remotes from the opener’s memory. Give it a few seconds to clear everything.
- Reprogram Your Remote(s): Go through the pairing steps above for each remote you want to work.
If you only want to remove one lost remote instead of all of them, unfortunately, you’ll have to erase all codes and re-add the ones you want. This is a common Genie design quirk.
Comparing Genie to Universal Garage Door Remotes
You might be wondering if you can program a universal remote instead of a Genie one. Here’s the scoop: universal remotes work with many brands, but programming can be trickier. Some require additional “mode” buttons or dipswitch settings, and not all support Genie’s rolling code tech.
Genie remotes are engineered to work seamlessly with Genie opening systems. If you’re replacing a lost remote, Genie branded options usually program faster and have fewer syncing headaches. Universal remotes can save money—just check for compatibility with your opener’s year and code type.
Pro tip: If you’re really stuck, Genie Master remotes are built to pair with almost every Genie opener made since 1993. They’re a safe bet if you can’t find your exact model remote or if yours isn’t made anymore.
Common Issues: Battery, Range, and Interference
Let’s address the obvious but easy-to-miss problems. Sometimes what looks like a programming problem is really just something basic.
- Battery: Old batteries mean weak signals. Always pop in a fresh one before programming. If your remote still doesn’t work, try another battery just to rule it out.
- Range: Genie remotes should work from at least a car-length or two away, but metal, concrete, or even the car itself can block signals. Try standing closer or changing your angle.
- Interference: Other wireless gadgets, LED bulbs, or even your neighbor’s opener can cause weird interference. If your remote acts flaky, unplug nearby electronics and test again.
If you’ve tried everything and nothing works, the remote itself might be faulty. Sometimes, electronics just give up. Replacing your Genie remote is usually the quickest solution if you suspect hardware failure.
Maintaining and Troubleshooting Your Genie Garage Door Opener System
Programming your Genie garage door remote is one thing, but keeping everything running smoothly is another. Some folks forget their opener is a machine that loves a little TLC.
Routine checks matter: Inspect the battery terminals inside the remote for rust or gunk. Clean them if needed. Periodically check the garage opener’s antenna (usually a little wire hanging down) and make sure it’s intact—not bunched up or broken.
If you start noticing the door opens slower or acts weird, your opener’s logic board might need a reset. Unplug the opener for 30 seconds, then plug it back in. Sometimes, that’s all it takes to fix weird sync problems or software hiccups.
Finally, keep those remotes away from moisture, pets, and pockets full of coins—trust me, I’ve fished enough gadgets out of the washing machine to know.
Wrapping Up: No Manual, No Problem
Programming a Genie garage door remote without the manual isn’t as scary as it sounds. It’s mostly about finding that little learn button, pressing it in the right order, and making sure your remote’s got a healthy battery. Even if you run into a roadblock, most fixes are simple—just a matter of checking power, range, or interference.
Whether you’ve lost your manual, tossed it years ago, or just need a refresher, the process is totally doable with a little patience. Genie’s rolling code system keeps things safe, and the steps above will have your garage opening with a single click in no time. If something doesn’t work the first time around, don’t get discouraged. Take a breath, reset, and try again. Your garage door will be back to business before you know it.