
Chamberlain garage door remotes are designed with flexibility in mind. Maybe you just moved in and want to reprogram the buttons for your garage and gate. Or perhaps you’re tired of that one button opening the wrong door every time. Whatever the reason, reassigning buttons isn’t rocket science—but it does help to know a few insider steps. Let’s unpack how it really works, one step at a time, so you get it right—without chucking your remote in frustration.
Understanding Chamberlain Garage Remote Functions
These remotes aren’t just little widgets with plastic buttons—they’re tiny computers with memory, code, and logic behind each press. Most Chamberlain garage remotes have multiple buttons, each capable of controlling a different device or even syncing with entirely separate openers. The beauty here is personalization. Just like setting up different profiles on a smartphone, you decide which button does what.
You might be wondering: why not just stick with factory settings? The answer is flexibility. Maybe you have more than one garage door, or you want to pair the remote with a neighbor’s gate temporarily. Each button can be reassigned and reassociated as your needs change. All it takes is a little know-how and the willingness to dig into a few steps that, honestly, are easier than programming a universal TV remote.
When you press a button on the Chamberlain remote, the device sends a coded signal to the opener or gate control panel. Reassigning the button essentially “teaches” the remote to use a new code or to target a different receiver. That’s why you can use one remote for many locations—if you know how to reset and re-sync it, you’re golden.
Why You Might Need to Reassign Chamberlain Remote Buttons
Maybe you recently moved to a new house and found an old Chamberlain remote in the car. Or perhaps you’re consolidating all your access points (think garage, gate, shed) into one handy fob. Reassignment lets you reset the button code assignments for new devices, making everyday life smoother.
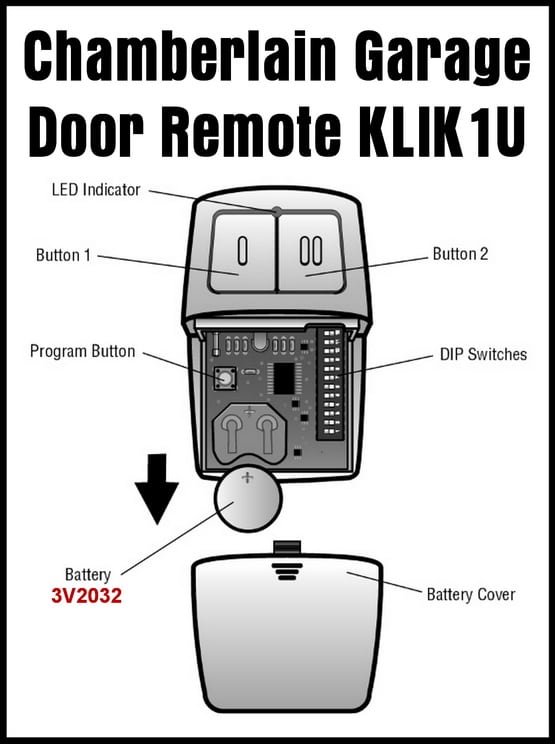
Here’s a common scenario: The previous homeowner had Button 1 opening Door A and Button 2 opening Door B, but your layout is totally different. Resetting and reprogramming each button ensures the remote matches your life—not someone else’s.
Sometimes, the need for reassignment isn’t by choice. If the opener or the remote gets out of sync, or if you swap in a fresh battery and something feels “off,” starting from scratch erases old codes and potential glitches. It’s also a handy troubleshooting step if you ever lose a remote—resetting prevents anyone else from using the lost one.
What You’ll Need Before You Start
Before you start poking at buttons, it helps to have everything ready. Here’s what you should gather:
- Your Chamberlain remote: Make sure it’s the right type—most modern models will work, but older versions may have different steps or limitations.
- Access to the garage door opener: You’ll usually need to reach the “Learn” button on the opener unit inside your garage. Sometimes a ladder is needed if it’s mounted high.
- A fresh battery: If your remote hasn’t been used in a while or is acting flaky, swap the battery. It sounds silly, but low power is a top reason for failed reprogramming.
- Patience: Some steps might take a few tries. The timing can be a bit finicky, a bit like trying to enter a video game cheat code on the first try.
If you’re not totally sure which Chamberlain remote model you have, check for a sticker inside the battery compartment or look for the model embossed on the back. Most remotes look similar, but the exact process can shift based on the remote’s age and whether it uses a yellow, purple, red/orange, or green “Learn” button on the opener.
Quick Review: Button Assignment vs. Universal Remotes
When you’re dealing with a Chamberlain-branded remote, button reassignment is pretty direct. Universal remotes, on the other hand, might need a bit more wrangling—different codes, extra setup, and sometimes more patience than a rainy traffic jam.
A Chamberlain remote is made to “speak the language” of Chamberlain openers. Universal remotes need to learn the code first, which can involve extra pairing steps. Some even require inputting a code manually or syncing with several different brands’ standards. If you’re using a universal remote, always check the manual for special pairing or resetting steps. It’s not one-size-fits-all.
You might wonder—why not just get a universal remote? Well, the dedicated Chamberlain models are generally more reliable with Chamberlain openers. Universal remotes are great if you need to control lots of different devices (maybe a car remote or a smart-home system), but if you want the easiest reassignment process, stick with the factory brand where possible.
Step-By-Step: How To Reassign Button Functions On Chamberlain Garage Remote
Here’s where the magic happens. If you’re ready to reassign button functions, follow these steps. Take it slow—you can always start over if something goes wonky.
-
1. Clear Old Codes (Optional but Recommended)
If you want a clean slate, hold down the “Learn” button on your garage opener for about 6–10 seconds (until the indicator light turns off). This erases all remote codes from the opener, so none of the old remotes or buttons will work until you re-pair them. This is a great idea if you’re moving in or worried about security. -
2. Decide Which Button You Want to Reassign
Pick the button (e.g., Button 2) you want to program for a new function or device. -
3. Press the “Learn” Button on the Opener
Press and release the “Learn” button. The indicator light should come on (usually for about 30 seconds, depending on model). This tells the opener it’s ready to learn a new code. -
4. Press and Hold the Desired Button on the Remote
Within 30 seconds of pressing “Learn,” hold down the remote button you chose. Hold until the opener’s light blinks or you hear a click—this means the pairing worked and the opener is now synced to that button. -
5. Test the Button
Press the button you just programmed. The door or device should activate. If it doesn’t, try the steps again and check the battery.
If you’re programming more than one opener or device, repeat the process with the next button and the respective opener’s “Learn” button. Each button can control a different location—handy if you have multiple garages or gates.
Dealing With Troubleshooting and Common Issues
Things don’t always go perfectly. Sometimes the remote refuses to sync, or the opener ignores your attempts. Don’t panic. Here’s what usually causes trouble:
- Batteries: If your Chamberlain remote is sluggish or unresponsive, swap the battery before trying anything else. Seriously—nine times out of ten, this fixes weird behavior.
- Timing: The opener only stays in “Learn” mode for about 30 seconds. If you take too long, you’ll need to press the “Learn” button again before assigning a button.
- Code Overlap: Make sure you’re not accidentally assigning two buttons to the same opener, which can cause confusion. If in doubt, start fresh by clearing old codes.
- Signal Interference: LED light bulbs, metal doors, or even nearby Wi-Fi routers can sometimes interfere with the signal. If you’re struggling, try moving the remote closer or turning off nearby gadgets temporarily.
If you’re still spinning your wheels, check the Chamberlain manual for model-specific tips. Some newer remotes may require a “double-press” or slightly different sequence, especially if your opener uses security+ 2.0 or rolling code technology.
Advanced Tips: Syncing Multiple Remotes or Openers
Let’s say you want one remote to open two garages, or you have multiple remotes for one house. Chamberlain allows for easy expansion, as long as you sync each button one at a time.
Here’s a sample scenario: You live in a house with a detached garage and a main garage, both using Chamberlain openers. Assign Button 1 to the main garage and Button 2 to the detached garage by repeating the pairing process with each opener’s “Learn” button. The opener stores remote codes in its memory, so each button can be uniquely identified.
If you want several remotes for different family members, just repeat the steps with each remote. There’s a limit to how many unique codes an opener will store—usually up to five, sometimes more depending on the model. If you exceed this, the opener will “forget” the oldest paired remote.
Keep track of which button controls which location. Some folks use tiny stickers or a note in their phone. Trust me—nothing’s more annoying than pressing the wrong button at 6 a.m. and opening your neighbor’s door by mistake.
Resetting vs. Reassigning: What’s the Difference?
Here’s where people get tripped up. Resetting wipes the slate clean—not just for one button, but for every remote and code linked to the opener. Reassigning, on the other hand, is just choosing a new function for a specific button. Think of resetting like deleting all your phone contacts at once, whereas reassigning is just renaming one contact.
You only need to reset when security is an issue (like after losing a remote or moving in to a new place), or if programming gets seriously scrambled. Otherwise, you can safely reassign one button at a time as you need. If you do reset everything, remember to re-pair every remote you still want to use—otherwise, you might get locked out yourself.
When To Consider a Universal Garage Remote
Maybe your Chamberlain remote is missing, damaged, or you want one fob that handles every brand in your garage. Universal garage remotes can be a good alternative, but they come with extra setup steps.
For Chamberlain openers, most major universal remotes (like Clicker or Genie) support rolling code and fixed code syncing, but you’ll still need to enter the correct code sequence or follow a different pairing process. This can involve selecting the brand, syncing via a universal code, or triggering compatibility mode. Instructions vary—always look up your opener model before you buy.
Still, if you want the cleanest, least stressful reassigning experience, the original Chamberlain remote is your best bet. Universal remotes are great for households juggling multiple opener brands, but they rarely beat the smoothness of the factory-brand solution.
Closing Thoughts: Keeping Control (and Your Cool)
Reassigning button functions on a Chamberlain garage remote isn’t just a handy skill—it’s a minor superpower for daily convenience. Once you know the steps, you can reset, sync, pair, or troubleshoot like a pro. No more stabbing random buttons and hoping for the best. You’re firmly in control, not just of your doors, but honestly, of making your daily routines way less stressful.
If you ever get stuck, double-check steps, give it another go, or peek at your model’s specific instructions. A little patience (and maybe a fresh battery) goes a long way. Happy programming—and here’s hoping your garage door always opens when you want it to.