Most LiftMaster remotes act as trusted sidekicks. They sync with your garage opener, let you in with a click, and usually play nice for years. But like any electronic helper, they can have their off days—dead batteries, lost codes, stubborn syncing problems. Figuring out what’s wrong isn’t rocket science, but it does help to walk through the right steps (and avoid the urge to just buy a new remote at the first sign of trouble).
How LiftMaster Garage Remotes Work: The Basics
Here’s the thing: garage remotes aren’t just fancy on/off switches. Inside that slim plastic shell is a mini transmitter and some clever code technology. When you press a button, the remote sends out a radio signal with a unique “code”—sort of like its digital handshake. The garage opener listens for this specific code before it does anything.
Most modern LiftMaster garage remotes use something called rolling code technology. Instead of sending the same code every time (which could be copied by someone sneaky), they shift codes with every press. This makes your garage much harder to hack, but it also means that occasional mistakes—like dropping the remote, or interference from a neighbor’s system—can throw the sync out of whack.
If you’re tackling a LiftMaster remote troubleshooting for the first time, it helps to know these basics. The remote needs a good battery, a clear signal path, and a properly paired connection with the opener itself. Sounds simple, but each of these steps hides a few common snags.
Check the LiftMaster Remote Battery First
Honestly, the battery is the silent culprit behind most problems. If your garage door isn’t responding, don’t assume the worst just yet. Often, it’s as straightforward as a dead coin battery hiding inside the remote.
You might be wondering: how often do these batteries die? In my experience, a LiftMaster remote battery usually lasts a couple of years. But heavy usage, extreme temperatures, or just plain bad luck can drain them sooner. Here’s what to do:
- Remove the back cover of your remote. Most LiftMaster models use a small notch or screw—no fancy tools needed.
- Look for a round coin cell battery (usually CR2032 or similar).
- Pop it out gently—don’t use metal tools if you can avoid it, to prevent damage.
- Replace it with a fresh battery, matching the + and – sides.
- Snap the cover back on and give it a test.
If your remote springs back to life, consider this a small victory. If not, don’t panic. Sometimes, a dying battery can mess with the remote’s code memory, which leads us to the next step.
Re-Sync or Re-Pair Your LiftMaster Remote
A lot of folks get tripped up here. If you’ve just changed the battery, or if you bought a new remote, you’ll often need to *pair* it again with your opener. LiftMaster remotes don’t always auto-connect—they need a sort of introduction each time.
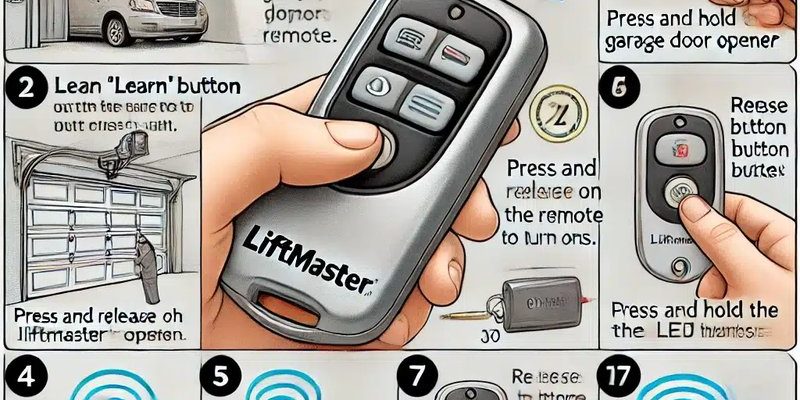
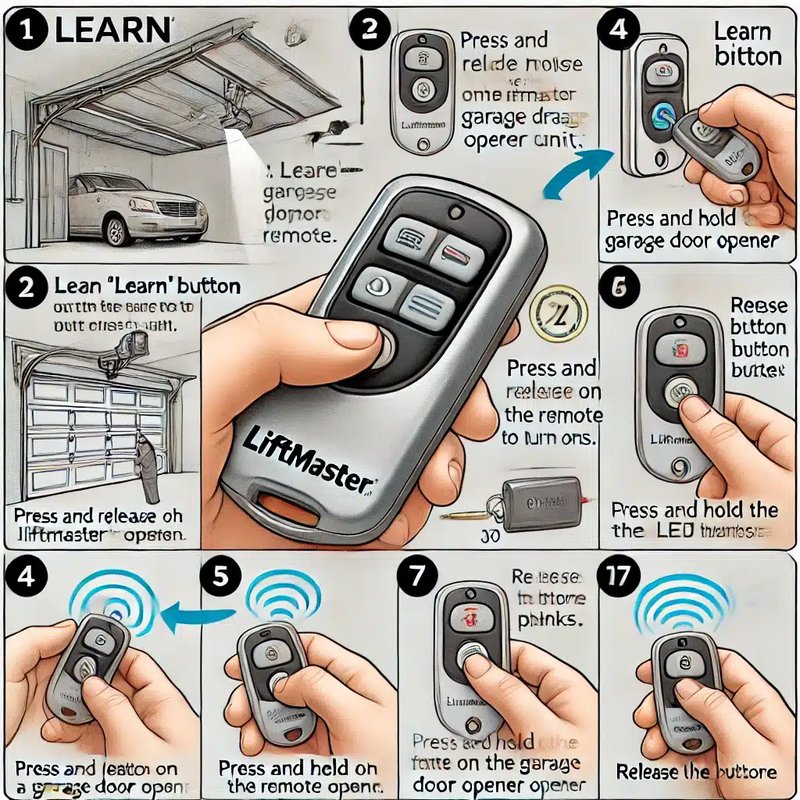
Here’s how syncing or pairing usually works:
- Locate the “Learn” button on your garage opener. It’s typically a colored button (yellow, purple, or red) near the antenna wire on the main opener unit in your garage.
- Press and release the Learn button. You’ll see an indicator light blink for 30 seconds.
- Within those 30 seconds, press the button on your remote you want to use. Hold it down until you see the opener light blink or hear a click. That means it’s paired.
If you have an older model, you might need to enter a physical code using tiny switches (called DIP switches) inside both the remote and the opener. Modern LiftMaster remotes use the rolling code system, so this is rare.
Tip: Don’t stand too far from the opener while pairing. And if you have several remotes, you’ll need to pair each one separately.
If syncing doesn’t work on the first try, clear the opener’s memory (usually by holding the Learn button for about 6 seconds until the light goes off), then attempt the pairing process again.
Look For Interference or Signal Blockages
Imagine trying to have a conversation in a noisy restaurant—sometimes your remote’s signal gets “drowned out” by interference. This is super common with all wireless gadgets, and LiftMaster garage remotes are no exception.
Common sources of interference include:
- LED or CFL light bulbs near the opener. Some emit signals that can block your remote’s code.
- Wi-Fi routers, wireless cameras, or other home electronics cluttering the garage.
- Metal objects—think toolboxes, ladders, or even parked cars—between the remote and the opener’s antenna.
Try moving closer to the opener and aiming the remote directly at the unit. If the range improves, something is blocking or jamming the signal. Switch out nearby light bulbs with regular incandescents, or move devices around as a test. Sometimes all it takes is a little garage decluttering.
When I helped a neighbor troubleshoot, we realized their new motion sensor light was the culprit. Swapping bulbs fixed the remote instantly. So don’t overlook the simple stuff.
Resetting Your LiftMaster Remote and Opener
Sometimes you just need a fresh start. If you’ve tried syncing, replaced the battery, and checked for interference, a factory reset can clear out sticky code glitches.
Here’s how to reset both remote and opener:
- On your garage opener, press and hold the Learn button for about 6 to 10 seconds. The indicator light will go out, erasing all paired remotes and codes.
- Release the button. All previous pairings are now wiped.
- Re-pair each remote (see the steps above) one at a time.
Resetting is useful if you’ve lost a remote, suspect a neighbor’s remote is interfering, or want to start over after moving into a new home. Just remember, you’ll need to reconnect every remote and wireless keypad after a reset.
Insight: If your opener flashes lights or beeps in a weird pattern, check your owner’s manual for error codes. Not all blinking means something’s wrong, but it can hint at deeper issues like a bad circuit board or safety sensor misalignment.
What To Do If Your LiftMaster Remote Still Doesn’t Work
By now, if you’ve swapped batteries, re-synced, cleared interference, and reset—and your LiftMaster remote still refuses to budge—it’s time to look at other possibilities.
Remote Failure: Remotes aren’t immune to physical damage. Dropping it, getting it wet, or years of pocket-jostling can break the internal components. If possible, try your remote on a friend’s opener (with their permission) or test a different remote on your own opener. If another remote works, yours might simply be toast.
Opener Logic Board Issues: Sometimes the opener itself is at fault—especially if none of your remotes work, but the wall button still opens the door. The logic board inside the opener might need replacing. This isn’t a DIY job for most people, so consider calling a garage door technician if things get this far.
Coding and Compatibility: Not all LiftMaster remotes work with all LiftMaster openers, especially if you have an older or legacy unit. Double-check the remote model and opener compatibility online or in your manual. Universal remotes can work, but need to be programmed correctly using the right code.
Comparing LiftMaster Remotes With Universal Garage Remotes
You might be tempted to pick up a universal remote if your original LiftMaster remote bites the dust. Here’s the quick rundown:
- Original LiftMaster Remotes will always match perfectly with your LiftMaster opener (as long as they’re compatible models). They’re easy to sync, reliable, and support all standard LiftMaster features.
- Universal Remotes are handy if you juggle several brands or want a single remote for multiple doors. But, the pairing process can be trickier and not all features (like rolling codes or keypads) will work with every system.
Some universal remotes require you to enter a numeric code or toggle DIP switches inside the remote. If your main concern is reliability and you don’t mind spending a little more, sticking with a LiftMaster-branded remote is usually simpler for beginners.
Pro tip: If you do go universal, keep the packaging and instructions—troubleshooting is much easier when you know exactly how your remote is supposed to pair with your opener.
When To Call For Professional Help
There are times when DIY troubleshooting stops making sense. If you’ve tried every tip above and your LiftMaster remote still refuses to cooperate, don’t sweat it. Wiring faults, fried antennas, or a bad logic board might be involved—and those are headaches you shouldn’t tackle alone.
Call a garage door technician if:
- No remotes work, even after resetting and replacing batteries.
- The wall button works, but remotes don’t (suggesting an opener-side issue).
- You see warning lights, error codes, or hear odd beeping from the opener.
A pro can diagnose tricky issues you can’t see—like circuit board problems, antenna breaks, or deeper electrical troubles. Sometimes, it’s a five-minute fix; other times, you’ll need a part replaced. You’ll save time, headaches, and avoid making things worse.
Final Thoughts: Getting Your LiftMaster Garage Remote Working Again
If you’ve ever stood in the rain, jabbing your LiftMaster remote as the garage stubbornly ignores you, you know how frustrating these hiccups can be. But most issues—dead batteries, lost sync, interference—are fixable with a bit of patience and a fresh battery or two.
Think of your remote as a partnership with your opener. When the code handshake breaks, retrace the basics: check the battery, try resyncing, clear out interference, and don’t be afraid to reset if needed. And if all else fails, there’s no shame in calling a professional.
Getting your LiftMaster garage remote back in working order isn’t a mystery. With these troubleshooting tips, you’ll be back to that satisfying beep and smooth door lift in no time.